All Packt Publishing ebooks at $10 for 10 years anniversary

/images/packt-10years.jpg

To celebrate the 10 years anniversay of Packt Publishing, all of the available ebooks on Packt Publishing are available at $10 with no limit per client.

In 10 years, Packt Publishing has published more than 200 titles. Throught its Open Source Project Royalty Scheme, Packt Publishing supports Open Source project and already has awarded more than $400'000.

If you need something to read or just want to use this occasion to pile some ebooks, don't hesitate to profit from this superb offer.

More information on the official site: http://bit.ly/1mE9FUz

Build OpenCV with libc++ on Gentoo and static-libs

When you build C++ projects with CLang, you have the choice between using the stdlibc++ that is provided along G++ and the new libc++ that is provided by CLang.

libc++ is another implementation of the C++ Standard Library. This implementation is dual-licensed under the MIT license and UIUC license. It is especially targeting C++11 and has already 100% support for C++14. This last point is the reason that I use libc++ on several of my projects. Moreover, it is also the default on Mac OS X.

The problem with linking with another library is that you can only works with libraries that have been compiled with libc++ support. For instance, if you want to use Boost dynamic libraries, you'll have to compile Boost from sources with libc++.

For one of my project, I'm using OpenCV and libc++. To simplify the installation of OpenCV, I created a new ebuild with a libcxx use flag to selectively build the library with libc++. This requires LLVM/CLang on the build machine. Moreover, by default, the Gentoo ebuild does not have support for building the static libraries. The reason for that is that OpenCV build is not able to build dynamic and static libraries. I added a static-libs use flag that build the static libraries by building OpenCV a second time after the first. That will likely double the compile time (unless ccache is used). Anyhow, it is simple easier than to build that by hand on several machine.

The ebuild is available on my overlay. You can add the overlay to your machine by modifying /etc/layman/layman.cfg:

overlays: http://www.gentoo.org/proj/en/overlays/repositories.xml
          http://github.com/wichtounet/wichtounet-overlay/raw/master/repository.xml

Then, you can add it to layman:

layman -S
layman -a wichtounet

For now, I have created an ebuild for opencv-2.4.8-r1. If someone is interested in other versions, I'd be glad to create new ebuilds.

I hope that this ebuild will be helpful.

Software Reliability Presentation

Software Reliability

In behalf of my school (College of Engineering and Architecture of Fribourg), I presented a shoft presentation about Software Reliability. In this presentation, I outline the main issues about the subject and propose some solutions:

  • Software Validation

  • Defensive Programming

  • Software Analysis Tools

In the Software Analysis Tools, I present three tools: cppcheck, Valgrind and the Clang Static analyzer. Several examples are presented for each tools as well as some recommendations for using them. A short presentation of SonarQube is also performed.

I thought that it could be of some interest to some of the readers, so here it is:

Don't hesitate if you have any comments or questions about the presentation ;)

The source code for the examples is available on Github.

budgetwarrior 0.3.1 - Git versioning and easier creation

I've finished a new version of budgetwarrior: budgetwarrior 0.3.1

Changes

The most interesting change is the ability to estimate the date when it is a good time to buy something from the wish list. This is done with the budget wish estimate command:

budget wish estimate

This command gives you two dates for each wish in your list. The first is the date wating for each yearly objectives to be fullfilled. The second one considers only the monthly objectives. For now on, no estimation of expenses is made for the future months. It means that the estimation is made as if there were no expenses in the future months. I'll try to improve that by considering averages of expenses in the previous months to make it more reliable.

Still on the wish module, you can now mark your wishes as paid instead of deleting them. This helps you keep track of the prices of your wishes. This is done with the budget wish paid id command. Finally, the totals of the unpaid wishes and of the paid wishes is displayed in budget wish list.

Another helpful change is the ability to set a date relative to today's date when creating an expense or an earning. For instance, you can create an expense one month before (-1m) or in one year ((+1y) or yesterday (-1d):

new date selection mechanism

Of course, you can also still set the date manually.

The last major change is the addition of a new module: budget versioning. This module helps you manipulate you budget directory with Git. There are two new commands:

  • budget versioning save: Commit the current changes with a default message (Update).
  • budget versioning sync: Pull the changes from the remote directory and push the local changes.

This will only works if you have already configured your budget directory to use Git.

Conclusion

I hope you'll found these changes interesting :)

If you are interested by the tool, you can download it on Github: budgetwarrior

If you have a suggestion or you found a bug, please post an issue on the github project: https://github.com/wichtounet/budgetwarrior.

If you have any comment, don't hesitate to contact me, either by letting a comment on this post or by email.

Changing root hard disk on Gentoo with LVM and Grub2

I recently changed my hard disk on one of my servers and I didn't found a simple and up to date tutorial to do that, so I decided to post here how I did it.

I do not claim that is the best method, or the easiest or the safest method, but that is the one I used and it worked quite well. You could do it online with LVM, but when changing the boot hard disk, I'd rather be safe. Especially because you need to reinstall Grub on the new hard disk and probably alter its configuration. But, doing it online directly with LVM should work.

My server is using LVM and Grub2. You will need a Gentoo Live CD (or DVD, or USB, or any other Linux live installation with the necessary tools). If you do not use LVM, this guide is not for you. Even if I wrote this guide for Gentoo, this is also gonna work with another system as long as you use LVM and Grub2, just use your distribution live cd.

Here I will assume /dev/sda is your old disk and /dev/sdb is your new disk. I will also assume that you previous VG was vg0. If it is, you'll have to replace them in the commands.

1. Obviously, shutdown your computer.

2. Install the new hard disk in it.

3. Reboot on the Live CD:

  • Activate LVM: vgchange -a y
  • Create the LVM partition on the new disk (/dev/sdb) with fdisk.
  • Create a new PV: pvcreate /dev/sdb1
  • Create a new VG: vgcreate vg1 /dev/sdb1
  • Recreate all your LV with lvcreate. In my case, I have /dev/vg0/root and /dev/vg0/data

Now, you'll need to copy your data. Here is an example with my root:

mkdir old
mkdir new
mount /dev/vg0/root/ old
mount /dev/vg1/root/ new
cp -ax old/* new
umount old
umount new

You have to do that with for LV you have.

4. Shutdown the computer

5. Remove the old hard disk and use the connector of the old hard disk to connect the new one.

6. Reboot on the Live CD:

  • Activate LVM: vchange -a y
  • Rename the VG: vgrename vg0
  • Chroot in the new hard disk
  • Install grub on the hard disk: grub2-install /dev/sda
  • Regenerate the Grub config: grub2-mkconfig -o /boot/grub/grub.cfg
  • Exit from chroot

7. Reboot on Gentoo

8. You now have switched hard disk.

At any point, if something goes wrong, you still have the previous hard disk completely ready at hand.

I hope this would useful to some Linux users.

Ri-Vier RV 2004 Rackmount case Review

I ordered a new rackmount case for my third server at home. Previously, I only used Norco cases, but the European distributor of Norco (Ri-vier, Netherlands) decided to switch to using its own cases, the Ri-vier cases.

Since the shipping fees are very expensive from United States to Switzerland, I decided to stick with Ri-vier for now and try their new cases.

I ordered and received the RV-2004 case. This is a 2U case with one 5.25" and 4 3.5". It is a very short case.

The case

Here is a picture of the case:

RV-2004 case

It looks quite good actually and very like the Norco equivalents.

And here is the front:

RV-2004 case front view

You can put a DVD reader on front. There are also two USB ports and several leds. I really don't like the front panel. There a lot of screws that maintain the front panel. Moreover, the part with the buttons and the LEDs is quite hard to put right and seems of really low facture, I haven't been able to make the LEDs work as of now. The buttons have a kind of plastic cap on them, but it is very hard to make them stay on the buttons when you install the front panel. Finally, there are two fans on the front on their own panel. You can remove the fans, but they are so close together, that most silent fans you will buy won't fit side by side.

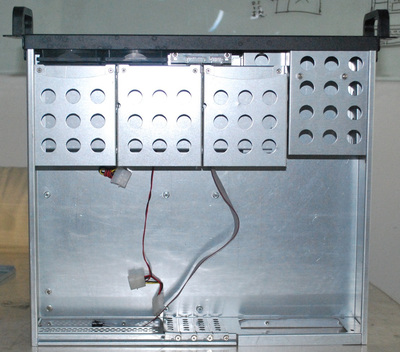
And an inner view:

RV-2004 case inner view

The three hard disk top cases are removable. In my case, I only left one of them for the SSD. The rightmost one is very hard to pull in and out. I don't understand why there are only three removable cases. The fourth disk location cannot be moved. As with all other cases, it it not very practical to install a SSD in it. I ended up screwing the SSD on top of one of the removable bays.

Without any media drive and only one SSD, there are plenty of space inside the case to put the cables. Even with all the bays used, there would probably be some space left under the drive bays.

Mouting the motherboard inside the case was really easy, nothing special here.

This case is only mountable with RVR-20 rails, not with the Norco RL rails. These rails are really worse than the Norco rails. There are extensible, being in three parts, but the extension is not as good as Norco's. If you extend the rails, you have to mount the rails close to the rear of the case. Moreover, the clip on rails to unblock them does not seem to work on my rails. Fortunately, that is not a case I intend to upgrade in the future, so I should not use the rails extensively.

Conclusion

Pros

  • Super short
  • Cheap
  • Enough room on the inside
  • Looks quite nice

Cons

  • Fans too close to each other
  • Front panel very cheaply built
  • Front panel hard to put correctly in place
  • One of the removable hard drive internal bays is very hard to move
  • Very poor rails
  • No documentation

Conclusion

To finish, I would say that I'm kind of disappointed with this case. It really feels worse than the Norco equivalent. I'd rather have Norco cases again. The only advantage it has over the Norco one is being cheaper. I'm probably gonna go for a Norco case again for my next server.

Install and Use CLang Static Analyzer on a CMake project

I recently started a bit of work on my compiler (eddic) again. I started by adapting it to build on CLang with libc++. There was some minor adaptions to make it compile, but nothing really fancy. It now compiles and runs fine on LLVM/Clang 3.4 with the last version of libc++. I'm gonna use some features of C++14 in it and I plan to refactor some parts to make it more STL-correct. I also plan to use only CLang on eddic right now, since C++14 support of GCC is not released right now.

I decided it was a good time to try again the CLang static analyzer.

Installation

If, like me, you're using Gentoo, the static analyzer is directly installed with the sys-devel/clang package, unless you disabled the static-analyzer USE flag.

If your distribution does not ship the static analyzer directly with CLang, you'll have to install it manually. To install it from sources, I advise you to follow the Official Installations instruction.

Usage

The usage of CLang static analyzer can be a bit disturbing at first. Most static analysis tools generally takes the sources directly and do their stuff. But that is not how Clang Static Analyzer works. It works as a kind of monitor in top of building the program, using scan-build. When you are analyzing a program, you are also building the program.

For instance, if you are compiling a source file like that:

clang [clang-options] source_file.cpp

you can perform static analysis like that:

scan-build [scan-build-options] clang [clang-options] source_file.cpp

scan-build works by replacing calls to the compiler by calls to ccc-analyzer . This works generally well, but there are some cases where that things get a bit more complicated. That is the case of CMake where the paths to the compiler are hardcoded in the generated makefiles.

For that, you have to run cmake and make with scan-build:

export CCC_CC=clang
export CCC_CXX=clang++
scan-build cmake -DCMAKE_CXX_COMPILER=clang++ -DCMAKE_C_COMPILER=clang .
scan-build make

This can take a very long time. On eddic, it is about three times slower than a normal compilation. An important point to note about performance, is that you can run compilations in parallel (-j option of make) and that it is supported by scan-build quite well.

Once analysis is performed, the found bugs are put into an HTML report. By default, the HTML report is created in /tmp/, but you can specificy the folder with -o option of scan-build.

You can enable or disable checker with the -enable-checker and -disable-checker options of scan-build.

Results on eddic

Several versions of Clang ago, I tried the static analyzer on eddic, but it failed on several source files without producing any results. Moreover, at this time, I don't think there was any nice HTML report at this time.

I ran it again on eddic with the last versions. Here is a picture of the generated report:

CLang Static Analyzer eddic results

As you can see, 14 bugs have been found. Unfortunately, none of them is a real bug on my code, but they are not all false positives neither. For instance, here is some unreachable code report:

CLang Static Analyzer eddic bug

It is indeed an unreachable statement, but it is expected, since it is an assert to ensure that the code is unreachable. But that proves that the analysis works ;)

Even if it didn't found anything, this time it worked much better than the last time I checked and the HTML results are just really good.

I hope you found this article interesting. If you happen to have interesting results on your codebase with the CLang static analyzer, I'd be glad to hear about them ;)

Related posts on a Nikola website

The one thing I missed in Nikola was the lack of Related Posts generation. I solved this during the migration from WordPress to Nikola, by using simple algorithms to generate related posts for each blog post and then display them in the form of a simple widget.

For example, you can see the related posts of this post on the left, just under my Google+ badge.

Here is the workflow that is used: * A simple C++ tool generate a list of related posts in HTML for each posts * The generated HTML code is included in the MAKO template using Python

In this article, I'll show how the related posts are generated and how to include them in your template.

Related Post Generation

It is important to note that it is necessary to cleanup the content of the files before using it: * First, it is necessary to remove all HTML that may be present in the Markdown files. I remove only the HTML tags, not their content. For instance, in <strong>test</strong>, test would be counted, but not strong. The only exception to that, is that the content of preformatted parts (typically some or console output) is completely removed. * It is also necessary to cleanup Markdown, for instance, parentheses and square brackets are removed, but not their content. Same goes for Markdown syntax for bold, italics, ... * Finally, I also remove punctuation.

My related posts algorithm is very simple.

First, I compute the Term Frequency (TF) of each word in each post. The number of times a word is present in a document is represented by tf(w,d). I decided to give a bigger importance to words in the title and the tags, but that is just a matter of choice.

After that, I compute the Inverse Document Frequency (IDF) of each word. This measure allows to filter words like: a, the, and, has, is, ... These words are not really representative of the content of a blog post. The formula for idf is very simple: idf(w) = log(N / (1+ n(w))). n(w) is the number of posts where the word is present. It is a measure of rarity of a word on the complete posts set.

Once we have the two values, we can easily compute the TF-IDF vectors of each blog post. The TF-IDF for a word is simply: tf_idf(w,d) = tf(w, d) * idf(w).

Finally, we can derive the matrix of Cosine similarities between the TF-IDF vectors. The idea of the algorithm is simple: each document is represented by a vector and then the distance between two vectors indicates how related two posts are. The formula for the Cosine similarity is also simple: cs(d1, d2) = dot(d1, d2) / ||d1|| * || d2||. d1 and d2 are two TF-IDF vectors. Once the cosine similarities between each document is computed, we can just take the N most related documents as the "Related Posts" for each blog post.

With this list, the C++ program simply generates an HTML file that will be included in each post by Nikola template. This process is very fast. I have around 200 posts on this blog and the generation takes about 1 second.

Include in template

Once the HTML files are generate, they are included into the website by altering the template and adding their content directly into the web page. Here is the code I use in base.tmpl.

%if post and not post.source_link().startswith('/stories/'):
    <div class="left-sidebar-widget">
        <h3>Related posts</h3>
        <div class="left-sidebar-widget-content">
            <%
                import os
                related_dir = os.getcwd()
                related_path = related_dir + post.source_link() + ".related.html"

                try:
                    with open(related_path, 'r') as f:
                        related_text = f.read()
                        f.close()
                except IOError as e:
                    related_text = "Not generated"
            %>
            ${related_text}
        </div>
    </div>
%endif

You could also display it in post.tmpl as a simple list.

There is a limitation with this code: it only works if the source file has the same name than the slug, otherwise the file is not found. If someone has a solution to get the path to the source file and not the slug version, I'd be glad to have it ;)

Conclusion

The code for the generator is available on the Github repository of my website.

I wrote it in C++ because I don't like Python a lot and because I'm not good at it and it would have taken me a lot more time to include it in Nikola. If I have time and I'm motivated enough, I'll try to integrate that in Nikola.

I hope that could be useful for some people.

Migrated from Wordpress to Nikola

As you're reading this post, the site has been migrated from WordPress to Nikola and is now hosted on Github. Nikola is a static site generator.

Reasons of the migration

I had several reasons to migrate my website from WordPress to a static site generator:

  1. I was getting tired of WordPress. It not a bad tool, but it is becoming heavier and heavier. I think that one of the biggest problems is that you need tons of plugins to make a fully-functional blog. I had more than 20 plugins. And each time you upgrade WordPress, you run into problems with the addons. In my opinion, while I understand why you need plugins for syntax highlighting for instance, you should not need any plugin for performances or security. Moreover, when you think of it a blog is not dynamic, I write less than a post a week and most bloggers write about once a day, in the computer science's sense, it is not dynamic at all. So why bother with a database ?
  2. I wanted to use my favourite tools for modifying my blog: the shell and vim. I don't think that wysiwyg editors are really adding any value to editing. I am faster writing posts in vim than I'm in a web editor.
  3. I wanted to be able to edit my website offline. With a static generator, as long as you have the files on your computer, you can edit your site and even browse it offline. You can then deploy it on the internet later when you are online.
  4. I wanted to host my blog at Github Pages, for fun! Moreover, I had some uptime issues with my host with quite some downtime in the last months. And it saves me some bucks each year, at least it was not a strong factor.

The quest for a good static blog generator

It has been several months already since I started thinking about migrating my blog. I had quite a hard time to find a suitable blog generator.

I needed something:

  • Simple
  • Completely usable in command line
  • With a WordPress import feature
  • Fast: I didn't wanted to spend a long time generating the website.
  • Actively developed

The problem is that there are tens of static site generator. I considered several of them. The most well known is Jekyll. It really looks fine, but I have to say that I HATE Ruby. I think it is an horrible language with an even more horrible environment. I cannot even have Ruby installed on my computer. So I didn't spend a long time considering Jekyll. I also considered Hyde, which is the evil brother of Jekyll, but I think that it was missing documentation to be completely usable for me. I also though of Pelican, but I was not convinced with it.

I don't know how, but at first I didn't found about Nikola. It was only after some time that I came across Nikola by pure luck. Once I came accross Nikola, I directly was convinced by it. Nikola is written in Python and has a large set of features but still keeps the whole think very simple. Generation of the website is pretty fast. Even though I don't like Python very much, I'm able to stand its environment and if necessary I can hack around a bit. I also considered Hyde, which is the evil brother of Jekyll, but I think that it was missing documentation to be completely usable for me. I also though of Pelican, but I was not convinced with it.

I don't know how, but at first I didn't found about Nikola. It was only after some time that I came across Nikola by pure luck. Once I found about Nikola, I directly was convinced by it. Nikola is written in Python and has a large set of features but still keeps the whole think very simple. Generation of the website is pretty fast. Even though I don't like Python very much, I'm able to stand its environment and if necessary I can hack around a bit. So I decided to try the complete migration.

The migration

Once I decided to migrate to Nikola, I directly started by importing my WordPress site into a Git repository. This process is quite simple, you just have to export and XML dump from WordPress and then import it into Nikola with the *import_wordpress" command. This already downloads the necessary images and resources and create posts and pages corresponding to your site. It also generates some redirections from the old URL scheme to the new one.

However, there is still some manual work to be done. Here is what I had to do after I imported my WordPress site into Nikola:

  • As syntax highlighting was done by a plugin, I had to convert it to Markdown myself. This was quite easy, just a matter of sed.
  • I was not satisfied with the default templates so I enhanced it myself. As I'm a very poor web developer and even poorer web designer, it took me a long time, even if it is a simple one.
  • I wanted to add some visibility to the comments, so I used Disqus API to create Most Popular and Recent Comments widgets.
  • I had to create some redirections by myself for the tags and categories. This was again just a matter of simple shell commands. I filled a bug about it so it'll probably be fixed in the near future.
  • I tried to improve the performances of the generated website, but I'm still gonna work on this later, the calls to Disqus and Google javascripts are the ones that takes the most of the load time. I think that a static site could be even faster.
  • Finally, I really missed the options to have related posts generated for each posts, so I hacked a simple way to include them for each posts. The related posts are generated using a very simple algorithm. I'll soon write a post about how I have done this.

Except from these things, it hasn't been too hard to migrate to Nikola.

Conclusion

Until now I'm really satisfied with Nikola and I hope this will motivate me to write more blog posts in the coming months. I hope you'll find the website as enjoyable as before (or even more :) ).

If you are interested, you can read the source of this blog post.

Even though I tried my best to avoid 404 or problems with the new site, I'm pretty sure there will be some issues in the following weeks. If you happen to found a dead link or some part of the website is not working for you, don't hesitate to comment this post and I'll my best to fix it. If you have suggestions on how to improve the site or have a question about the process of migrating a website from Wordpress to Nikola, I'd be glad to answer you.

budgetwarrior 0.3.0 - Objective and wish management

I'm pleased to announce the release of another budgetwarrior release, the version 0.3.0.

Changes

This version contains several important changes.

The first one is the addition of a new module to manage objectives. You can add objective with budget objective add). For instance, you can add an objective saying you want to save 10000$ a year or 200$ a month. When you set your objectives, budget warrior computes how well you complete them. For instance, here is the status of my objectives:

Objective Status

Another module has been added to manage wishes. You can add wishes to budgetwarrior (budget wish add) and then budgetwarrior will tell you if it is a good time to buy them. Here is an example of wish status:

Wish Status Wish Status

The diagnostics tells you where the money will be taken: On savings, on year savings or on month savings (ideal case). It also checks the objectives to see if the payment doesn't break the fulfillment of some of them.

For complete diagnostics, it is necessary to you register your fortune (budget fortune check), ideally once a month.

Of course, this is only a tool, you should not only use that to decide when to buy something, but it may have a good point of view ;)

Moreover, the version also have other smaller changes:

  1. When you make an error when creating a new item (expense, earning, ...), the tool now lets you retry without losing what you typed before.
  2. Confirmation messages are now shown after each modification command (delete, add and edit).
  3. The license has been changed from Boost to MIT. The sense is almost the same, but the MIT is more well known and I thought it would be easier for people to know what this means.
  4. There have several changes to the code base, but that doesn't impact the usage of the tool.

Conclusion

I hope you'll found these changes interesting :)

If you are interested by the tool, you can download it on Github: budgetwarrior

  • There is now Gentoo and Arch Linux installation packages available for ease of installation

If you have a suggestion or you found a bug, please post an issue on the github project: https://github.com/wichtounet/budgetwarrior.

If you have any comment, don't hesitate to contact me, either by letting a comment on this post or by email.