A Mutt journey: Search mails with notmuch

In the previous installment in the Mutt series, I've talked about my Mutt configuration. In this post, I'll talk about notmuch and how to use it to search through mails.

By default, you can search mails in Mutt by using the / key. By doing that, you can only search in the current folder. This is very fast, but this is not always what you want. When you don't know in which folder the mail you are looking for is, you don't want to test each folder. By default, there are no feature to achieve global searching in Mutt.

That is where notmuch comes to the rescue. notmuch is a very simple tool that allows you to search through your mail. As its name indicates, it does not do much. It doesn't download your mails, you have to have them locally, which is perfect if you use offlineimap. It does not provide a user interface, but you can query it from the command line and it can be used from other tools. It should be available in most of the distributions.

Configuration

The configuration of notmuch is fairly simple. You can write your .notmuch-config directly or run notmuch setup that will interactively help you to fill the configuration.

Here is my configuration:

[database]
path=/data/oi/Gmail/

[user]
name=Baptiste Wicht
[email protected]

[new]
tags=inbox
ignore=

[search]
exclude_tags=deleted;

[maildir]
synchronize_flags=true

It needs of cours the place where your mails are stored. Then, some information about you. The next section is to specify which tags you want to add to new mails. Here, I specified that each new mail must be tagged with inbox. You can add several tags to new mails. In the [search] section, the excluded tags are specified.

Usage

Once you have configured notmuch, you can run notmuch new to process all existing mails. The first run may take some time (in minutes, it is still quite fast), but the subsequent runs will be very fast. You should run notmuch after each offlineimap run. I personally run it in a shell script that is run by cron. You could also use one of the hooks of offlineimap to run notmuch.

Once indexing has been done, you can start searching your mails. The first option to search mail is simply to use notmuch search <query> from the command line. This will directly displays the results. Search is instant on my mails.

If you use mutt-kz like me, notmuch support is directly integrated. You can type X, and then type your query like notmuch://?query=X and the results will be displayed as a normal Mutt folder. You can open mails directly from here and you can also edit the mails as if you were in their source folders. This is really practical.

If you use mutt, you can have the same experience, by using the notmuch-mutt patch (here <http://notmuchmail.org/notmuch-mutt/>). In several distributions, there is an option to build it with this support or another package to add the feature.

Another feature of notmuch is its ability to tag mails. It automatically tags new mails and deleted mails. But you can also explicitely tag messages by using notmuch tag. For instance, to tag all messages from the notmuch mailing list:

notmuch tag +notmuch -- tag:new and to:[email protected]

I personally don't use this feature since I use imapfilter and IMAP folders to sort my mail, but it can be very useful. You can run these commands in the cronjob and always have you tags up to date. Tags can then be used in notmuch to search or to create virtual folder in Mutt.

Conclusion

That is already more or less everything that there is to know about notmuch. It does not do a lot of thing, but it does them really well.

That concludes the series of posts on Mutt. If you have any question on my Mutt configuration, I'd be glad to extend on the comments.

Catch: A powerful yet simple C++ test framework

Recently, I came accross a new test framework for C++ program: Catch.

Until I found Catch, I was using Boost Test Framework. It is working quite well, but the problem is that you need to build Boost and link to the Boost Test Framework, which is not highly convenient. I wanter something lighter and easier to integrate.

Catch is header only, you only have to include one header for each test file. Moreover, it is very easy to combine several source files without linking problems.

Usage

The usage is really simple. Here is a basic example:

#define CATCH_CONFIG_MAIN
#include "catch.hpp"

TEST_CASE( "stupid/1=2", "Prove that one equals 2" ){
    int one = 1;
    REQUIRE( one == 2 );
}

The define is made to ensure that Catch will generate a main for you. This should only defined in one of your tests files if you have several. You define a new test case using the TEST_CASE macro. There are two parameters, the first one is the name of the test case, you can use any name, you don't have to use a valid C++ name. The second parameter is a longer description of the test case.

You then use REQUIRE to verify a condition. You can also use CHECK to verify a condition, the difference being that it does not stop if the condition is not true. CHECK is a good tool to put together some conditions that are related. There also exists REQUIRE_FALSE and CHECK_FALSE versions.

As you can see, there are no REQUIRE_EQUALS or things like that, you can use any comparison operator you want in the REQUIRE.

This produces an executable that will, by default, run every test contained in the executable. You can also configure the output report to be XML or JUnit if you want or run a subset of your tests. Take a look at the command line usage by running the executable with the -h option if you want more information.

Here is the result of the previous test:

~~~~~~~~~~~~~~~~~~~~~~~~~~~~~~~~~~~~~~~~~~~~~~~~~~~~~~~~~~~~~~~~~~~~~~~~~~~~~~~
catch_test_1 is a Catch v1.0 b52 host application.
Run with -? for options

-------------------------------------------------------------------------------
stupid/1=2
-------------------------------------------------------------------------------
src/catch/test1.cpp:4
...............................................................................

src/catch/test1.cpp:6: FAILED:
  REQUIRE( one == 2 )
with expansion:
  1 == 2

===============================================================================
test cases: 1 | 1 failed
assertions: 1 | 1 failed

For each failed condition, the source location is printed as well as some information on the test that failed. What is also interesting is the "with expansion" information that shows LHS and RHS of the comparison operator.

You can also check for exceptions with several macros:

  • REQUIRE_THROWS(expression) and CHECK_THROWS(expression) verify that an exception is thrown when the given expresssion is evaluated.

  • REQUIRE_THROWS_AS(expression, exception_type) and CHECK_THROWS_AS(expression, exception_type) verify the the given exception is thrown.

  • REQUIRE_NOTHROW(expression) and CHECK_NOTHROW(expression) verify that no exception is thrown.

Conclusion

I have only covered the most basic features, there is more that you can do with Catch: fixtures, logging and BDD-style test cases for instance. For more information you can read the reference documentation.

I'm really satisfied with this framework. It also can be used for Objective-C if you are interested. You can download Catch on Github.

If you want more examples, you can take a look at the ETL tests that are all made with Catch.

ETL - C++ library for vector and matrix computations

When working on Machine Learning algorithms, I was in need of a simple library to ease working with vectors and matrix. This is the reason why I started developing ETL (Expression Template Library).

ETL is a small header only library for C++ that provides vector and matrix classes with support for Expression Templates to perform very efficient operations on them.

The library supports statically sized and dynamically sized vector and matrix structures with efficient element-wise operations. All the operations are implemented lazily with Expression Templates, they are only implemented once the expression is assigned to a concrete structure.

Data structures

Several structures are available:

  • fast_vector<T, Rows>: A vector of size Rows with elements of type T. This must be used when you know the size of the vector at compile-time.

  • dyn_vector<T>: A vector with element of type T. The size of the vector can be set at runtime.

  • fast_matrix<T, Rows,Columns>: A matrix of size Rows x Columns with elements of type T. This must be used when you know the size of the matrix at compile-time.

  • dyn_matrix<T>: A matrix with element of type T. The size of the matrix can be set at runtime.

All the structures are size-invariant, once set they cannot be grown or shrinked.

In every operations that involves fast version of the structures, all the sizes are known at compile-time, this gives the compiler a lot of opportunities for optimization.

Element-wise operations

Classic element-wise operations can be done on vector and matrix as if it was done on scalars. Matrices and vectors can also be added, subtracted, divided, ... by scalars.

Here is an example of what can be done:

etl::dyn_vector<double> a({1.0,2.0,3.0});
etl::dyn_vector<double> b({3.0,2.0,1.0});

etl::dyn_vector<double> c(1.4 * (a + b) / b + b + a / 1.2);

All the operations are only executed once the expression is evaluated to construct the dyn_vector. No temporaries are involved. This is as efficient as if a single for loop was used and each element was computed directly.

You can easily assign the same value to a structure by using the operator = on it.

Unary operators

Several unary operators are available. Each operation is performed on every element of the vector or the matrix.

Available operators:

  • log

  • abs

  • sign

  • max/min

  • sigmoid

  • noise: Add standard normal noise to each element

  • logistic_noise: Add normal noise of mean zero and variance sigmoid(x) to each element

  • exp

  • softplus

  • bernoulli

Several transformations are also available:

  • hflip: Flip the vector or the matrix horizontally

  • vflip: Flip the vector or the matrix vertically

  • fflip: Flip the vector or the matrix horizontally and vertically. It is the equivalent of hflip(vflip(x))

  • dim/row/col: Return a vector representing a sub part of a matrix (a row or a col)

  • reshape: Interpret a vector as a matrix

Again, all these operations are performed lazily, they are only executed when the expression is assigned to something.

Lazy evaluation

All binary and unary operations are applied lazily, only when they are assigned to a concrete vector or matrix class.

The expression can be evaluated using the s(x) function that returns a concrete class (fast_vector,fast_matrix,dyn_vector,dyn_matrix) based on the expression.

Reduction

Several reduction functions are available:

  • sum: Return the sum of a vector or matrix

  • mean: Return the sum of a vector or matrix

  • dot: Return the dot product of two vector or matrices

Functions

The header convolution.hpp provides several convolution operations both in 1D (vector) and 2D (matrix). All the convolution are available in valid, full and same versions.

The header mutiplication.hpp provides the matrix multiplication operation (mmult). For now on, only the naive algorithm is available. I'll probably add support for Strassen algorithm in the near future.

It is possible to pass an expression rather than an data structure to functions. You have to keep in mind that expression are lazy, therefore if you pass a + b to a matrix multiplication, an addition will be run each time an element is accessed (n^3 times), therefore, it is rarely efficient.

Examples

Here are some examples of these operators (taken from my Machine Learning Library):

h_a = sigmoid(b + mmul(reshape<1, num_visible>(v_a), w, t));
h_s = bernoulli(h_a);
h_a = min(max(b + mmul(reshape<1, num_visible>(v_a), w, t), 0.0), 6.0);
h_s = ranged_noise(h_a, 6.0);
weight exp_sum = sum(exp(b + mmul(reshape<1, num_visible>(v_a), w, t)));

h_a = exp(b + mmul(reshape<1, num_visible>(v_a), w, t)) / exp_sum;

auto max = std::max_element(h_a.begin(), h_a.end());

h_s = 0.0;
h_s(std::distance(h_a.begin(), max)) = 1.0;

Conclusion

This library is available on Github: etl. It is licensed under MIT license.

It is header-only, therefore you don't have to build it. However, it uses some recent C++14 stuff, you'll need a recent version of Clang or G++ to be able to use it.

If you find an issue or have an idea to improve it, just post it on Github or as a comment here and I'll do my best to work on that. If you have any question on the usage of the library, I'd be glad to answer them.

A Mutt journey: Mutt configuration

If you've followed my Mutt posts, you'll know that I'm filtering my mails with imapfilter and downloading them with offlineimap.

In this post, I'll share my Mutt configuration. I'm not using Mutt directly, but mutt-kz which is a fork with good notmuch integration. For this post, it won't change anything.

Configuration

The complete configuration is made in the .muttrc file. Mutt configuration supports the source command so that you can put some of your settings in another files and source them from the .muttrc file. You'll see that the configuration can soon grow large and therefore, splitting it in several files will save you a lot of maintenance issues ;)

First, let's tell Mutt who we are:

set from = "[email protected]"
set realname = "Baptiste Wicht"

Receive mail

As I'm using offlineimap to get my mails, there is no IMAP settings in my configuration. But you need to tell Mutt where the mails are:

set folder = /data/oi/

set spoolfile = "+Gmail/INBOX"
set postponed = "+Gmail/drafts"

source ~/.mutt/mailboxes

The spoolfile and postponed are specifying the inbox and draft mailboxes. The .mutt/mailboxes file is generated by offlineimap.

By default, Mutt will ask you to move read messages from INBOX to another mailbox (set by mbox). I personally let my read messages in my inbox and move them myself in a folder. For that, you have to disable the move:

set move = no

If you move a mail from a mailbox to another, Mutt will ask for confirmation, you can disable this confirmation:

set confirmappend = no

If you use Mutt, you want to read plaintext messages rather than monstruous HTML. You can tell Mutt to always open text plain if any:

alternative_order text/plain text/html

If the mail has no text/plain part, you can manage to read HTML in Mutt in an almost sane format. First, you need to tell Mutt to open html messages:

auto_view text/html

And then, you need to tell it how to open it. Mutt reads a mailcap file to know how to open content. You can tell Mutt where it is:

set mailcap_path = ~/.mailcap

And then, you have to edit the .mailcap file:

text/html; w3m -I %{charset} -T text/html; copiousoutput;

That will use w3m to output the message inside Mutt. It works quite well. You can also use linx if you prefer.

Send mail

You need to indicate Mutt how to send mail:

set smtp_url = "smtp://[email protected]:587/"
set smtp_pass = "SECRET"

Some people prefer to use another SMTP client instead of Mutt builtin SMTP support, you can also do that by setting sendmail to the mailer program.

It is generally a good idea to enforce the charset of sent mail:

set send_charset="utf-8"

You can choose another charset if you prefer ;)

You need to configure vim to correctly handle mail editing:

set editor='vim + -c "set textwidth=72" -c "set wrap" -c "set spell spelllang=en"'

It sets the width of the text, enable wrap and configure spelling.

By default, Mutt will ask you if you want to include the body of the message you reply to in your answer and the reply subject. You can make that faster by using these two lines:

set include=yes
set fast_reply

Once mail are sent, they are copied in your outgoing mailbox. If you use GMail, the STMP server already does that for you, therefore you should disable this behavior:

set copy = no

Appearance

Many things can also be configured in the appearance of Mutt. If you like the threaded view of GMail, you want to configure Mutt in a similar way:

set sort = 'threads'
set sort_aux = 'reverse-last-date-received'

It is not as good as the GMail view, but it does the job :)

You can make reading mail more comfortable using smart wrapping:

set smart_wrap

A mail has many many headers and you don't want to see them all:

ignore *
unignore From To Reply-To Cc Bcc Subject Date Organization X-Label X-Mailer User-Agent

With that, you just configure which headers you're interested in.

If you're using the sidebar patch (and you should be ;), you can configure the sidebar:

set sidebar_visible = yes
set sidebar_width = 35
set sort_sidebar = desc

color sidebar_new yellow default

It makes the sidebar always visible with a width of 35 and sort the mailboxes. The last line makes yellow the mailboxes that have unread mails.

The index_format allows you to set what will shown for every mail in the index view:

set index_format = "%4C %Z %{%b %d} %-15.15L %?M?(#%03M)&(%4l)? %?y?{%.20y}? %?g?{%.20g} ?%s (%c)"

This is a classical example that display the sender, the flags, the date, the subject, the size of the mail and so on. You will need to look at the Reference to have more information on what you can do with the format variables. There are plenty of information that can be shown.

You can also configure the text that is present on the status bar:

set status_chars  = " *%A"
set status_format = "───[ Folder: %f ]───[%r%m messages%?n? (%n new)?%?d? (%d to delete)?%?t? (%t tagged)? ]───%>─%?p?( %p postponed )?───"

The example here displays the current folder, the number of mails in it with some details on deleted and unread mails and finally the number of postponed mail. Again, if you want more information, you can read the reference.

You can configure Mutt so that the index view is always visible when you read mails. For instance, to always show 8 mails in the index:

set pager_index_lines=8

Another important thing you can configure is the colors of Mutt. I'm not gonna cover everything, since Mutt is very powerful on this part. For instance, here are some examples from my configuration:

color index red white "~v~(~F)!~N" # collapsed thread with flagged, no unread color index yellow white "~v~(~F~N)" # collapsed thread with some unread & flagged color index_subject brightred default "~z >100K" color header blue default "^(Subject)"

Unless you are really wanting to spend time on this part, I recommend to pick an existing theme. I took a Solarized theme here. It looks quite good and works well. There other themes available, you'll surely find the one that looks best for you.

Bindings

Bindings are always very important. If like me, you're a vim aficionado, you'll want your Mutt bindings to be as close as possible to vim. The default settings are quite good, but not always close to vim.

Something that is important to know when you configure Mutt bindings is that they are relative to the current view open (index, pager,browser,attach, ...). You can bind a keystroke to a different action in each view. You can also select several views in which the keystroke is valid.

If you are using the sidebar patch (and again, you should ;) ), you'll want to configure fast bindings for it. Here are mine:

bind index,pager \Ck sidebar-prev
bind index,pager \Cj sidebar-next
bind index,pager \Cl sidebar-open
bind index,pager \Cn sidebar-scroll-up
bind index,pager \Cv sidebar-scroll-down
bind index,pager \Ct sidebar-toggle

I use Ctrl+j,k to move inside the sidebar. I use Ctrl+l to open a folder and Ctrl+n,v to scroll up and down. The last one is to toggle between multiple sidebars for instance if you use notmuch.

I find l very good to open messages in the index too:

bind index l display-message
bind index gg first-entry
bind index G last-entry
bind index h noop               # Disable h

gg and G are used to go to the first and last element. Here I disabled h which had a not often used command.

The pager is the view where you read mail:

bind pager h exit
bind pager gg top
bind pager G bottom
bind pager J next-line
bind pager K previous-line

In this view, I use h to get out of the pager, gg and G as usual. As I always let the index open, I already use j and k to move in the index, so I chose J and K to move in the pager.

The browser is the view where you select folders for instance:

bind browser l select-entry
bind browser L view-file
bind browser gg first-entry
bind browser G last-entry
bind browser h exit

Again, I use l and h to go back and forth and gg and G to go first and last. j and k are already used here to go up and down.

In the attach view:

bind attach h exit
bind attach e edit-type # Edit MIME Types
bind attach l view-attach

I use h to exit and l to view an attachment.

That is it for my bindings, but you configure a lot more of them.

Conclusion

This is the end of this post. I have covered my complete Mutt configuration here. My .muttrc is available online.

If you have comments on my configuration, you're welcome to let a comment on this post ;)

In the next blog post about my "Mutt journey", I'll talk about notmuch and this will likely be the last post on this series.
pm 0.1.1 - A simple workspace manager for Git projects

In the last month, I've developped a very simple tool in Python: pm. This tool allows to check the status of all the Git repositories inside a repository. I've just released the first version of this tool: pm-0.1.1

Those who are following this blog will perhaps wonder why Python and not C++ :) The reason is quite simple, I wanted to improve my skills in Python. And what is better than to develop a project from scratch.

Features

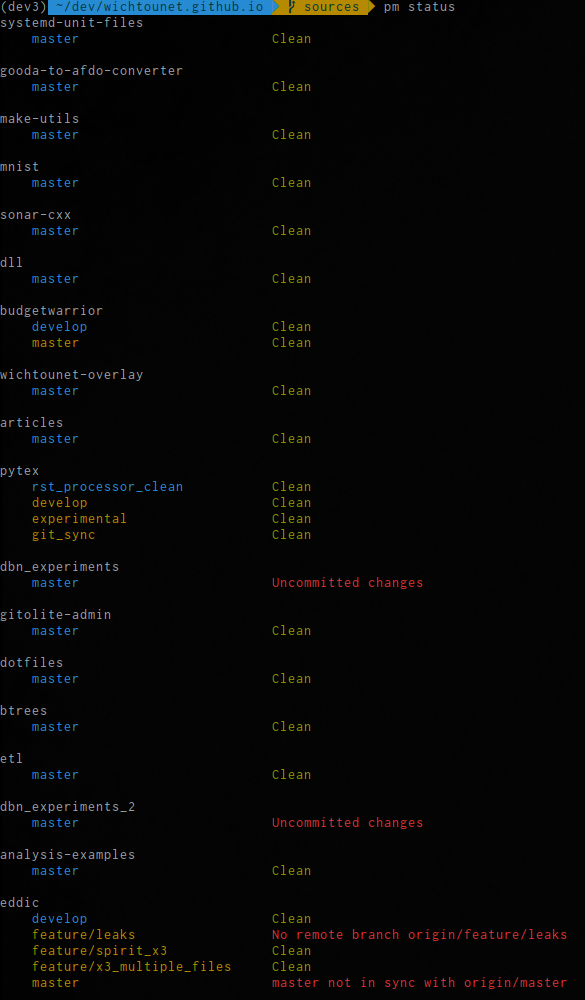
The main feature of this application is to show the status of every projects in a directory. The status of your projects can be queried by using pm status. On my computer this gives something like that:

/images/pm_status.png

The state of each branch of each project is shown. There different possible status (they are cumulative): * Behind remote: Commits are available on the remote repository * Ahead of remote: Some local commits are no pushed * Diverged: Behind and Ahead * Uncomitted changes: Some changes are not committed * Clean: Indicates that everything is committed, pushed and pull.

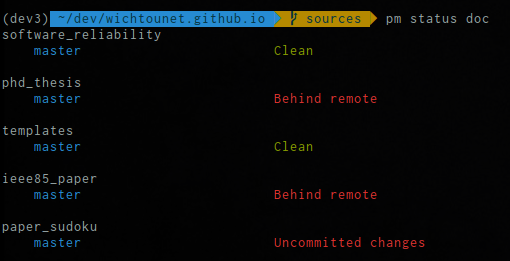
By default, the directory is ~/dev/ but you can change it by passing the repository to the command, if you pass a relative directory, it will be relative to home. For instance, here is the status of my doc repositories:

/images/pm_status_2.png

Another feature that can be useful is that it is able to check the status of submodules with the -s option:

/images/pm_status_sm.png

As you can see it supports recursive submodules. For each submodule it will indicate if there are new commits available or not.

pm is not only able to show status of the projects, it can also fetch the status of branches from remote by using pm fetch. All the remote branches are fetched from remote. It can also automatically update the projects that are behind remote (equivalent of git pull) with pm update. Only projects that can be fast-forwarded are updated.

Installation

Thanks to pip, installation of pm is quite simple:

pip install pm

If you don't want to use pip, you can install it by hand:

wget https://github.com/wichtounet/pm/archive/0.1.1.tar.gz
tar xf 0.1.1.tar.gz
cd 0.1.1
python setup.py install

For those interested, source code is available on Github.

If you have any suggestion for the tool or on the source code, post a comment to this post ;)

A Mutt Journey: Download mails with offlineimap

In the series of posts about Mutt, I recently presented how I was filtering my email. In this post, I'll show how I download my emails locally using offlineimap. This is the perfect companion for Mutt.

With Mutt, you can easily directly query an IMAP server and keep the views up to date with it. There are a few problem with this approach:

  • First, you wont' be able to read your mails when you'are offline. It is rarely an issue in these days, but it can be useful.

  • Opening an IMAP folder with a large number of mails (>1000) can be quite slow. I've several large folders and it was a pain opening them.

  • When Mutt synchronizes with the state of the IMAP server, you'll encounter a freeze. If you want to synchronize often, it is quite boring.

Having your mails offline on your computers solves all these problems. Moreover, it is also a good way to have a backup of your mails. I'm gonna talk here about the usage for Mutt, but you can use offlineimap just for backup or for migration reasons. The downside is that you have to store it locally. My mails takes around 5GB on my computer.

offlineimap is a very simple tool to synchronize emails from IMAP servers. It only supports IMAP, but in those days it is not a limitation. The synchronization is made both ways, it will upload your local changes to the IMAP server. It is very powerful when paired with a MUA such as Mutt.

To use offlineimap, you have to put your configuration in the ~/.offlineimaprc. You can synchronize several accounts at once, in this post, we'll focus on one, but the process is the same for several accounts. I'll focus on Gmail too, but again it is the same with a bit different parameters for other mail accounts.

Configuration

First, we have to declare the account:

[general]
accounts = Gmail

[Account Gmail]
localrepository = Gmail-Local
remoterepository = Gmail-Remote

accounts is the list of accounts that we have, here only one. Then, in account, repositories are just names of the repositories we'll declare now.

The local repository has to be configured:

[Repository Gmail-Local]
type = Maildir
localfolders = /data/oi/Gmail/
sep = /

The first important point is localfolders that sets where the mail will be put on your computer. sep defines the separator used for nested IMAP folders. I recommend / since Mutt will nest them automatically if / is used as separator.

Then, the remote repository has to be configured:

[Repository Gmail-Remote]
type = Gmail
remoteuser = USER
remotepass = PASSWORD
realdelete = no
folderfilter = lambda folder: folder not in ['[Gmail]/All Mail',
                                             '[Gmail]/Important',
                                             '[Gmail]/Starred',
                                             ]
sslcacertfile = /etc/ssl/certs/ca-certificates.crt

remotepass and remoteuser are your user names and password. You can also use remotepassfile to read the password from a file. realdelete=no indicates that we only want to remove all the labels of deleted mails. For Gmail, it means that the mail will still be in the All Mail folder. The last line (sslcacertfile) is mandatory for recent versions of offlineimap. The folderfilter is a function that filters some folders. In my case, I do not want to get the "All Mail", "Important" and "Starred" of my Gmail account because it is only a duplicata of the mails in other labels. What is pretty cool with offlineimap is that you can write Python directly in it for some of the configuration options. Here is rule for filter is plain Python, so you can complicated filtering if you want.

Last, but not least, offlineimap can generates a list of mailboxes (one for each folder in every account). It is pretty useful since Mutt can then read this file and you'll find your mailboxes directly configured in Mutt :)

This code will generate a file ~/.mutt/mailboxes that you can source in your Mutt configuration and get the complete list of available mailboxes. This will be kept up to date if you add new IMAP folders on the server for instance.

[mbnames]
enabled = yes
filename = ~/.mutt/mailboxes
header = "mailboxes "
peritem = "+%(accountname)s/%(foldername)s"
sep = " "
footer = "\n"

Translate names

You may have seen in the previous section some weird folder name like "[Gmail]/All mail", this is how Gmail names folders that are not labels. This is quite ugly and will create odd looking folders on your computer. You can configure offlineimap to rename these names to better ones. For that, you'll need to rule (in Python ;) ), one to translate from remote to local and one to do the reverse.

Here is what I did:

[Repository Gmail-Local]
nametrans = lambda folder: {'drafts':   '[Gmail]/Drafts',
                            'sent':     '[Gmail]/Sent Mail',
                            'important':'[Gmail]/Important',
                            'spam':     '[Gmail]/Spam',
                            'starred':  '[Gmail]/Starred',
                            'trash':    '[Gmail]/Trash',
                            'archive':  '[Gmail]/All Mail',
                            }.get(folder, folder)

[Repository Gmail-Remote]
nametrans = lambda folder: {'[Gmail]/Drafts':    'drafts',
                            '[Gmail]/Sent Mail': 'sent',
                            '[Gmail]/Starred':   'flagged',
                            '[Gmail]/Important':   'important',
                            '[Gmail]/Spam':   'spam',
                            '[Gmail]/Trash':     'trash',
                            '[Gmail]/All Mail':  'archive',
                            }.get(folder, folder)

I simply renamed all "[Gmail]" folders into something more readable and that makes more sense to me. It is not limited to special Gmail folders of course, this can also be applied to rename a folder X into a folder Y in the same. As it is Python, you can do sophisticated stuff if necessary.

Speed up things

If you happen to sync your mails often, you may want to speed things up. There are several ways to do that.

The first thing you can do is use several connections to the server. You can set maxconnections to a number higher than 1 in the remote repository configuration. I tested several values and for Gmail 2 was the fastest choice. You can try some values with your server to see what value is good.

Instead of plain old text files for the status of the mails, offlineimap can use a sqlite backend. This is much faster since the complete file is not rewritten for each update of the flags. For that behaviour, you have to set status_backend = sqlite in the Account configuration.

Another thing you can do is reduce the I/O involved during sync by setting general.fsync to false. With that, offlineimap won't have to wait for disk operation completion after each operation.

You can run offlineimap in quick mode with -q option. With this option, change in flags of remote messages will not be updated locally. Changes on the local side will be uploaded corectly. It is generally a good idea is to run offlineimap in quick mode often (every X minutes) and run it in normal mode once or twice a day.

You can also specify which folder to sync with the -f option. Sometimes it is enough to sync INBOX for instance. It may be much faster.

Conclusion

Now that you have fully configured offlineimap, you can make it run by hand or in a cron job. I personally run it every 5 minutes, you can choose your favourite frequency according to your workflow. I think I'll reduce the frequency further, it is more comfortable to get mails only by batch and not too much of them.

If you're interested, you can take a look at my .offlineimaprc configuration.

If you want more information about this awesome tool, you can take a look at the reference documentation.

This is it for this part of this series. In the next post, I'll present my Mutt configuration and how I use it.

A Mutt Journey: Filter mails with imapfilter

About a month ago, I decided to switch to Mutt to read my emails. I kept my GMail account, but I don't use the web interface anymore. It took me a long time to prepare a complete enviromnent.

Currently, i'm using:

  • imapfilter to filter mails

  • offlineimap to download my mails

  • notmuch to quickly search all my mails

And of course Mutt. To be precise, I use mutt-kz, a fork of mutt with very good notmuch integration.

I'll try to explain each part of my environment in a series of articles on this blog. The first one will be about imapfilter.

imapfilter is a mail filtering utility. It connects to a remote server using IMAP and is then able to move, copy or delete mails around. You can use it for several tasks:

  • Delete unwanted mail

  • Move mails into folders according to rules

What is pretty cool is that the configuration is entirely made in Lua. It is quite easy to write rules and then apply them to several mailboxes as if you were programming.

Another advantage of imapfilter is that it works at the server level. Therefore, even if you use your web client from time to time or check your mail on your phone, the changes will still be viewable.

The configuration is done in the ~/.imapfilter/config.lua file. The configuration is quite easy, you have to declare an IMAP object as the account.

local account = IMAP {
    server = 'imap_sever',
    username = 'username',
    password = 'password',
    ssl = 'ssl3',
}

As the configuration is in Lua, you can easily get the password from another file. For instance, here is my account declaration:

local account = IMAP {
    server = 'imap.gmail.com',
    username = '[email protected]',
    password = get_imap_password(".password.offlineimaprc"),
    ssl = 'ssl3',
}

-- Utility function to get IMAP password from file
function get_imap_password(file)
    local home = os.getenv("HOME")
    local file = home .. "/" .. file
    local str = io.open(file):read()
    return str;
end

It gets the password by reading a file in the home directory.

Once, you have the account, you can check the status of a folder with the check_status() function. For instance:

account.INBOX:check_status()
account['[Gmail]/Trash']:check_status()

You can run imapfilter simply by launching imapfilter on the command line. Once imapfilter is run, it will print the status of the folder you choses:

38 messages, 0 recent, 6 unseen, in [email protected]@imap.gmail.com/INBOX.
70 messages, 0 recent, 67 unseen, in [email protected]@imap.gmail.com/[Gmail]/Trash.

Several functions are important:

  • select_all() on a folder allows you to get messages from an account to them perform action on them

  • contain_subject('subject') on a list of mails allows you to keep only the mails that contains 'subject' in their subject

  • contain_from('from') on a list of mails allows you to keep only the mails that comes from 'from'

  • contain_to('to') on a list of mails allows you to keep only the mails that are addressed to 'to'

  • delete_messages() on a collection of mails deletes all of them

  • move_messages(folder) on a collection of mails moves all of them to another folder.

You can also mix different IMAP accounts, you don't have to use only one.

For instance, if you would delete all the mail coming from me, you could do:

mails = account.INBOX:select_all()
filtered = mails:contains_from("[email protected]")
filtered:delete_messages()

Or you could move all the mails containing Urgent in the subject line to an IMAP folder:

mails = account.INBOX:select_all()
filtered = mails:contains_subject("Urgent")
filtered:move_messages(account["urgent_mails"])

If you want some more examples, you can take a look at my imapfilter configuration.

The best way to start using it is to look at examples, there are plenty of them in the internet, especially in Github dotfiles repositories.

The reference documentation is available using 'man imapfilter_config', there is plenty more to see.

For more information, you can also consult the offical site.

That is it for this part of the mutt series. In the next post about mutt, I'll talk about how I use offlineimap to get my mails.

budgetwarrior 0.4 - Enhanced wish list and aggregate

I've just released a new version of my command-line budget manager: budgetwarrior 0.4.

Enhanced aggregate overview

The aggregate overviews have been greatly improved. First, there is now a budget overview month command that groups all expenses of amonth together. Here is a possible output:

/images/budget_04_aggregate_month.png

It also possible to use --full option to also aggregate together the different accounts:

/images/budget_04_aggregate_month_full.png

Another new option is --no-group that disables the grouping by categories:

/images/budget_04_aggregate_month_full_ng.png

Moreover, the separator of categories can now be configured with --separator=.

All these options can also be set in the configuration with these options:

  • aggregate_full : If set to true, does the same as the --full option.

  • aggregate_no_group : If set to true, does the same as the --no-group option.

  • aggregate_separator : Sets the separator for grouping.

Enhanced wish list

The wishes management has also been improved.

First, each wish can now be set an Urgency and Importance level. This is now shown in wish status as simple indicators:

/images/budget_04_wish_status.png

Moreover, the accuracy of the estimation compared to the paid amount is shown in wish list:

/images/budget_04_wish_list.png

Various changes

Objective status now shows more information about the status of the objectives:

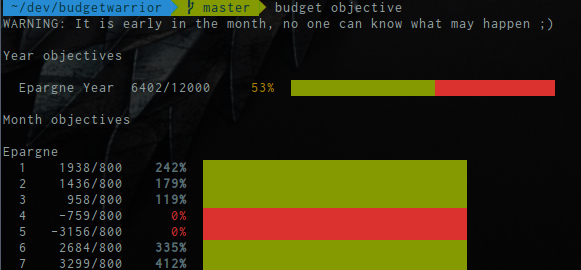
/images/budget_04_objective_status.png

The versioning module has been improved. The versioning sync does now perform a commmit as well as pull/push. versioning push, versioning pull and versioning status commands have been added.

budget version command shows the version of budgetwarrior.

Aliases a now available to make shorted commands:

  • budget sync -> budget versioning sync

  • budget aggregate -> budget overview aggregate

Installation

If you are on Gentoo, you can install it using layman:

layman -a wichtounet
emerge -a budgetwarrior

If you are on Arch Linux, you can use this AUR repository.

For other systems, you'll have to install from sources:

git clone git://github.com/wichtounet/budgetwarrior.git
cd budgetwarrior
make
sudo make install

Conclusion

If you are interested by the sources, you can download them on Github: budgetwarrior.

If you have a suggestion or you found a bug, please post an issue on Github.

If you have any comment, don't hesitate to contact me, either by letting a comment on this post or by email.

Compile integer Square Roots at compile-time in C++

For one of my projects, I needed to evaluate a square root at compile-time. There are several ways to implement it and some are better than the others.

In this post, I'll show several versions, both with Template Metaprogramming (TMP) and constexpr functions.

Naive version

The easiest way to implement it is to enumerate the integers until we find two integers that when multiplied are equal to our number. This can easily be implemented in C++ with class template and partial specialization:

template <std::size_t N, std::size_t I=1>
struct ct_sqrt : std::integral_constant<std::size_t, (I*I<N) ? ct_sqrt<N,I+1>::value : I> {};

template<std::size_t N>
struct ct_sqrt<N,N> : std::integral_constant<std::size_t, N> {};

Really easy, isn't it ? If we test it with 100, it gives 10. But, if we try with higher values, we are going to run into problem. For instance, when compiled with 289, here is what clang++ gives me:

src/sqrt/tmp.cpp:5:64: fatal error: recursive template instantiation exceeded maximum depth of 256
struct ct_sqrt : std::integral_constant<std::size_t, (I*I<N) ? ct_sqrt<N,I+1>::value : I > {};
                                                               ^
src/sqrt/tmp.cpp:5:64: note: in instantiation of template class 'ct_sqrt<289, 257>' requested here
struct ct_sqrt : std::integral_constant<std::size_t, (I*I<N) ? ct_sqrt<N,I+1>::value : I > {};
                                                               ^
src/sqrt/tmp.cpp:5:64: note: in instantiation of template class 'ct_sqrt<289, 256>' requested here
struct ct_sqrt : std::integral_constant<std::size_t, (I*I<N) ? ct_sqrt<N,I+1>::value : I > {};
                                                               ^
src/sqrt/tmp.cpp:5:64: note: in instantiation of template class 'ct_sqrt<289, 255>' requested here
struct ct_sqrt : std::integral_constant<std::size_t, (I*I<N) ? ct_sqrt<N,I+1>::value : I > {};
                                                               ^
src/sqrt/tmp.cpp:5:64: note: in instantiation of template class 'ct_sqrt<289, 254>' requested here
struct ct_sqrt : std::integral_constant<std::size_t, (I*I<N) ? ct_sqrt<N,I+1>::value : I > {};
                                                               ^
src/sqrt/tmp.cpp:5:64: note: in instantiation of template class 'ct_sqrt<289, 253>' requested here
struct ct_sqrt : std::integral_constant<std::size_t, (I*I<N) ? ct_sqrt<N,I+1>::value : I > {};
                                                               ^
src/sqrt/tmp.cpp:5:64: note: (skipping 247 contexts in backtrace; use -ftemplate-backtrace-limit=0 to see all)
src/sqrt/tmp.cpp:5:64: note: in instantiation of template class 'ct_sqrt<289, 5>' requested here
struct ct_sqrt : std::integral_constant<std::size_t, (I*I<N) ? ct_sqrt<N,I+1>::value : I > {};
                                                               ^
src/sqrt/tmp.cpp:5:64: note: in instantiation of template class 'ct_sqrt<289, 4>' requested here
struct ct_sqrt : std::integral_constant<std::size_t, (I*I<N) ? ct_sqrt<N,I+1>::value : I > {};
                                                               ^
src/sqrt/tmp.cpp:5:64: note: in instantiation of template class 'ct_sqrt<289, 3>' requested here
struct ct_sqrt : std::integral_constant<std::size_t, (I*I<N) ? ct_sqrt<N,I+1>::value : I > {};
                                                               ^
src/sqrt/tmp.cpp:5:64: note: in instantiation of template class 'ct_sqrt<289, 2>' requested here
struct ct_sqrt : std::integral_constant<std::size_t, (I*I<N) ? ct_sqrt<N,I+1>::value : I > {};
                                                               ^
src/sqrt/tmp.cpp:11:18: note: in instantiation of template class 'ct_sqrt<289, 1>' requested here
    std::cout << ct_sqrt<289>::value << std::endl;
                 ^
src/sqrt/tmp.cpp:5:64: note: use -ftemplate-depth=N to increase recursive template instantiation depth
struct ct_sqrt : std::integral_constant<std::size_t, (I*I<N) ? ct_sqrt<N,I+1>::value : I > {};
                                                               ^

And it is only to compute the square root for 289, not a big number. We could of course increase the template depth limit (-ftemplate-depth=X), but that would only get us a bit farther. If you try with g++, you should see that this works, that is because g++ has a higher template depth limit (900 for 4.8.2 on my machine) where clang has a default limit of 256. It can be noted too that with g++ no context is skipped, therefore the error is quite long.

Now that C++11 gives us constexpr function, we can rewrite it more cleanly:

constexpr std::size_t ct_sqrt(std::size_t n, std::size_t i = 1){
    return n == i ? n : (i * i < n ? ct_sqrt(n, i + 1) : i);
}

Much nicer :) And it works perfectly with 289. And it works quite well up to a large number. But it still fails once we git large numbers. For instance, here is what clang++ gives me with 302500 (550*550):

src/sqrt/constexpr.cpp:8:36: error: constexpr variable 'result' must be initialized by a constant expression
static constexpr const std::size_t result = ct_sqrt(SQRT_VALUE);
                                   ^        ~~~~~~~~~~~~~~~~~~~
src/sqrt/constexpr.cpp:5:38: note: constexpr evaluation exceeded maximum depth of 512 calls
    return n == i ? n : (i * i < n ? ct_sqrt(n, i + 1) : i);
                                     ^
src/sqrt/constexpr.cpp:5:38: note: in call to 'ct_sqrt(302500, 512)'
src/sqrt/constexpr.cpp:5:38: note: in call to 'ct_sqrt(302500, 511)'
src/sqrt/constexpr.cpp:5:38: note: in call to 'ct_sqrt(302500, 510)'
src/sqrt/constexpr.cpp:5:38: note: in call to 'ct_sqrt(302500, 509)'
src/sqrt/constexpr.cpp:5:38: note: in call to 'ct_sqrt(302500, 508)'
src/sqrt/constexpr.cpp:5:38: note: (skipping 502 calls in backtrace; use -fconstexpr-backtrace-limit=0 to see all)
src/sqrt/constexpr.cpp:5:38: note: in call to 'ct_sqrt(302500, 5)'
src/sqrt/constexpr.cpp:5:38: note: in call to 'ct_sqrt(302500, 4)'
src/sqrt/constexpr.cpp:5:38: note: in call to 'ct_sqrt(302500, 3)'
src/sqrt/constexpr.cpp:5:38: note: in call to 'ct_sqrt(302500, 2)'
src/sqrt/constexpr.cpp:8:45: note: in call to 'ct_sqrt(302500, 1)'
static constexpr const std::size_t result = ct_sqrt(SQRT_VALUE);
                                            ^

Again, we run into the limits of the compiler. And again, the limit can be change with fconstexpr-backtrace-limit=X. With g++, the result is the same (without the skipped part, which makes the error horribly long), but the command to change the depth is -fconstexpr-depth=X.

So, if we need to compute higher square roots at compile-time, we need a better version.

Binary Search version

To find the good square root, you don't need to iterate through all the numbers from 1 to N, you can perform a binary search to find the numbers to test. I found a very nice implementation by John Khvatov (source).

Here is an adaptation of its code:

#define MID(a, b) ((a+b)/2)
#define POW(a) (a*a)

template<std::size_t res, std::size_t l = 1, std::size_t r = res>
struct ct_sqrt;

template<std::size_t res, std::size_t r>
struct ct_sqrt<res, r, r> : std::integral_constant<std::size_t, r> {};

template <std::size_t res, std::size_t l, std::size_t r>
struct ct_sqrt : std::integral_constant<std::size_t, ct_sqrt<res,
        (POW(MID(r, l)) >= res ? l : MID(r, l)+1),
        (POW(MID(r, l)) >= res ? MID(r, l) : r)>::value> {};

With smart binary search, you can reduce A LOT the numbers that needs to be tested in order to find the answer. It very easily found the answer for 302500. It can find the square root of almost all integers, until it fails due to overflows. I think it is really great :)

Of course, we can also do the constexpr version:

static constexpr std::size_t ct_mid(std::size_t a, std::size_t b){
    return (a+b) / 2;
}

static constexpr std::size_t ct_pow(std::size_t a){
    return a*a;
}

static constexpr std::size_t ct_sqrt(std::size_t res, std::size_t l, std::size_t r){
    return
        l == r ? r
        : ct_sqrt(res, ct_pow(
            ct_mid(r, l)) >= res ? l : ct_mid(r, l) + 1,
            ct_pow(ct_mid(r, l)) >= res ? ct_mid(r, l) : r);
}

static constexpr std::size_t ct_sqrt(std::size_t res){
    return ct_sqrt(res, 1, res);
}

Which is a bit more understandable. It works the same way than the previous one and is only limited by numeric overflow.

C++14 Fun

In C++14, the constraints on constexpr functions have been highly relaxed, we can now use variables, if/then/else statements, loops and so on... in constexpr functions making them much more readable. Here is the C++14 version of the previous code:

static constexpr std::size_t ct_sqrt(std::size_t res, std::size_t l, std::size_t r){
    if(l == r){
        return r;
    } else {
        const auto mid = (r + l) / 2;

        if(mid * mid >= res){
            return ct_sqrt(res, l, mid);
        } else {
            return ct_sqrt(res, mid + 1, r);
        }
    }
}

static constexpr std::size_t ct_sqrt(std::size_t res){
    return ct_sqrt(res, 1, res);
}

I think this version is highly superior than the previous version. Don't you think ?

It performs exactly the same as the previous. This can only be done in clang for now, but that will come eventually to gcc too.

Conclusion

As you saw, there are several ways to compute a square root at compile-time in C++. The constexpr versions are much more readable and generally more scalable than the template metaprogramming version. Moreover, now, with C++14, we can write constexpr functions almost as standard function, which makes really great.

I hope that is is helpful to some of you :)

All the sources are available on Github: https://github.com/wichtounet/articles/tree/master/src/sqrt