Improve ETL compile-time with Precompiled Headers

Very recently, I started trying to improve the compile-time of the ETL test suite. While not critical, it is always better to have tests that compile as fast as possible. In a previous post, I was able to improve the time a bit by improve the makefile, using pragra once and avoiding <iostream> headers. With these techniques, I reduced the compile-time from 87.5 to 84.1, which is not bad, but not as good as I would have expected.

In the previous, I had not tried to use Precompiled Headers (PCH) to improve the compile time, so I thought it would be a good time to do it.

Precompiled Headers

Precompiled Headers are an option of the compiler, where one header gets compiled. Normally, you only compile source files into object files, but you can also compile headers, although it is not the same thing. When a compiler compiles a header, it can do a lot of preprocessing (macros, includes, AST, symbols) and then store all the results into a precompiled header file. Once you compile the source files, the compiler will try to use the precompiled header file instead of the real header file. Of course, this can breaks the C++ standard since with that a header can not have different behaviour based on macros for instance. For these reasons (and probably implementation reasons as well), precompiled headers are really limited.

If we take the case of G++, G++ will consider the precompiled header file instead of the standard header only if (for a complete list, take a look at the GCC docs):

  • The same compilation flags are the same between the two compilations

  • The same compiler binary is used for the compilations

  • Only one precompiled header can be used in each compilation

  • The same macros must be defined

  • The include of the header must be before every possible C/C++ token

If all these conditions are met and you try to #include "header.hpp and there is a header.hpp.gch (the precompiled file) available in the search path, then the precompiled header will be taken instead of the standard one.

With clang, it is a bit different because the precompiled header cannot be included automatically, but has to be included explicitely in the source code, meaning you have to modify your code for this technique to work. This is a bad thing in my opinion, you never should have to modify your code to profit from a compiler feature. This is why I haven't used and don't plan to use precompiled headers with clang.

How-to

Once you know all the conditions for a precompiled header to be automatically included, it is quite straightforward to use them.

To generate a PCH file is easy:

g++ options header.hpp

This will generate header.hpp.gch. When you compile your source file using header.hpp, you don't have anything to do, you just have to compile it as usually and if all the conditions are met, the PCH file will be used instead of the other header.

Results and conclusion

I added precompiled header support into my make-utils collection of Makefile utilities and tested it on ETL. I have precompiled a header that itself included Catch and ETL. Almost all test files are including this header. With this change, I went from 84 seconds to 78seconds. Headers are taking 1.5seconds to be precompiled. This is a nice result I think. If your application is not as template-heavy as mine or if you have more source files, you should expect better improvements.

To conclude, even if precompiled headers are a sound way to reduce compile-time, they are really limited to some cases. I'm not a fan of the feature overally. It is not portable between compilers and not standard. Anyway, if you are really in need of saving some time, you should not hesitate too much ;)

How I improved (a bit) compile time of ETL ?

Recently I read several articles about C++ and compile time and I wondered if I could improve the compile time of my Expression Template Library (ETL) project. ETL is a header-only and template-heavy library. I'm not going to the change the design completely or to use type erasure techniques to reduce the compile time, ETL is all about performance.

As a disclaimer, don't expect fancy results from this post, I haven't been able to reduce compile time a lot, but I still wanted to share my experience.

I've used g++-4.9.2 to perform these tests.

I'm compiling the complete test suite (around 6900 source lines of codes in 36 files) in release mode. Each test file includes the ETL (around 10K SLOC). Each test is run with 8 threads (make -j8). For each result, I have run a complete build 5 times and taken the best result as the final result. Everything is run on a SSD and I have more than enough RAM to handle all the compilation in parallel.

The reference build time was 87.5 seconds.

Compile and generate dependency files at the same time

To help write my makefiles, I'm using a set of functions that I have written. This includes automatic dependency generation using -MM -MT options of the compiler. Until now, I had two targets, one to compile the cpp file into the object file and another one to generate the dependency file. I recently saw that compilers were able to do both at the same time! Clang, G++ and the Intel compiler all have a -MD -MF options that lets you generate the dependency file at the same time you compile your file, saving you at least one read of the file.

My compilation rule in my makefile has now become:

release/$(1)/%.cpp.o: $(1)/%.cpp
    @ mkdir -p release/$(1)/
    $(CXX) $(CXX_FLAGS) $(RELEASE_FLAGS) $(2) -MD -MF release/$(1)/$$*.cpp.d -o release/$(1)/$$*.cpp.o -c $(1)/$$*.cpp
    @ sed -i -e 's@^\(.*\)\.o:@\1.d \1.o:@' release/$(1)/$$*.cpp.d

This reduced the compilation time to 86.8 seconds. Not that much reduction, but it still is quite nice to know that. I would have expected this to reduce more the compile time.

Use #pragma once

Normally, I'm not a fan of #pragma since it is not standard, but for now ETL only supports three compilers and only very recent of them, so I have the guarantee that #pragma once is available, so what the hell!

I've replaced all the include guards by single #pragma once directives.

Again, the results are not impressive, this reduced the compile time to 86.2 seconds. I would only advise to use this if you are sure of the compilers you want to support and you need the extra time.

Avoid <iostream>

I've read that the <iostream> header was one of the slowest to compile of the STL. It is only one that is included several times in my headers only for stream operators and it turns out that there is a <iosfwd> header that forward declares a lot of things from the <iostream> and other I/O headers.

By replacing all <iostream> include by <iosfwd>, compile time has gone down to 84.1 seconds.

Conclusion

By using the three techniques, I've reduced the compile time from 87.5 to 84.1 seconds. I would have honestly hoped for more improvements, but this is a already a good start.

As a side note, clang compile time is 45.2 seconds under the same conditions (was 46.2 seconds before the optimizations). It is really much faster :) I'm still using GCC a lot since in several cases, it does generate much better code and in average, the generated code if faster (on my benchmarks at least). I don't have the numbers for icc, but icc is definitely the slowest of the three. When I have it available (at work), I use for release build before running something. The generated executables are generally faster (I only use Intel processors) and sometimes the difference can be quite important.

If you have ideas to reduce further the compile time on this test case, I'd be glad to hear them and put them to the test.

I hope that this small experience would be helpful to some of you :)

Other techniques

There are several other techniques that you can use to reduce compile time:

  1. Precompiled Headers are supported by both Clang and GCC, altough not in a compatible. I haven't tested this in a while, but it is quite effective and a very interesting technique. The main problem with this is that is not standard and not compatible between compilers. But it probably is the most efficient techniques when you have lots of headers and lots of templates as in my case.

  2. Unity builds can make full rebuild much faster. I personally don't like unity builds especially because it is only really good for full builds and you generally don't do full rebuilds that much (I know, I know, this is also the test done in this article :) ). Moreover, it also sucks at doing parallel builds.

  3. Pimpl idioms and other type erasure techniques can reduce compile time a lot. If it is well done, it can be implemented without so much overhead.

  4. Explicit instantiation of templates can also help, but only in the case of a user program. In the case of a library itself, you cannot do anything.

  5. Reduce inclusions and use forward declarations, obviously...

  6. Use tools like distcc (I very rarely use it) and ccache (I generally use it).

  7. Update your compiler

  8. Upgrade your computer ;)

  9. ...

Continuous Performance Management with CPM for C++

For some time, I have wanted some tool to monitor the performance of some of my projects. There are plenty of tools for Continuous Integration and Sonar is really great for continuous monitoring of code quality, but I haven't found anything satisfying for monitoring performance of C++ code. So I decided to write my own. Continous Performance Monitor (CPM) is a simple C++ tool that helps you running benchmarks for your C++ programs and generate web reports based on the results. In this article, I will present this tool. CPM is especially made to benchmark several sub parts of libraries, but it perfectly be used to benchmark a whole program as well.

The idea is to couple it with a Continuous Integration tool (I use Jenkins for instance) and run the benchmarks for every new push in a repository. With that, you can check if you have performance regression for instance or simply see if your changes were really improving the performance as much as you thought.

It is made of two separate parts:

  1. A header-only library that you can use to benchmark your program and that will give you the performance results. It will also generate a JSON report of the collected data.

  2. A program that will generate a web version of the reports with analysis over time, over different compilers or over different configurations.

CPM is especially made to benchmark functions that takes input data and which runtime depends on the dimensions of the input data. For each benchmark, CPM will execute it with several different input sizes. There are different ways to define a benchmark:

  • two_pass: The benchmark is made of two part, the initialization part is called once for each input size and then the benchmark part is repeated several times for the measure. This is the most general version.

  • global: The benchmark will be run with different input sizes but uses global data that will be randomized before each measure

  • simple: The benchmark will be run with different input sizes, data will not be randomized

  • once: The benchmark will be run with no input size.

Note: The randomization of the data can be disabled.

You can run independent benchmarks or you can run sections of benchmarks. A section is used to compared different implementations of the same thing. For instance, I use them to compare different implementation of convolution or to see how ETL compete with other Expression Templates library.

/images/cpm_large.png

Examples

I've uploaded three generated reports so that you can have look at some results:

Run benchmarks

There are two ways of running CPM. You can directly use the library to run the benchmarks or you can use the macro facilities to make it easier. I recommend to use the second way since it is easier and I'm gonna try to keep it stable while the library can change. If you want an example of using the library directly, you can take a look at this example. In this chapter, I'm gonna focus on the macro-way.

The library is available here, you can either include as a submodule of your projects or install it globally to have access to its headers.

The first thing to do is to include the CPM header:

#define CPM_BENCHMARK "Example Benchmarks"
#include "cpm/cpm.hpp"

You have to name your benchmark. This will automatically creates a main and will run all the declared benchmark.

Define benchmarks

Benchmarks can be defined either in a CPM_BENCH functor or in the global scope with CPM_DIRECT_BENCH.

  1. simple

CPM_DIRECT_BENCH_SIMPLE("bench_name", [](std::size_t d){ std::this_thread::sleep_for((factor * d) * 2_ns ); })

The first argument is the name of the benchmark and the second argument is the function that will be benchmarked by the system, this function takes the input size as input.

  1. global

CPM_BENCH() {
    test a{3};
    CPM_GLOBAL("bench_name", [&a](std::size_t d){ std::this_thread::sleep_for((factor * d * a.d) * 1_ns ); }, a);
}

The first argument is the name of the benchmark, the second is the function being benchmarked and the following arguments must be references to global data that will be randomized by CPM.

  1. two_pass

CPM_DIRECT_BENCH_TWO_PASS("bench_name",
    [](std::size_t d){ return std::make_tuple(test{d}); },
    [](std::size_t d, test& d2){ std::this_thread::sleep_for((factor * 3 * (d + d2.d)) * 1_ns ); }
)

Again, the first argument is the name. The second argument is the initialization functor. This functor must returns a tuple with all the information that will be passed (unpacked) to the third argument (the benchmark functor). Everything that is being returned by the initialization functor will be randomized.

Select the input sizes

By default, CPM will invoke your benchmarks with values from 10 to 1000000, multiplying it by 10 each step. This can be tuned for each benchmark and section independently. Each benchmark macro has a _P suffix that allows you to set the size policy:

CPM_SIMPLE_P(
    VALUES_POLICY(1,2,3,4,5,6),
    "simple_a_n",
    [](std::size_t d){ std::this_thread::sleep_for((factor * d) * 1_ns ); });

You can also have several sizes (for multidimensional data structures or algorithms):

CPM_DIRECT_BENCH_TWO_PASS_P(
    NARY_POLICY(VALUES_POLICY(16, 16, 32, 32, 64, 64), VALUES_POLICY(4, 8, 8, 16, 16, 24)),
    "convmtx2",
    [](std::size_t d1, std::size_t d2){ return std::make_tuple(dmat(d1, d1), dmat((d1 + d2 - 1)*(d1 + d2 - 1), d2 * d2)); },
    [](std::size_t /*d1*/, std::size_t d2, dmat& a, dmat& b){ b = etl::convmtx2(a, d2, d2); }
)

Configure benchmarks

By default, each benchmark is run 10 times for warmup and then repeated 50 times, but you can define your own values:

#define CPM_WARMUP 3
#define CPM_REPEAT 10

This must be done before the inclusion of the header.

Define sections

Sections are simply a group of benchmarks, so instead of putting several benchmarks inside a CPM_BENCH, you can put them inside a CPM_SECTION. For instance:

CPM_SECTION("mmul")
    CPM_SIMPLE("std", [](std::size_t d){ std::this_thread::sleep_for((factor * d) * 9_ns ); });
    CPM_SIMPLE("fast", [](std::size_t d){ std::this_thread::sleep_for((factor * (d / 3)) * 1_ns ); });
    CPM_SIMPLE("common", [](std::size_t d){ std::this_thread::sleep_for((factor * (d / 2)) * 3_ns ); });
}
CPM_SECTION("conv")
    CPM_TWO_PASS("std",
        [](std::size_t d){ return std::make_tuple(test{d}); },
        [](std::size_t d, test& d2){ std::this_thread::sleep_for((factor * 5 * (d + d2.d)) * 1_ns ); }
        );
    CPM_TWO_PASS("fast",
        [](std::size_t d){ return std::make_tuple(test{d}); },
        [](std::size_t d, test& d2){ std::this_thread::sleep_for((factor * 3 * (d + d2.d)) * 1_ns ); }
        );
}

You can also set different warmup and repeat values for each section by using CPM_SECTION_O:

CPM_SECTION_O("fft",11,51)
    test a{3};
    test b{5};
    CPM_GLOBAL("std", [&a](std::size_t d){ std::this_thread::sleep_for((factor * d * (d % a.d)) * 1_ns ); }, a);
    CPM_GLOBAL("mkl", [&b](std::size_t d){ std::this_thread::sleep_for((factor * d * (d % b.d)) * 1_ns ); }, b);
}

will be warmup 11 times and run 51 times.

The size policy can also be changed for the complete section (cannot be changed independently for benchmarks inside the section):

CPM_SECTION_P("mmul",
    NARY_POLICY(STD_STOP_POLICY, VALUES_POLICY(1,2,3,4,5,6), VALUES_POLICY(2,4,8,16,32,64)))
    test a{3};
    test b{5};
    CPM_GLOBAL("std", [&a](std::size_t d1,std::size_t d2, std::size_t d3){ /* Something */ }, a);
    CPM_GLOBAL("mkl", [&a](std::size_t d1,std::size_t d2, std::size_t d3){ /* Something */ }, a);
    CPM_GLOBAL("bla", [&a](std::size_t d1,std::size_t d2, std::size_t d3){ /* Something */ }, a);
}

Run

Once your benchmarks and sections are defined, you can build you program as a normal C++ main and run it. You can pass several options:

./debug/bin/full -h
Usage:
  ./debug/bin/full [OPTION...]

  -n, --name arg           Benchmark name
  -t, --tag arg            Tag name
  -c, --configuration arg  Configuration
  -o, --output arg         Output folder
  -h, --help               Print help

The tag is used to distinguish between runs, I recommend that you use a SCM identifier for the tag. If you want to run your program with different configurations (compiler options for instance), you'll have to set the configuration with the --configuration option.

Here is a possible output:

 Start CPM benchmarks
    Results will be automatically saved in /home/wichtounet/dev/cpm/results/10.cpm
    Each test is warmed-up 10 times
    Each test is repeated 50 times
    Time Sun Jun 14 15:33:51 2015

    Tag: 10
    Configuration:
    Compiler: clang-3.5.0
    Operating System: Linux x86_64 3.16.5-gentoo


 simple_a(10) : mean: 52.5us (52.3us,52.7us) stddev: 675ns min: 48.5us max: 53.3us througput: 190KEs
 simple_a(100) : mean: 50.1us (48us,52.2us) stddev: 7.53us min: 7.61us max: 52.3us througput: 2MEs
 simple_a(1000) : mean: 52.7us (52.7us,52.7us) stddev: 48.7ns min: 52.7us max: 53us througput: 19MEs
 simple_a(10000) : mean: 62.6us (62.6us,62.7us) stddev: 124ns min: 62.6us max: 63.5us througput: 160MEs
 simple_a(100000) : mean: 161us (159us,162us) stddev: 5.41us min: 132us max: 163us througput: 622MEs
 simple_a(1000000) : mean: 1.16ms (1.16ms,1.17ms) stddev: 7.66us min: 1.15ms max: 1.18ms througput: 859MEs

-----------------------------------------
|            gemm |       std |     mkl |
-----------------------------------------
|           10x10 | 51.7189us | 64.64ns |
|         100x100 | 52.4336us | 63.42ns |
|       1000x1000 | 56.0097us |  63.2ns |
|     10000x10000 | 95.6123us | 63.52ns |
|   100000x100000 | 493.795us | 63.48ns |
| 1000000x1000000 | 4.46646ms |  63.8ns |
-----------------------------------------

The program will give you for each benchmark, the mean duration (with confidence interval), the standard deviation of the samples, the min and max duration and an estimated throughput. The throughput is simply using the size and the mean duration. Each section is directly compared with an array-like output. Once the benchmark is run, a JSON report will be generated inside the output folder.

Continuous Monitoring

Once you have run the benchmark, you can use the CPM program to generate the web reports. It will generate:

  • 1 performance graph for each benchmark and section

  • 1 graph comparing the performances over time of your benchmark sections if you have run the benchmark several time

  • 1 graph comparing different compiler if you have compiled your program with different compiler

  • 1 graph comparing different configuration if you have run the benchmark with different configuration

  • 1 table summary for each benchmark / section

First you have to build and install the CPM program (you can have a look at the Readme for more informations.

Several options are available:

Usage:
  cpm [OPTION...]  results_folder

      --time-sizes             Display multiple sizes in the time graphs
  -t, --theme arg              Theme name [raw,bootstrap,boostrap-tabs] (default:bootstrap)
  -c, --hctheme theme_name     Highcharts Theme name [std,dark_unica] (default:dark_unica)
  -o, --output output_folder   Output folder (default:reports)
      --input arg              Input results
  -s, --sort-by-tag            Sort by tag instaed of time
  -p, --pages                  General several HTML pages (one per bench/section)
  -d, --disable-time           Disable time graphs
      --disable-compiler       Disable compiler graphs
      --disable-configuration  Disable configuration graphs
      --disable-summary        Disable summary table
  -h, --help                   Print help

There are 3 themes:

  • bootstrap: The default theme, using Bootstrap to make a responsive interface.

  • bootstrap-tabs: Similar to the bootstrap theme except that only is displayed at the same time for each benchmark, with tabs.

  • raw : A very basic theme, only using Highcharts library for graphs. It is very minimalistic

For instance, here are how the reports are generated for the ETL benchmark:

cpm -p -s -t bootstrap -c dark_unica -o reports results

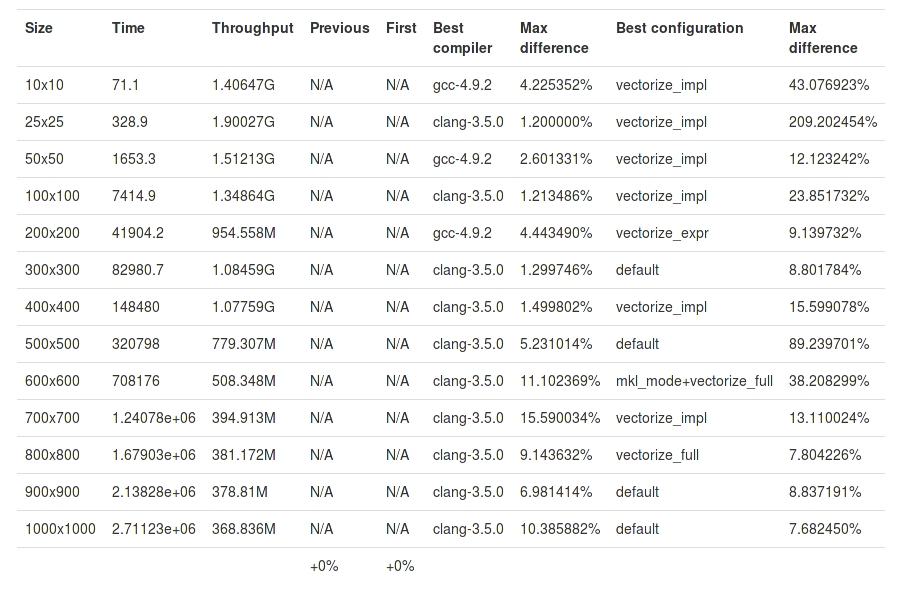
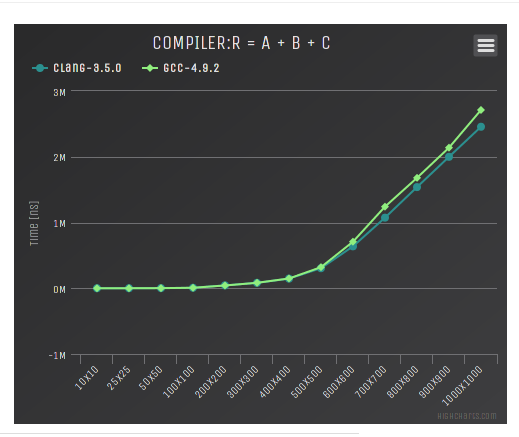
Here is the graph generated for the "R = A + B + C" benchmark and different compilers:

/images/cpm_etl_compiler.png

and its summary:

/images/cpm_etl_summary.png

Here is the graph for a 2D convolution with ETL:

/images/cpm_etl_section.png

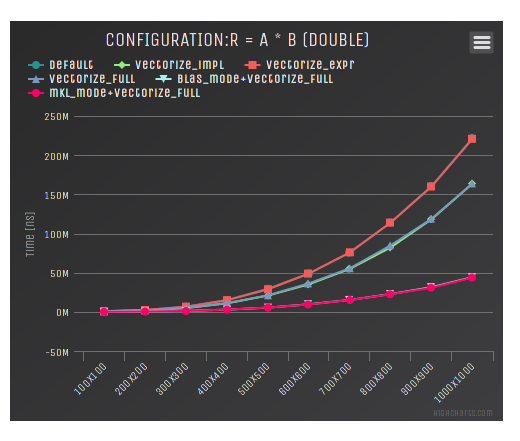
And the graph for different configurations of ETL and the dense matrix matrix multiplication:

/images/cpm_etl_configuration.png

Conclusion and Future Work

Although CPM is already working, there are several things that could be done to improve it further:

  • The generated web report could benefit from a global summary.

  • The throughput evaluation should be evaluated more carefully.

  • The tool should automatically evaluate the number of times that each tests should be run to have a good result instead of global warmup and repeat constants.

  • A better bootstrapping procedure should be used to determine the quality of the results and compute the confidence intervals.

  • The performances of the website with lots of graphs should be improved.

  • Make CPM more general-purpose to support larger needs.

Here it is, I have summed most of the features of the CPM Continuous Performance Analysis tool. I hope that it will be helpful to some of you as well.

If you have other ideas or want to contribute something to the project, you can directly open an issue or a pull request on Github. Or contact me via this site or Github.

C++17 Fold Expressions

Variadic Templates

C++11 introduced variadic template to the languages. This new feature allows to write template functions and classes taking an arbitrary number of template parameters. This a feature I really like and I already used it quite a lot in my different libraries. Here is a very simple example computing the sum of the parameters:

auto old_sum(){
    return 0;
}

template<typename T1, typename... T>
auto old_sum(T1 s, T... ts){
    return s + old_sum(ts...);
}

What can be seen here is a typical use of variadic templates. Almost all the time, is is necessary to use recursion and several functions to unpack the parameters and process them. There is only one way to unpack the arguments, by using the ... operator that simply put comma between arguments. Even if it works well, it is a bit heavy on the code. This will likely be completely optimized to a series of addition by the compiler, but it may still happen in more complicated functions that this is not done. Moreover, the intent is not always clear with that.

That is why C++17 introduced an extension for the variadic template, fold expressions.

Fold expressions

Fold expressions are a new way to unpack variadic parameters with operators. For now, only Clang 3.6 supports C++17 fold expression, with the -std=c++1z flag. That is the compiler I used to validate the examples of this post.

The syntax is bit disturbing at first but quite logical once you get used to it:

( pack op ... )             //(1)
( ... op pack )             //(2)
( pack op ... op init )     //(3)
( init op ... op pack )     //(4)

Where pack is an unexpanded parameter pack, op an operator and init a value. The version (1) is a right fold that is expanded like (P1 op (P2 op (P3 ... (PN-1 op PN)))). The version (2) is a left fold where the expansion is taken from the left. The (3) and (4) versions are almost the same except for an init value. Only some operators (+,*,&,|,&&,||, ,) have defined init values and can be used with the versions (1) and (2). The other operators can only be used with an init value.

For instance, here is how we could write the sum functions with fold expressions:

template<typename... T>
auto fold_sum_1(T... s){
    return (... + s);
}

I personally think it is much better, it clearly states our intent and does not need recursion. By default, the init value used for addition is 0, but you can change it:

template<typename... T>
auto fold_sum_2(T... s){
    return (1 + ... + s);
}

This will yield the sum of the elements plus one.

This can be also very practical to print some elements for instance:

template<typename ...Args>
void print_1(Args&&... args) {
    (std::cout << ... << args) << '\n';
}

And this can even be used when doing Template Metaprogramming, for instance here is a TMP version of the and operator:

template<bool... B>
struct fold_and : std::integral_constant<bool, (B && ...)> {};

Conclusion

C++17 fold expressions are a really nice additions to the language that makes working with variadic templates much easier. This already makes me wish for C++17 release :)

The source code for the examples are available on Github: https://github.com/wichtounet/articles/blob/master/src/fold_expressions.cpp

Sonar C++ Community Plugin Review

It's been a long time since I have written on this blog. I have had quite a lot of work between my Ph.D and my teaching. I have several projects going on, I'll try to write updates on them later on.

Some time ago, I wrote an article about the official C++ plugin for Sonar <http://baptiste-wicht.com/posts/2014/10/sonarqube-inspections-for-cpp-projects.html>. I was quite disappointed by the quality of a plugin. I was expecting more from an expensive official plugin.

There is an open-source alternative to the commercial plugin: sonar-cxx-plugin <https://github.com/wenns/sonar-cxx>. I already tested it quite some time ago (a development version of the 0.9.1 version) and the results were quite bad. I'm using C++11 and C++14 in almost all of my projects and the support was quite bad at that time. Happily, this support has now gotten much better :) In this article, I'll talk about the version 0.9.2.

Usage

The usage of this plugin is very easy, you don't need any complicated build wrapping techniques for it. You simply need to complete a sonar-project.properties file:

sonar.projectKey=etl
sonar.projectName=etl
sonar.projectVersion=1.0

sonar.sourceEncoding=UTF-8
sonar.sources=include,test,workbench
sonar.language=c++

After that, you simply have to use sonar-runner as for any other Sonar project:

sonar-runner

And the analysis will be run.

I haven't had any issues with the analysis. However, the plugin is not yet completely C++11/C++14 compatible, therefore I'm encountering a lot of parser errors during the analysis. When an error is encountered by the parser, the line is skipped and the parser goes to the next line. This means that the analysis of the line is incomplete, which may lead to false positives or to missing issues. This comes from that sonar-cxx uses its own parser, which is to on par with clang-compatible parsers for instance.

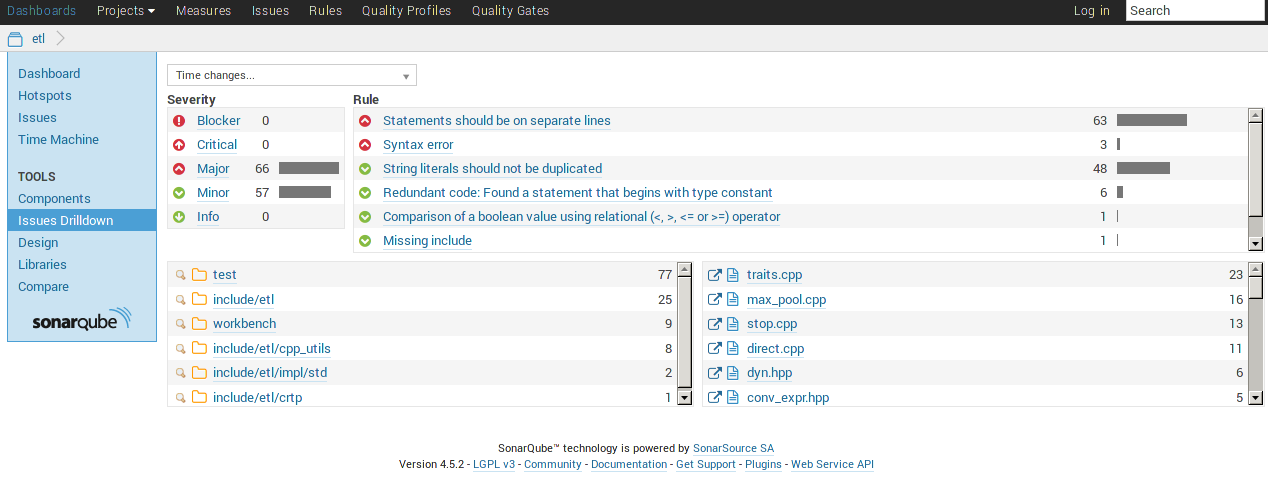
Here is the Sonar summary of my ETL project:

/images/sonar_summary.png

Inspections

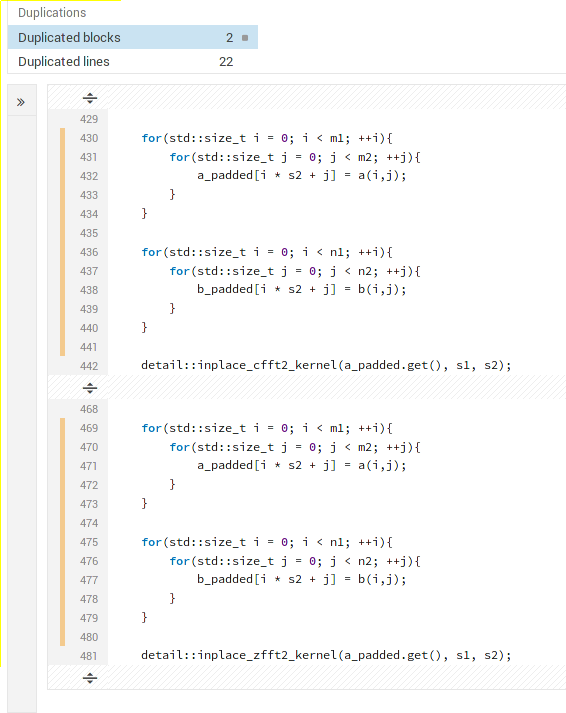
This plugin supports some inspections on itself. Nevertheless, you have to enable since it seems that most of them are disable by default. Code duplication is also automatically generated during the analysis:

/images/sonar_duplicated.png

The philosophy of this project is not to develop all inspections, but to integrate with other tools. For instance, cppcheck is already supported and the integration works perfectly. Here are the tools that sonar-cxx supports for quality analysis:

  • cppcheck

  • valgrind

  • Vera++

  • RATS

  • PC-Lint

I have only tested cppcheck for now. I plan to use valgrind running on my tests in the future. I don't plan to use the others.

It should also be noted that the plugin supports compiler warnings coming from G++ and Visual Studio. I don't use this since I compile all my projects with -Werror.

The biggest absent here is Clang, there is no support for its warnings, its static-analyzer or its advanced clang-tidy tool. If clang-tidy support does not come in the near future, I'm planning to try to add it myself, provided I find some time.

You can have to some inspections on one of my project:

/images/sonar_inspections.png

As with any Sonar projects, you have access to the Hotsposts view:

/images/sonar_hotspots.png

Unit Tests Integration

I have been able to integrate my unit tests results inside Sonar. The plugin expects JUnit compatible format. Several of C++ unit test libraries already generates compatible format. In my case, I used Catch and it worked very well.

What is even more interesting is the support for code coverage. You have to run your coverage-enabled executable and then use gcovr to generate an XML file that the plugin can read.

This support works quite well. The only thing I haven't been able to make work is the execution time computation of the unit tests, but that is not something I really care about.

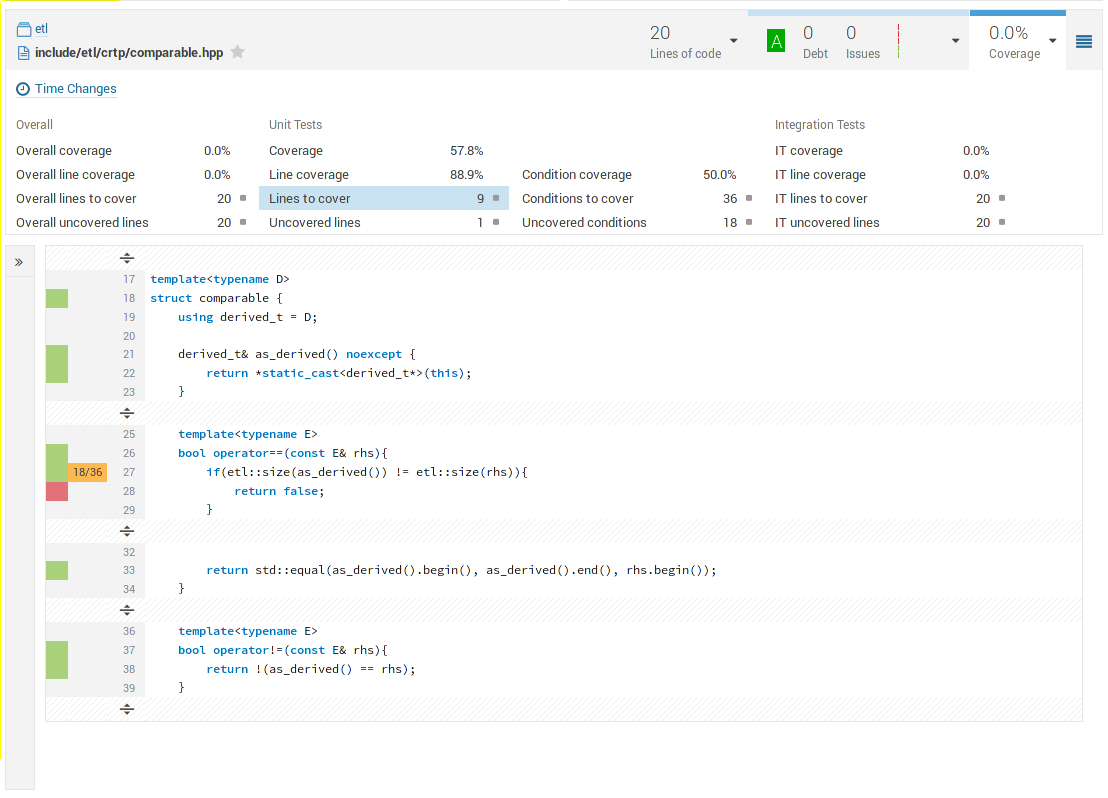
Here are the coverage results for one of my files:

/images/sonar_coverage.png

Conclusion

Pros

  • Support of a lot of external tools

  • Very easy to use

  • Duplicated code analysis

  • Very good code coverage analysis integration

Cons

  • Too few integrated inspections

  • Limited parsing of C++

  • Not fully compatible with C++11/C++14

  • False positives

  • Not enough love for clang (compiler warnings, clang-tidy, tooling, static-analyzer, ...)

The provided metrics are really good, the usage is quite simple and this plugin supports some external tools adding interesting inspections. Even if this plugin is not perfect, it is a very good way to do Continuous Quality Analysis of your C++ projects. I personally find it superior to the official plugin. The usage is more simple (no build-wrapper that does not work), it supports more external tools and supports JUnit reports. On the other hand, it has much less integrated inspections and rely more on external tools. Both have problems with modern C++ features.

What I would really like in this plugin is the support of the clang-tidy analyzer (and other Clang analysis tools) and also complete C++11/C++14 support. I honestly think that the only way to fix the latter is to switch to Clang parsing with libtooling rather than developing an in-house parser, but that is not up to me.

I will definitely continue to use this plugin to generate metrics for my C++ projects. I use it with Jenkins which launch the analysis every time I push to one my git repositories. This plugin definitely shows promises.

How to speed up RAID (5-6) growing with mdadm ?

Yesterday, I added my 11th disk to my RAID 6 array. As the last time it took my more than 20 hours, I spent some time investigating how to speed things up and this post contains some tips on how to achieve good grow performances. With these tips, I have been able to reach a speed of about 55K in average during reshape. It did finish in about 13 hours.

First, take into account that some of these tips may depend on your configuration. In my case, this server is only used for this RAID, so I don't care if the CPU is used a lot during rebuild or if other processes are suffering from the load. This may not be the case with your configuration. Moreover, I speak only of hard disks, if you use SSD RAID, there are probably better way of tuning the rebuild (or perhaps it is fast enough). Finally, you have know that a RAID reshape is going to be slow, there is no way you'll grow a 10+ RAID array in one hour. G

In the examples, I use /dev/md0 as the raid array, you'll have to change this to your array name.

The first 3 tips can be used even after the rebuild has started and you should see the differences in real-time. But, these 3 tips will also be erased after each reboot.

Increase speed limits

The easiest thing to do is to increase the system speed limits on raid. You can see the current limits on your system by using these commands:

sysctl dev.raid.speed_limit_min
sysctl dev.raid.speed_limit_max

These values are set in Kibibytes per second (KiB/s).

You can put them to high values:

sysctl -w dev.raid.speed_limit_min=100000
sysctl -w dev.raid.speed_limit_max=500000

At least with these values, you won't be limited by the system.

Increase stripe cache size

By allowing the array to use more memory for its stripe cache, you may improve the performances. In some cases, it can improve performances by up to 6 times. By default, the size of the stripe cache is 256, in pages. By default, Linux uses 4096B pages. If you use 256 pages for the stripe cache and you have 10 disks, the cache would use 10*256*4096=10MiB of RAM. In my case, I have increased it to 4096:

echo 4096 > /sys/block/md0/md/stripe_cache_size

The maximum value is 32768. If you have many disks, this may well take all your available memory. I don't think values higher than 4096 will improve performance, but feel free to try it ;)

Increase read-ahead

If configured too low, the read-ahead of your array may make things slower.

You can see get the current read-ahead value with this command:

blockdev --getra /dev/md0

These values are in 512B sector. You can set it to 32MB to be sure:

blockdev --setra 65536 /dev/md0

This can improve the performances, but don't expect this to be a game-changer unless it was configured really low at the first place.

Tip: Reshape stuck at 0K/s

If reshape starts, but with a speed of 0K/s, you can try to issue this simple command:

echo max > /sys/block/md0/md/sync_max

And the reshape should start directly at your maximum speed.

The solution is the same if you are growing any type of RAID level with parity (RAID5, RAID6, ...).

Bonus: Speed up standard resync with a write-intent bitmap

Although it won't speed up the growing of your array, this is something that you should do after the rebuild has finished. Write-intent bitmaps is a kind of map of what needs to be resynced. This is of great help in several cases:

  • When the computer crash (power shutdown for instance)

  • If a disk is disconnected, then reconnected.

In these case, it may totally avoid the need of a rebuild which is great in my opinion. Moreover, it does not take any space on the array since it uses space that is not usable by the array.

Here is how to enable it:

mdadm --grow --bitmap=internal /dev/md0

However, it may cause some write performance degradation. In my case, I haven't seen any noticeable degradation, but if it is the case, you may want to disable it:

mdadm --grow --bitmap=none /dev/md0

Bonus: Monitor rebuild process

If you want to monitor the build process, you can use the watch command:

watch cat /proc/mdstat

With that you'll see the rebuild going in real-time.

You can also monitor the I/O statistics:

watch iostat -k 1 2

Bonus: How to grow a RAID 5-6 array

As a sidenote, this section indicates how to grow an array. If you want to add the disk /dev/sdl to the array /dev/md0, you'll first have to add it:

mdadm --add /dev/md0 /dev/sdl

This will add the disk as a spare disk. If you had 5 disks before, you'll want to grow it to 6:

mdadm --grow --backup-file=/root/grow_md0_backup_file --raid-devices=6 /dev/md0

The backup file must be on another disk of course. The backup file is optional but improves the chance of success if you have a power shutdown or another form of unexpected shutdown. If you know what you're doing, you can grow it without backup-file:

mdadm --grow --raid-devices=6 /dev/md0

This command will return almost instantly, but the actual reshape won't likely be finished for hours (maybe days).

Once the rebuild is finished, you'll still have to extend the partitions with resize2fs. If you use LVM on top of the array, you'll have to resize the Physical Volume (PV) first:

pvresize /dev/md0

and then extend the Logical Volume (s) (LV). For instance, if you want to add 1T to a LV named /dev/vgraid/work:

vgextend -r -L+1T /dev/vgraid/work

The -r option will automatically resize the underlying filesystem. Otherwise, you'd still have to resize it with resize2fs.

Conclusion

These are the changes I have found that speed up the reshape process. There are others that you may test in your case. For instance, in some systems disabling NCQ on each disk may help.

I hope that these tips will help you doing fast rebuilds in your RAID array :)

Named Optional Template parameters to configure a class at compile-time

In this post, I'll describe a technique that can be used to configure a class at compile-time when there are multiple, optional parameters, with default values to this class. I used this technique in my dll project to configure each instance of Restricted Boltzmann Machine.

The technique presented here will only work with C++11 because of the need for variadic template. This could be emulated without them by fixing a maximum number of parameters, but I won't go into this in this post.

The problem

For this post, we'll take the case of a single class, let's call it configurable. This class has several parameters:

  • A of type int

  • B of type char

  • C of an enum type

  • D of type bool

  • E is a type

  • F is a template type

This class could simply be written as such:

enum class type {
    AAA,
    BBB,
    CCC
};

template<int T_A = 1, char T_B = 'b', type T_C = type::BBB, bool T_D = false, typename T_E = watcher_1, template<typename> class T_F = trainer_1>
struct configurable_v1 {
    static constexpr const int A = T_A;
    static constexpr const char B = T_B;
    static constexpr const type C = T_C;
    static constexpr const bool D = T_D;

    using E = T_E;

    template<typename C>
    using F = T_F<C>;

    //Something useful
};

and used simply as well:

using configurable_v1_t = configurable_v1<100, 'z', type::CCC, true, watcher_2, trainer_2>;

This works well and nothing is wrong with this code. However, if you want all default values but the last one, you have to specify each and every one of the previous template parameters as well. The first disadvantage is that it is verbose and tedious. Secondly, instead of using directly the default values implicitly, you have specified them. This means that if the default values are changed by the library authors or even by you in the configurable_v1 class, either all the usages will be out of sync or you'll have to update them. And again, this is not practical. Moreover, if the author of the configurable_v1 template adds new template parameters before the last, you'll have to update all the instantiation points as well.

Moreover, here we only have 6 parameters, if you have more, the problem becomes even worse.

The solution

What can we do to improve over these problems ? We are going to use variadic template parameters in the configurable class and use simple classes for each possible parameters. This will be done in the configurable_v2 class. At the end you could use the class as such:

using configurable_v2_t1 = configurable_v2<a<100>, b<'z'>, c<type::CCC>, d, e<watcher_2>, f<trainer_2>>;
using configurable_v2_t2 = configurable_v2<f<trainer_2>>;

You can note, that on the second line, we only specified the value for the last parameter without specifiyng any other value :) This is also much more flexible since the order of the parameters has absolutely no impact. Here, for the sake of the example, the parameters are badly named, so it is not very clear what this do, but in practice, you can give better names to the parameters and make the types more clear. Here is an example from my dll library:

using rbm_t = dll::rbm_desc<
    28 * 28, 200,
   dll::batch_size<25>,
   dll::momentum,
   dll::weight_decay<>,
   dll::visible<dll::unit_type::GAUSSIAN>,
   dll::shuffle,
   dll::weight_type<float>
>::rbm_t;

rbm_desc is class that is configurable with this technique, expect that the first two parameters are mandatory and not named. I personally thinks that this is quite clear, but of course I may be biased ;)

So let's code!

The class declaration is quite simple:

template<typename... Args>
struct configurable_v2 {
    //Coming
}

We will now have to exact values and types from Args in order to get the 4 values, the type and the template type out of Args.

Extracting integral values

We will start with the parameter a that holds a value of type int with a default value of 1. Here is one way of writing it:

struct a_id;

template<int value>
struct a : std::integral_constant<int, value> {
    using type_id = a_id;
};

So, a is simply an integral constant with another typedef type_id. Why do we need this id ? Because a is a type template, we cannot use std::is_same to compare it with other types, since its value is part of the type. If we had only int values, we could easily write a traits that indicates if the type is a specialization of a, but since will have several types, this would be a real pain to do and we would need such a traits for each possible type. Here the simple way to go is to add inner identifiers to each types.

We can now write a struct to extract the int value for a from Args. Args is a list of types in the form parameter_name<parameter_value>... . We have to find a specialization of a inside this list. If such a specialization is present, we'll take its integral constant value as the value for a, otherwise, we'll take the default values. Here is what we want to do:

template<typename... Args>
struct configurable_v2 {
    static constexpr const int A = get_value_int<a<1>, Args...>::value;

    //Coming
}

We specify directly into the class the default values (1) for a and we use the class get_value_int to get its value from the variadic type list. Here is the implementation:

template<typename D, typename... Args>
struct get_value_int;

template<typename D>
struct get_value_int<D> : std::integral_constant<int, D::value> {};

template<typename D, typename T2, typename... Args>
struct get_value_int<D, T2, Args...> {
    template<typename D2, typename T22, typename Enable = void>
    struct impl
        : std::integral_constant<int, get_value_int<D, Args...>::value> {};

    template<typename D2, typename T22>
    struct impl <D2, T22, std::enable_if_t<std::is_same<typename D2::type_id, typename T22::type_id>::value>>
        : std::integral_constant<int, T22::value> {};

    static constexpr const int value = impl<D, T2>::value;
};

If you are not really familiar with Template Metaprogramming (TMP), this may seems very unfamiliar or even barbaric, but I'll try to explain into details what is going on here :)

get_value_int is a template that takes a type D, representing the parameter we want to extract and its default, and the list of args. It has a first partial specialization for the case when Args is empty. In which case, its value is simply the value inside D (the default value). The second partial specialization handles the case when there are at least one type (T2) inside the list of args. This separation in two partial specialization is the standard way to works with variadic template parameters. This specialization is more complicated than the first one since it uses an inner class to get the value out of the list. The inner class (impl) takes the parameter type (D2), the type that is present in the list (T22) and a special parameter (Enable) that is used for SFINAE. If you're not familiar with SFINAE (you're probably not reading this article...), it is, put simply, a mean to activate or deactivate a template class or function based on its template parameters. Here, the partial specialization of impl is enabled if T22 and D2 have the same type_id, in which case, the value of T22 is taken as the return of impl. In the basic case, template recursion is used to continue iterating over the list of types. The fact that this has to be done into two template classes is because we cannot add a new template parameter to a partial template specialization even without a name. We cannot either add a simple Enable parameter to get_value_int, we cannot put before Args since then it would be necessary to give it a value in the code that uses it which is not practical neither a good practice.

We can now do the same for b that is of type char. Here is the parameter definition for b:

struct a_id;

template<int value>
struct a : std::integral_constant<int, value> {
    using type_id = a_id;
};

This code is highly similar to the code for a, so we can generalize a bit this with a base class:

struct a_id;
struct b_id;

template<typename ID, typename T, T value>
struct value_conf_t : std::integral_constant<T, value> {
    using type_id = ID;
};

template<int value>
struct a : value_conf_t<a_id, int, value> {};

template<char value>
struct b : value_conf_t<b_id, char, value> {};

This make the next parameters easier to describe and avoids small mistakes.

Making get_value_char could be achieved by replacing each int by char but this would create a lot of duplicated code. So instead of writing get_value_char, we will replace get_value_int with a generic get_value that is able to extract any integral value type:

template<typename D, typename... Args>
struct get_value;

template<typename D, typename T2, typename... Args>
struct get_value<D, T2, Args...> {
    template<typename D2, typename T22, typename Enable = void>
    struct impl
        : std::integral_constant<decltype(D::value), get_value<D, Args...>::value> {};

    template<typename D2, typename T22>
    struct impl <D2, T22, std::enable_if_t<std::is_same<typename D2::type_id, typename T22::type_id>::value>>
        : std::integral_constant<decltype(D::value), T22::value> {};

    static constexpr const auto value = impl<D, T2>::value;
};

template<typename D>
struct get_value<D> : std::integral_constant<decltype(D::value), D::value> {};

This code is almost the same as get_value_int except that the return type is deduced from the value of the parameters. I used decltype and auto to automatically gets the correct types for the values. This is the only thing that changed.

With that we are ready the parameter c as well:

template<typename... Args>
struct configurable_v2 {
    static constexpr const auto A = get_value<a<1>, Args...>::value;
    static constexpr const auto B = get_value<b<'b'>, Args...>::value;
    static constexpr const auto C = get_value<c<type::BBB>, Args...>::value;

    //Coming
};

Extracting boolean flags

The parameter d is a bit different since it is a boolean flag that puts directly the value to true. We could simply make a integral boolean value (and this would work), but here I needed a boolean flag for activating a feature deactivated by default.

Defining the parameter is easy:

template<typename ID>
struct basic_conf_t {
    using type_id = ID;
};

struct d_id;
struct d : basic_conf_t<d_id> {};

It is similar to the other parameters, except that it has no value. You'll see later in this article why type_id is necessary here.

To check if the flag is present, we'll write the is_present template:

template<typename T1, typename... Args>
struct is_present;

template<typename T1, typename T2, typename... Args>
struct is_present<T1, T2, Args...> : std::integral_constant<bool, std::is_same<T1, T2>::value || is_present<T1, Args...>::value> {};

template<typename T1>
struct is_present<T1> : std::false_type {};

This time, the template is much easier. We simply need to iterate through all the types from the variadic template parameter and test if the type is present somewhere. Again, you can see that we used two partial template specialization to handle the different cases.

With this we can now get the value for D:

template<typename... Args>
struct configurable_v2 {
    static constexpr const auto A = get_value<a<1>, Args...>::value;
    static constexpr const auto B = get_value<b<'b'>, Args...>::value;
    static constexpr const auto C = get_value<c<type::BBB>, Args...>::value;
    static constexpr const auto D = is_present<d, Args...>::value;

    //Coming
};

Extracting types

The next parameter does not hold a value, but a type. It won't be an integral constant, but it will define a typedef value with the configured type:

template<typename ID, typename T>
struct type_conf_t {
    using type_id = ID;
    using value = T;
};

template<typename T>
struct e : type_conf_t<e_id, T> {};

You may think that the extracting will be very different, but in fact it very similar. And here it is:

template<typename D, typename... Args>
struct get_type;

template<typename D, typename T2, typename... Args>
struct get_type<D, T2, Args...> {
    template<typename D2, typename T22, typename Enable = void>
    struct impl {
        using value = typename get_type<D, Args...>::value;
    };

    template<typename D2, typename T22>
    struct impl <D2, T22, std::enable_if_t<std::is_same<typename D2::type_id, typename T22::type_id>::value>> {
        using value = typename T22::value;
    };

    using value = typename impl<D, T2>::value;
};

template<typename D>
struct get_type<D> {
    using value = typename D::value;
};

Every integral constant has been replaced with alias declaration (with using) and we need to use the typename disambiguator in from of X::value, but that's it :) We could probably have created an integral_type struct to simplify it a bit further, but I don't think that would change a lot. The code of the class follows the same changes:

template<typename... Args>
struct configurable_v2 {
    static constexpr const auto A = get_value<a<1>, Args...>::value;
    static constexpr const auto B = get_value<b<'b'>, Args...>::value;
    static constexpr const auto C = get_value<c<type::BBB>, Args...>::value;
    static constexpr const auto D = is_present<d, Args...>::value;

    using E = typename get_type<e<watcher_1>, Args...>::value;

    //Coming
};

Extracting template types

The last parameter is not a type but a template, so there are some slight changes necessary to extract them. First, let's take a look at the parameter definition:

template<typename ID, template<typename> class T>
struct template_type_conf_t {
    using type_id = ID;

    template<typename C>
    using value = T<C>;
};

template<template<typename> class T>
struct f : template_type_conf_t<f_id, T> {};

Here instead of taking a simple type, we take a type template with one template parameter. This design has a great limitations. It won't be possible to use it for template that takes more than one template parameter. You have to create an extract template for each possible combination that you want to handle. In my case, I only had the case of a template with one template parameter, but if you have several combination, you'll have to write more code. It is quite simple code, since the adaptations are minor, but it is still tedious. Here is the get_template_type template:

template<typename D, typename... Args>
struct get_template_type;

template<typename D, typename T2, typename... Args>
struct get_template_type<D, T2, Args...> {
    template<typename D2, typename T22, typename Enable = void>
    struct impl {
        template<typename C>
        using value = typename get_template_type<D, Args...>::template value<C>;
    };

    template<typename D2, typename T22>
    struct impl <D2, T22, std::enable_if_t<std::is_same<typename D2::type_id, typename T22::type_id>::value>> {
        template<typename C>
        using value = typename T22::template value<C>;
    };

    template<typename C>
    using value = typename impl<D, T2>::template value<C>;
};

template<typename D>
struct get_template_type<D> {
    template<typename C>
    using value = typename D::template value<C>;
};

Again, there are only few changes. Every previous alias declaration is now a template alias declaration and we have to use template disambiguator in front of value. We now have the final piece to write the configurable_v2 class:

template<typename... Args>
struct configurable_v2 {
    static constexpr const auto A = get_value<a<1>, Args...>::value;
    static constexpr const auto B = get_value<b<'b'>, Args...>::value;
    static constexpr const auto C = get_value<c<type::BBB>, Args...>::value;
    static constexpr const auto D = is_present<d, Args...>::value;

    using E = typename get_type<e<watcher_1>, Args...>::value;

    template<typename C>
    using F = typename get_template_type<f<trainer_1>, Args...>::template value<C>;
};

Validating parameter rules

If you have more parameters and several classes that are configured in this manner, the user may use a wrong parameter in the list. In that case, nothing will happen, the parameter will simply be ignored. Sometimes, this behavior is acceptable, but sometimes it is better to make the code invalid. That's what we are going to do here by specifying a list of valid parameters and using static_assert to ensure this condition.

Here is the assertion:

template<typename... Args>
struct configurable_v2 {
    static constexpr const auto A = get_value<a<1>, Args...>::value;
    static constexpr const auto B = get_value<b<'b'>, Args...>::value;
    static constexpr const auto C = get_value<c<type::BBB>, Args...>::value;
    static constexpr const auto D = is_present<d, Args...>::value;

    using E = typename get_type<e<watcher_1>, Args...>::value;

    template<typename C>
    using F = typename get_template_type<f<trainer_1>, Args...>::template value<C>;

    static_assert(
        is_valid<tmp_list<a_id, b_id, c_id, d_id, e_id, f_id>, Args...>::value,
        "Invalid parameters type");

    //Something useful
};

Since the is_valid traits needs two variadic list of parameters, we have to encapsulate list of valid types in another structure (tmp_list) to separate the two sets. Here is the implementation of the validation:

template<typename... Valid>
struct tmp_list {
    template<typename T>
    struct contains : std::integral_constant<bool, is_present<typename T::type_id, Valid...>::value> {};
};

template<typename L, typename... Args>
struct is_valid;

template<typename L, typename T1, typename... Args>
struct is_valid <L, T1, Args...> : std::integral_constant<bool, L::template contains<T1>::value && is_valid<L, Args...>::value> {};

template<typename L>
struct is_valid <L> : std::true_type {};

The struct tmp_list has a single inner class (contains) that test if a given type is present in the list. For this, we reuse the is_present template that we created when extracting boolean flag. The is_valid template simply test that each parameter is present in the tmp_list.

Validation could also be made so that no parameters could be present twice, but I will put that aside for now.

Conclusion

Here it is :)

We now have a set of template that allow us to configure a class at compile-time with named, optional, template parameters, with default and in any order. I personally thinks that this is a great way to configure a class at compile-time and it is also another proof of the power of C++. If you think that the code is complicated, don't forget that this is only the library code, the client code on contrary is at least as clear as the original version and even has several advantages.

I hope that this article interested you and that you learned something.

The code of this article is available on Github: https://github.com/wichtounet/articles/blob/master/src/named_template_par/configurable.cpp It has been tested on Clang 3.5 and GCC 4.9.1.

SonarQube inspections for C++ projects

Back in the days, when I used to develop in Java (I hadn't discovered the wonders of C++ :) ), I used Sonar a lot for my projects. Sonar is a great tool for quality inspections of a project. Sonar has been made for Java and is mostly free and opensource (some plugins are commercial) to inspect Java projects. Unfortunately, this is not the case for C++ inspection. Indeed, the C++ plugin cost 7000 euros (more than 8500$). As I mostly work on C++ for opensource and school projects, I'm definitely not able to buy it. I wanted for a long time to test the commercial C++ plugin. For this article, sonarsource provided me with a short (very short) time license for the C++ plugin.

There is also another option for C++ which is the C++ community plugin: https://github.com/wenns/sonar-cxx. I have tested it some time ago, but I was not satisfied with it, I had several errors and had to use a dev version to make it work a bit. Moreover, the C++11 support is inexistant and management of parsing error is not really satisfying. But maybe it is good for you. This article will only focus on the commercial plugin.

Usage

For each project that you want to analyze with Sonar, you have to create a sonar-project.properties files describing some basic information about your project.

Then, there are two ways to inspect a C++ project. The first one and recommended one is to use the build-wrapper executable. It is a sub project that you have to download and install alongside Sonar. It works by wrapping the commands to your build systems:

build-wrapper make all

and this should generate enough informations for not having to fill each field in the project configuration. The, you have to use the sonar-runner program to upload to Sonar.

I tried it on several projects and there seems to be a problem with the includes. It didn't include the header files in the Sonar inspections.

I finally ended up using manual configuration of the Sonar project and the header files were included correctly. However, you normally have to include many information in the configuration including all macros for instance. For now, I haven't bothered generating them and it doesn't seem to impact too much the results.

When I look in the log, it seems that there are still a lot of parsing errors. They seem mostly related to some compiler macro, especially the __has_feature__ macro of clang. This is the same problem with the build-wrapper. When I don't use the build-wrapper I also have other problems with macros for unit testing.

I also have other errors coming during the inspection, for instance:

error directive: This file requires compiler and library support for the ISO C++
2011 standard. This support is currently experimental, and must be enabled with
the -std=c++11 or -std=gnu++11 compiler options

I think it comes from the fact that I compile with std=c++1y and that Sonar does not support C++14.

Inspections

Here is the results of inspection on my ETL project:

/images/etl_dashboard.png

I really like the web interface of Sonar, it really sums well all the information and the various plugins play quite nice with each other. Moreover, when you check issues, you can see directly the source code very clearly. I really think this is the strong point of Sonar.

Here is the Hotspots view for instance:

/images/etl_dashboard.png

Or the Time Machine view:

/images/etl_dashboard.png

The issues that are reported by Sonar are quite good. On this project there is a lot of them related to naming conventions because I don't follow the conventions configured by default. However, you can easily configure the inspections to give your own naming regex or simple enable/disable some inspections.

There are some good inspections:

  • Some missing explicit keyword

  • Some commented block of code that can be removed

  • An if-elseif construct that should have had a else

  • Files with too high complexity

However, there are also some important false positives. For instance:

/images/etl_false_positive_1.png

In here, there are no reasons to output this issue since the operator is deleted. It proves that the C++11 support is rather incomplete. I have other false positives of the same kind for = default operators and constructors. Here is another example:

/images/etl_false_positive_2.png

In this case, the varadic template support is mixed with the old ellipsis notation, making it again a lack of C++11 support. There are also other false positives for instance because of lambdas, but all of them were related to C++11.

Various

If you don't think you have enough quality rules, you can also include the one from cppcheck simply by givin the path to cppcheck in sonar-project.properties. I think this is great, since it works all by itself. You can also create your own rule, but you'll have to use XPath for path.

If you want, you can also include unit test reports inside Sonar. I haven't tested this support since they only support cppunit test reports and I use only Catch for my unit tests. It would have been great if JUnit format would have been supported since many tool support it.

The last option that is supported by this plugin is the support of GCOV reports for code coverage information. I haven't been able to make it work, I had errors indicating that the source files were not found. I didn't figure this out. It may come from the fact that I used llvm and clang to generate the GCOV reports and not G++.

Conclusion

First, here are some pros and cons for the C++ support in SonarQube.

Pros

  • Good default inspections

  • Great web interface.

  • cppcheck very well integrated

  • Issues are easily configurable

Cons

  • C++11 support is incomplete and no C++14 support

  • build-wrapper support seems instable. It should be integrated directly into sonar.

  • Unit tests support is limited to cppunit

  • Haven't been able to make Code Coverage work

  • Macro support not flexible enough

  • Too expensive

  • Quite complicated

  • No support for other static analyzer than cppcheck

The general web interface feeling is quite good, everything looks great and the report are really useful. However, the usage of the tool does not feel very professional. I had a lot more problems than I expected to use it. I was also really disappointed by the C++11. The syntax seems to be supported but not the language feature in the inspections, making the C++11 support completely useless. This is weird since they cite C+11 as supported. Moreover, there not yet any C++14 support, but this is less dramatic. It is also a bit sad that they limit the import to cppcheck and no other static analyzers and the same stands for cppunit.

In my opinion, it is really an inferior product compared to the Java support. I was expecting more from a 8500 dollars product.

For now, I won't probably use it anymore on my projects since all of them use at least C++11, but I will probably retry Sonar for C++ in the future hoping that it will become as the Sonar Java support.

Linux tip: Force systemd networkd to wait for DHCP

Recently, I started using systemd-networkd to manage my network. It works really good for static address configuration, but I experienced some problem with DHCP. There is DHCP client support integrated into systemd, so I wanted to use this instead of using another DHCP client.

(If you are not familiar with systemd-networkd, you can have a look at the last section of this article)

The problem with that is that services are not waiting for DHCP leases to be obtained. Most services (sshd for instance), are waiting for network.target, however, network.target does not wait for the DHCP lease to be obtained from the server. If you configured ssh on a specific IP and this IP is obtained with DHCP, it will fail at startup. The same is true for NFS mounts for instance.

Force services to wait for the network to be configured

The solution is to make services like sshd waits for network-online.target instead of network.target. There is a simple way in systemd to override default service files. For a X.service, systemd will also parse all the /etc/systemd/X.service.d/*.conf files.

For instance, to make sshd be started only after DHCP is finished

/etc/systemd/system/sshd.service.d/network.conf:

[Unit]
Wants=network-online.target
After=network-online.target

However, by default, network-online.target does not wait for anything. You'll have to enable another service to make it work:

systemctl enable systemd-networkd-wait-online

And another note, at least on Gentoo, I had to use systemd-216 for it to work:

emerge -a "=sys-apps/systemd-216"

And after this, it worked like a charm at startup.

Force NFS mounts to wait for the network

There is no service file for nfs mounts, but there is a target remote-fs.target that groups the remote file systems mounts. You can override its configuration in the same as a service:

/etc/systemd/system/remote-fs.target.d/network.conf:

[Unit]
Wants=network-online.target
After=network-online.target

Conclusion

Here we are, I hope this tip will be useful to some of you ;)

Appendix. Configure interface with DHCP with systemd

To configure an interface with DHCP, you have to create a .network file in /etc/systemd/network/. For instance, here is my /etc/systemd/network/local.network file:

[Match]
Name=enp3s0

[Network]
DHCP=v4

and you have to enable systemd-networkd:

systemctl enable systemd-networkd

budgetwarrior 0.4.1 - Expense templates and year projection

I've been able to finish the version 0.4.1 of budgetwarrior before I though :)

Expense templates

The "most useful" new feature of this release is the ability to create template for expenses.

For that, you can give an extra parameter to budget expense add:

budget expense add template name

This will works exactly the same as creating a new expense expect that it will be saved as a template. Then, the next time you do:

budget expense add template name

A new expense will be created with the date of the day and with the name and amount saved into the template. You can create as many templates as you want as long as they have different names. You can see all the templates you have by using 'budget expense template'. A template can be deleted the exact same as an expense with 'budget expense delete id'.

I think this is very useful for expense that are made several times a month, for instance a coffee at your workplace. The price should not change a lot and it is faster to just use the template name rather than entering all the information again.

Year prediction

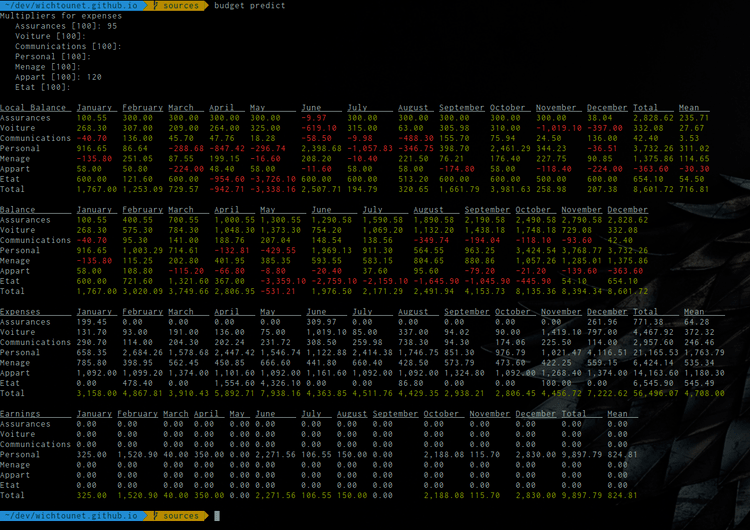
You can now see what would be next year if you changed a bit your expenses. For instance, how much would you still have at the end of the year if you increased your house expenses by 20% and reduced your insurances by 5% ?

The 'budget predict' can be used for that purpose. You can enter a multiplier for each account in your budget and a new year will be "predicted" based on the expenses of the current year multiplied by the specified multiplier:

/images/budget_041_prediction.png

I think that this feature can be very useful if you want to estimate how your budget will be for moving to a more expensive house or another insurance for instance.

Various changes

Two accounts can be merged together with the 'budget account migrate' command. This command will move all expenses from an account to another and adapt the amount of the target account. The source account will be deleted. This supports migrated accounts.

The 'budget wish list' command will now display the mean accuracy of your predictions.

You don't need Boost anymore for this project. The only remaining dependency is libuuid. I will perhaps remove it in the next version since the UUID are not used in the application for now.

The command 'budget gc' will clean the IDs of all your data in order to fill the holes and make all the IDs contiguous. It is mostly a feature for order-freaks like me who do not like to have holes in a sequence of identifiers ;)

There was a bug in the monthly report causing the scale to be displayed completely moved, it is now fixed:

https://raw.githubusercontent.com/wichtounet/budgetwarrior/develop/screenshots/budget_report.png

Installation

If you are on Gentoo, you can install it using layman:

layman -a wichtounet
emerge -a budgetwarrior

If you are on Arch Linux, you can use this AUR repository.

For other systems, you'll have to install from sources:

git clone git://github.com/wichtounet/budgetwarrior.git
cd budgetwarrior
make
sudo make install

Conclusion

If you are interested by the sources, you can download them on Github: budgetwarrior.

If you have a suggestion for a new features or you found a bug, please post an issue on Github, I'd be glad to help you.

If you have any comment, don't hesitate to contact me, either by letting a comment on this post or by email.