Use clang-tidy for static analysis and integration in Sonarqube

clang-tidy is an extensive linter C++. It provides a complete framework for analysis of C++ code. Some of the checks are very simple but some of them are very complete and most of the checks from the clang-static-analyzer are integrated into clang-tidy.

Usage

If you want to see the list of checks available on clang-tidy, you can use the list-checks options:

clang-tidy -list-checks

You can then choose the tests you are interested in and perform an analysis of your code. For, it is highly recommended to use a Clang compilation database, you can have a look at Bear to generate this compilation database if you don't have it yet. The usage of clang-tidy, is pretty simple, you set the list of checks you want, the header on which you want to have warnings reported and the list of source files to analyse:

clang-tidy -checks='*' -header-filter="^include" -p . src/*.cpp

You'll very likely see a lot of warnings. And you will very likely see a lot of false positives and a lot of warnings you don't agree too. For insance, there are a lot of warnings from the CPP Core Guidelines and the Google Guidelines that I don't follow in my coding. You should not take the complete list of tests as rule, you should devise your own list of what you really want to fix in your code. If you want to disable one check X, you can use the - operation:

clang-tidy -checks='*,-X' -header-filter="^include" -p . src/*.cpp

You can also enable the checks one by one or parts of them with *:

clang-tidy -checks='google-*' -header-filter="^include" -p . src/*.cpp

One problem with the clang-tidy tool is that it is utterly slow, especially if you enable the clang-static-analyzer checks. Moreover, if you use it like it is set before, it will only use one thread for the complete set of files. This may not be an issue on small projects, but this will definitely be a big issue for large projects and template-heavy code (like my ETL project). You could create an implicit target into your Makefile to use it on each file independently and then use the -j option of make to make them in parallel, but it not really practical.

For this, I just discovered that clang propose a Python script, run-clang-tidy.py that does it all for us! On Gentoo, it is installed at /usr/share/run-clang-tidy.py.

run-clang-tidy.py -checks='*' -header-filter="^include" -p . -j9

This will automatically run clang-tidy on each file from the compilation database and use 9 threads to perform the checks. This is definitely much faster. For me, this is the best way to run clang-tidy.

One small point I don't like is that the script always print the list of enabled checks. For, this I changed this line in the script:

invocation = [args.clang_tidy_binary, '-list-checks']

with:

invocation = [args.clang_tidy_binary]

This makes it more quiet.

One thing I didn't mention is that clang-tidy is able to fix some of the errors directly if you use the -fix option. Personally, I don't like this, but for a large code base and a carefully selected set of checks, this could be really useful. Note that not all the checks are automatically fixable by clang-tidy.

Results

I have run clang-tidy on my cpp-utils library and here some interesting results. I have not run all the checks, here is the command I used:

/usr/share/clang/run-clang-tidy.py -p . -header-filter '^include/cpp_utils' -checks='cert-*,cppcoreguidelines-*,google-*,llvm-*,misc-*,modernize-*,performance-*,readility-*,-cppcoreguidelines-pro-type-reinterpret-cast,-cppcoreguidelines-pro-bounds-pointer-arithmetic,-google-readability-namespace-comments,-llvm-namespace-comment,-llvm-include-order,-google-runtime-references' -j9 2>/dev/null  | /usr/bin/zgrep -v "^clang-tidy"

Let's go over some warnings I got:

include/cpp_utils/assert.hpp:91:103: warning: consider replacing 'long' with 'int64' [google-runtime-int]
void assertion_failed_msg(const CharT* expr, const char* msg, const char* function, const char* file, long line) {
                                                                                                      ^

I got this one several times. It is indeed more portable to use int64 rather than long.

include/cpp_utils/aligned_allocator.hpp:53:9: warning: use 'using' instead of 'typedef' [modernize-use-using]
        typedef aligned_allocator<U, A> other;
        ^

This one is part of the modernize checks, indicating that one should use using rather than a typedef and I completely agree.

include/cpp_utils/aligned_allocator.hpp:79:5: warning: use '= default' to define a trivial default constructor [modernize-use-default]
    aligned_allocator() {}
    ^
                        = default;

Another one from the modernize checks that I really like. This is completely true.

I don't agree that every constructor with one argument should be explicit, sometimes you want implicit conversion. Nevertheless, this particular case is very interesting since it is variadic, it can have one template argument and as thus it can be implicitly converted from anything, which is pretty bad I think.

test/array_wrapper.cpp:15:18: warning: C-style casts are discouraged; use reinterpret_cast [google-readability-casting]
    float* mem = (float*) malloc(sizeof(float) * 8);
                 ^
                 reinterpret_cast<float*>(         )

On this one, I completely agree, C-style casts should be avoided and much clearer C++ style casts should be preferred.

/home/wichtounet/dev/cpp_utils_test/include/cpp_utils/aligned_allocator.hpp:126:19: warning: thrown exception type is not nothrow copy constructible [cert-err60-cpp]
            throw std::length_error("aligned_allocator<T>::allocate() - Integer overflow.");
                  ^

This is one of the checks I don't agree with. Even though it makes sense to prefer exception that are nothrow copy constructible, they should be caught by const reference anyway. Moreover, this is here an exception from the standard library.

/home/wichtounet/dev/cpp_utils_test/include/cpp_utils/aligned_allocator.hpp:141:40: warning: do not use const_cast [cppcoreguidelines-pro-type-const-cast]
        free((reinterpret_cast<void**>(const_cast<std::remove_const_t<T>*>(ptr)))[-1]);
                                       ^

In general, I agree that using const_cast should be avoided as much as possible. But there are some cases where they make sense. In this particular case, I don't modify the object itself but some memory before the object that is unrelated and I initialize myself.

I also had a few false positives, but overall nothing too bad. I'm quite satisfied with the quality of the results. I'll fix these warnings in the coming week.

Integration in Sonarqube

The sonar-cxx plugin just integrated support for clang-tidy in main. You need to build the version yourself, the 0.9.8-SNAPSHOT version. You then can use something like this in your sonar-project.properties file:

sonar.cxx.clangtidy.reportPath=clang-tidy-report

and sonar-cxx will parse the results and integrate the issues in your sonar report.

Here is an example:

/images/sonar-cxx-clang-tidy.png

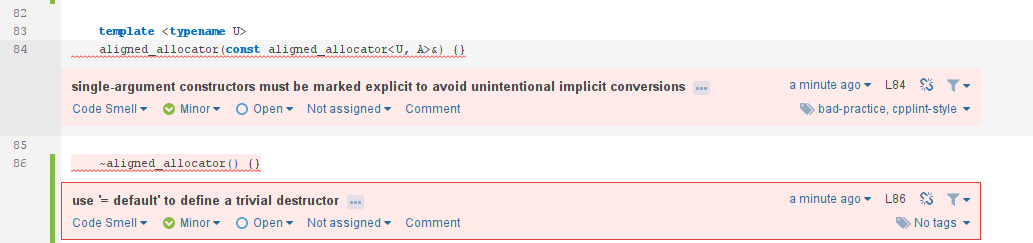
You can see two of the warnings from clang-tidy :)

For now, I haven't integrate this in my Continuous Integration system because I'm still having issues with clang-tidy and the compilation database. Because the compilation contains absolute paths to the file and to the current directory, it cannot be shared directly between servers. I have to find a way to fix that so that clang-tidy can use on the other computer. I'll probably wait till the sonar-cxx 0.9.8 version is released before integrating all this in Sonarqube, but this is a great news for this plugin :)

Conclusion

clang-tidy is C++ linter that can analyze your code and checks for hundreds of problems in it. With it, I have found some very interesting problems in the code of my cpp_utils library. Moreover, you can now integrate it Sonarqube by using the sonar-cxx plugin. Since it is a bit slow, I'll probably not integrate it in my bigger projects, but I'll integrate at least in the cpp_utils library when sonar-cxx 0.9.8 will be released.

Disappointing zapcc performance on Deep Learning Library (DLL)

One week ago, zapcc 1.0 was released and I've observed it to be much faster than the other compilers in terms of compile time. This can be seen when I tested it on my Expression Templates Library (ETL). It was almost four times faster than clang 3.9 and about 2.5 times faster than GCC.

The ETL library is quite heavy to compile, but still reasonable. This is not the case for my Deep Learning Library (DLL) where compiling all the test cases takes a very long time. I have to admit that I have been going overboard with templates and such and I have now to pay the price. In practice, for the users of the library, this is not a big problem since only one or two neural networks will be compiled (and it will take hours to train), but in the test cases, there are hundreds of them and this is a huge pain. Anyway, enough with the ramble, I figured it would be very good to test zapcc on it and see what I can gain from using it.

In this article, when I speak of a compiler thread, I mean an instance of the processor, so it's really a process in the Linux world.

Results

However, I soon realized that I would have more issues than I thought. The first problem is the memory consumed by zapcc. Indeed, it is based on clang and I always had problem with huge memory consumption from clang on this library and zapcc has even bigger memory consumption because some information is cached between runs. The amount of memory that zapcc is able to cache can be configured in the configuration file. By default, it can use 1.5Go of memory. When zapcc goes over the memory limit, it simply wipes out its caches. This means that all the gain for the next compilation will be lost, since the cache will have to be rebuilt from scratch. This is not a hard limit for the compilation itself. Indeed, if the compilation itself takes 3Go, it will still be able to complete it, but it is likely that the cache will be wiped after the compilation.

When I tried compiling using several threads, it soon used all my memory and crashed. The same occurs with clang but I can still compile with 3 or 4 threads without too much issues on this computer. The same also occurs with GCC but it can still handle 4 or 5 threads (depending on the order of the compilation units).

The tests are performed on my desktop computer at work, which is not really good... I have 12Go of RAM (I had to ask for extra...) and an old Sandy Bridge processor, but at least I have an SSD (also had to ask for extra).

I started with testing with only one compiler thread. For zapcc, I set the maximum memory limit to 8Go. Even with such a limit, the zapcc server restarted more than 10 times during the compilation of the 84 test cases. After this first experiment, I increased the number of threads to 2 for each compiler, using 4Go limit for zapcc. The limit is for each server and each parallel thread will spawn a new server, so the effective limit is the number of threads times the limit. Even with two threads, I was unable to finish a compilation with zapcc. This is quite disappoint for me since clang is able to run with 4 threads in parallel. Moreover, a big problem with that is that the servers are not always killed when there is no no more memory, they just hang and use all the memory of the computer, which is evidently really inconvenient for service processes. When this happens with clang or gcc, the compiler simply crashes and the memory is released and make is interrupted. Since zapcc is not able to work with more than one thread on this computer, the results are the ones with one thread. I was also surprised to be able to compile the library with clang and four threads, this was not possible before clang-3.9.

Compiler

-j1

-j2

-j3

-j4

gcc-4.9.3

2250.95

1256.36

912.67

760.84

gcc-5.3.0

2305.37

1279.49

918.08

741.38

clang-3.9

2047.61

1102.93

899.13

730.42

zapcc-1.0

1483.73

1483.73

1483.73

1483.73

Difference against Clang

-27.55%

+25.69%

+39.37%

+50.77%

Speedup VS GCC-5.3

-35.66%

+13.75%

+38.09%

+50.03%

Speedup VS GCC-4.9

-34.08%

+15.30%

+38.50%

+48.75%

If we look at the results with only one thread, we can see that there still are some significant improvements when using zapcc, but nowhere near as good as what was seen in the compilation of ETL. Here, the compilation time is reduced by 34% compared to gcc and by 27% compared to clang. This is not bad, since it is faster than the other compilers, but I would have expected better speedups. We can see that g++-4.9 is slightly faster than g++-5.3, but this is not really a significant difference. I'm actually very surprised to find that clang is faster than g++ on this experiment. On ETL, it is always very significantly slower and before, it was also significantly slower on DLL. I was so used to this, that I stopped using it on this project. I may have to reconsider my position when working on this project.

Let's look at the results with more than two threads. Even with two threads, every compiler is faster than zapcc. Indeed, zapcc is slower than Clang by 25% and slower than GCC by about 15%. If we use more threads, the other compilers are becoming even faster and the slowdowns of zapcc are more important. When using four threads, zapcc is about 48% slower than gcc and about 50% slower than clang. This is really showing one big downside of zapcc that has a very large memory consumption. When it is used to compile really heavy template code, it is failing very early to use more processes. And even when there is enough memory, the speedups are not as great as for relatively simpler code.

One may argue that this is not a fair comparison since zapcc does not have the same numbers of threads. However, considering that this is the best zapcc can do on this machine, I would argue that this is a fair comparison in this limited experimental setting. If we were to have a big machine for compilation, which I don't have at work, the zapcc results would likely be more interesting, but in this specific limited case, it shows that zapcc suffers from its high memory consumption. It should also be taken into account that this experiment was done with almost nothing else running on the machine (no browser for instance) to have as much memory as possible available for the compilers. This is not a common use case. Most of the days, when I compile something, I have my browser open, which makes a large difference in memory available, and several other applications (but consoles and vim instances do not really consume memory :D).

This experiment made me realize that the compilation times for this library were quickly becoming crazy. Most of the time, the complete test suite is only compiled on my Continuous Integration machine at home which has a much faster processor and much more RAM. Therefore, it is relatively fast since it uses more threads to compile. Nevertheless, this is not a good point that the unit tests takes so much time to compile. I plan to split the test cases in several sets. Because, currently the real unit tests are compiled with the performance tests and other various tests. I'll probably end up generating three executables. This will help greatly during development. Moreover, I also have a technique to decrease the compilation time by erasing some template parameters at compilation time. This is already ready, but has currently a runtime overhead that I will try to remove and then use this technique everywhere to get back to reasonable compilation times. I'll also try to see if I can find obvious compilation bottlenecks in the code.

Conclusion

To conclude, while zapcc brings some very interesting compilation speedups in some cases like in my ETL library, it also has some downsides, namely huge memory consumption. This memory consumption may prevent the use of several compiler threads and render zapcc much less interesting than other compilers.

When trying to compile my DLL library on a machine with 12Go of RAM with two zapcc threads, it was impossible for me to make it complete. While zapcc was faster with one thread than the other compilers, they were able to use up to four threads and in the end zapcc was about twice slower than clang.

I knew that zapcc memory consumption was very large, but I would have not have expected something so critical. Another feature that would be interesting in zapcc would be to set a max memory hard limit for the server instead of simply a limit on the cache they are able to keep in memory. This would prevent hanging the complete computer when something goes wrong.

I had a good surprise with clang that was actually faster than GCC and also able to work with four threads in parallel. This was not the case with previous version of clang. On ETL, it is still significantly slower than GCC though.

For now, I'll continue using clang on this DLL project and use zapcc only on my ETL project. I'll also focus on improving the compilation time on this project and make it reasonable again.

Migrated from owncloud 5 to Nextcloud 11

For several years now I've been using Owncloud running on one of my servers. I'm using simply using as a simple synchronization, I don't use any of the tons of fancy features they keep adding. Except from several synchronization issues, I haven't had too much issues with it.

However, I have had a very bad time with updates of Owncloud. The last time I tried, already long ago, was to upgrade from 5.0 to 6.0 and I never succeeded without losing all the configuration and having to do the resync. Therefore, I've still an Owncloud 5.0 running. From this time, I had to say that I've been lazy and didn't try again to upgrade it. Recently, I've received several mails indicating that this is a security threat.

Since I was not satisfied with updates in Owncloud and its security has been challenged recently, I figured it would be a good moment to upgrade to Nextcloud which is a very active fork of Owncloud that was forked by developers of Owncloud.

I haven't even tried to do an upgrade from such an old version to the last version of Nextcloud, it was doomed to fail. Therefore, I made a new clean installation. Since I only use the sync feature of the tool, it does not really matter, it is just some time lost to sync everything again, but nothing too bad.

I configured a new PostgreSQL on one of my servers for the new database and then installed Nextcloud 11 on Gentoo. It's a bit a pain to have a working Nginx configuration for Nextcloud, I don't advice to do it by hand, better take one from the official documentation, you'll also gain some security. One very bad thing in the installation process is that you cannot choose the database prefix, it's set like Owncloud. The problem with that is that you cannot install both Owncloud and Nextcloud on the same database which would be more practical for testing purpose. It's a bit retarded in my opinion, but not a big problem in the end. Other than these two points, everything went well and it was installation pretty nicely. Then, you should have your user ready to go.

Nextcloud view

As for the interface, I don't think there is a lot to tell here. Most of it is what you would except from this kind of tool. Moreover, I very rarely use the web interface or any of the feature that are not the sync feature. One thing that is pretty cool I think is the monitoring graphs in the Admin section of the interface. You can the number of users connected, the memory used and the CPU load. It's pretty useful if you share your Nextcloud between a lot of different users.

I didn't have any issue with the sync either. I used the nextcloud-client package on Gentoo directly and it worked perfectly directly. It took about 10 minutes to sync everything again (about 5GB). I'll have to do the same thing on my other computer as well, but I don't think I'll have any issue.

So far, I cannot say that this is better than Owncloud, I just hope the next upgrade will fare better than they did on Owncloud. Moreover, I also hope that the security that they promise is really here and I won't have any problem with it. I'll see in the future!

For more information about nextcloud and owncloud compared to each other, you can read this in-depth comparison, by David Feldman.

Release of zapcc 1.0 - Fast C++ compiler

If you remember, I recently wrote about zapcc C++ compilation speed against gcc 5.4 and clang 3.9 in which I was comparing the beta version of zapcc against gcc and clang.

I just been informed that zapcc was just released in version 1.0. I though it was a good occasion to test it again. It will be compared against gcc-4.9, gcc-5.3 and clang-3.9. This version is based on the trunk of clang-5.0.

Again, I will use my Expression Template Library (ETL) project. This is a purely header-only library with lots of templates. I'm going to compile the full test cases. This is a perfect example for long compilation times.

The current tests are made on the last version of the library and with slightly different parameters for compilation, therefore the absolute times are not comparable, but the speedups should be comparable.

Just like last time, I have configured zapcc to let is use 2Go RAM per caching server, which is the maximum allowed. Moreover, I killed the servers before each tests.

Debug results

Let's start with a debug build, with no optimizations enabled. Every build will use four threads. This is the equivalent of doing make -j4 debug/bin/etl_test without the link step.

Compiler

g++-4.9.3

190.09s

g++-5.3.0

200.92s

clang++-3.9

313.85

zapcc++

81.25

Speedup VS Clang

3.86

Speedup VS GCC-5.3

2.47

Speedup VS GCC-4.9

2.33

The speedups are even more impressive than last time! zapcc is almost four times fast than clang-3.9 and around 2.5 times faster than GCC-5.3. Interestingly, we can see that gcc-5.3 is slighly slower than GCC-4.9.

It seems that they have the compiler even faster!

Release results

Let's look now how the results are looking with optimizations enabled. Again, every build will use four threads. This is the equivalent of doing make -j4 release_debug/bin/etl_test without the link step.

Compiler

g++-4.9.3

252.99

g++-5.3.0

264.96

clang++-3.9

361.65

zapcc++

237.96

Speedup VS Clang

1.51

Speedup VS GCC-5.3

1.11

Speedup VS GCC-4.9

1.06

We can see that this time the speedups are not as interesting as they were. Very interestingly, it's the compiler that suffers the more from the optimization overhead. Indeed, zapcc is three times slower in release mode than it was in debug mode. Nevertheless, it still manages to beat the three other compilers, by about 10% for Gcc and 50% than clang, which is already interesting.

Conclusion

To conclude, we have observed that zapcc is always faster than the three compilers tested in this experiment. Moreover, in debug mode, the speedups are very significant, it was almost 4 times faster than clang and around 2.5 faster than gcc.

I haven't seen any problem with the tool, it's like clang and it should generate code of the same performance, but just compile it much faster. One problem I have with zapcc is that it is not based on an already released version of clang but on the trunk. That means it is hard to be compare with the exact same version of clang and it is also a risk of running into clang bugs.

Although the prices have not been published yet, it is indicated on the website that zapcc is free for non-commercial entities. Which is really great.

If you want more information, you can go to the official website of zapcc

Home Automation: First attempt at voice control with Jarvis

I have several devices in my home that can be controller via Domoticz, a few power outlets, a few lights (more are coming), my Kodi home theater. And I have a lot of sensors and information gathered by Domoticz. All of this is working quite well, but I have only a few actuators and intelligence (motion sensor, button and some automation via Lua script).

My next objective was to add voice control to my system. If I was living in United States or United Kingdom I would directly an Amazon Dot or even an Amazon Echo, but they are not available in Switzerland. I could have arranged for delivery, but if I want my system to be useful to several people, I need to have in French. It's the same problem with the Google Home system. So, no other way than custom solutions.

Since I had an extra Raspberry Pi 2, I based my system on this. I bought a Trust Mico microphone and a Trust Compact speakers and installed them on the Pi. Both peripherals are working quite well.

You can have a closer look at my microphone:

Trust Mico microphone for Jarvis Home Automation Voice Control

and the complete installation:

Jarvis Home Automation Voice Control around my TV

The Raspberry Pi is on the bottom, the speakers below the TV, left and right and the microphone on the top right.

For the voice control software, I decided to go with Jarvis. It seems to me that this is the best suited software for this kind of project. Moreover, it supports French natively which seems good. I also tried Jasper, but this has been such a pain to install that I gave up.

Jarvis is reasonably easy to install if you have a recent Raspbian image. It took some time to install the dependencies, but in the end it was not difficult. The installation process has a step-by-step wizard help so it's really easy to configure everything.

However, even if it's easy to install, it's easy to configure correctly. The first thing is to configure the hotword to activate commands. There are several options, but I used snowboy which is offline and is made for hotword recognition. This worked quite well, you just have to train a model with the hotword to recognize the voice. After this, the problems started... You then have to configure audio for the commands themselves. There are 6 parameters for audio capture (noise levels to start and stop the capture, silence levels, ...) and no help to tune them. So basically, I tried a lot of combinations until I had something working reasonably well. When you are in debug mode, you can listen to what the system captured. These parameters are dependent on your environment and on your microphone and on your voice. I may be dumb but it took several hours and a lot of tries to get a configuration working. After this, you have to choose the engine for recognition of the commands. Unfortunately, all the good options are online so everything you'll say as commands after the hotword will be sent online. I first tried Bing, but I had very poor recognition rate. I then switched to wit.ai which gave me better results. In the end, I have about 60% recognition rate, which is not great at all, but at least some phrases are working almost all the time while others are always failing. Another problem I have with this is the large delay between commands and action. It takes almost five seconds between the end of my sentence and the time where the lights in my living room are tuned on or off by Jarvis via Domoticz.

So far, I'm a bit disappointed by the quality of the system, but maybe I was hoping for too much. I have been able to control a few of my appliances but not really reliably. Another thing I have realized is that when counting the Raspberry Pi, its enclosure the Microphone and the speakers, this system is more costly than an Amazon Dot and seem highly inferior (and is much less good looking).

I'll try to improve the current system with better configuration and commands in the coming days and I will maybe try another system for voice control. I still hope Amazon Alexa systems or Google Home are made available in France/Switzerland not too far in the future, since I believe these systems are a better solution than custom made systems, at least for now. Moreover, next month, I plan to integrate ZWave into my systems with a few sensors, complete the lighting installation and add new motion sensors. This should make it more useful. And hopefully, by this time, I should have a good voice control system, but I'm not too hopeful.

Don't hesitate to comment or contact me if you have questions about this installation or want to share experience about voice control in home automation. If you want more details about this, dont' hesitate to ask as well ;)

Publication: CPU Performance Optimizations for RBM and CRBM

Recently, we have published a paper about performance optimizations that may interest you.

The paper is On CPU Performance Optimizations for Restricted Boltzmann Machine and Convolutional RBM, published in the Proceedings of the Artificial Neural Networks and Pattern Recognition workshop (ANNPR-2016). I've presented this paper in Germany, at Ulm.

Although most of the performance research going on is focused on GPU, there are still of research laboratories that are only equipped with CPU and it remains important to be as fast as possible on CPU. Moreover, this is something I really like.

For this publication, I have tried to make my Restricted Boltzmann Machine (RBM) and Convolutional RBM (CRBM) implementations in my DLL library as fast as possible.

The first part of the article is about Restricted Boltzmann Machine (RBM) which are a form of dense Artificial Neural Network (ANN). Their training is very similar to that of the ANN with Gradient Descent. Four different network configurations are being tested.

First, mini-batch training is shown to be much faster than online training, even when online training is performed in parallel. Once mini-batch training is used, BLAS operations are used in order to get as much performance as possible on the different operations, mainly the Matrix Matrix Multiplication with the use of the GEMM operation from the Intel Math Kernel Library (MKL). Moreover, the parallel version of the MKL is also used to get even more performance. When all these optimizations are performed, speedups of 11 to 30 are obtained compared to the online training, depending on the network configurations. This final version is able to perform one epoch of Contrastive Divergence in 4 to 15 seconds depending on the network, for 60000 images.

The second part of the article is about Convolutional Restricted Boltzmann Machine (CRBM). This is almost the equivalent of a Convolutional Neural Network (CNN). Again four different networks are evaluated.

The main problem with CRBM is that there are no standard implementations of the convolution operation that is really fast. Therefore, it is not possible to simply use a BLAS library to make the computation as fast as possible. The first optimization that was tried is to vectorize the convolutions. With this, the speedups have been between 1.1 and 1.9 times faster. I'm not really satisfied with these results since in fact per convolution the speedups are much better. Moreover, I have since been able to obtain better speedups but the deadline was too short to include them in this paper. I'll try to talk about these improvements in more details on this blog. What is more interesting to to parallellize the different convolutions since they are mostly independent. This can bring a speedup of the amount of cores available on the machine. Since convolutions are extremely memory hungry, virtual cores with Hyper Threading generally does not help. An interesting optimization is to use a Matrix Multiplication to compute several valid convolutions at once. This can give an additional speedup between 1.6 and 2.2 compared to the vectorized version. While it is possible to use the FFT to reduce the full convolution as well, in our experiment the images were not big enough for this to be interesting. The final speedups are about 10 times faster with these optimizations.

We have obtained pretty good and I'm happy we have been published. However, I'm not very satisfied with these results since I've been able to get even faster since this and when compared with other frameworks, DLL is actually quite competitive. I'll try to publish something new in the future.

If you want more information, you can have a look at the paper. If you want to look at the code, you can have a look at my projects:

Don't hesitate to ask any questions if you want more information :)

Publications - Sudoku Recognition with Deep Belief Network

I recently realized that I never talked about my publications on this website... I thought it was time to start. I'll start to write a few posts about my earlier publications and then I'll try to write something for the new ones not too late.

For the story, I'm currently a PHD student at the University of Fribourg, in Switzerland. My PHD is about the use of Deep Learning technologies to automatically extract features from images. I have developed my Deep Learning Library (DLL) project for this thesis. We have published a few articles on the various projects that we tackled during the thesis. I'll try to go in order.

At the beginning of the thesis, I used Restricted Boltzmann Machine and Deep Belief Network to perform digit recognition on images of Sudoku taken with a phone camera. We published two papers on this subject.

The Sudoku grid and digits are detected using standard image processing techniques:

  1. The image is first converted to grayscale, then a median blur is applied to remove noise and the image is binarized using Adapteive Thresholding

  2. The edges are detected using the Canny algorithm. From these, the lines are detected using a Progressive Probabilistic Hough Transform

  3. Using a connected component analysis, the segments of lines are clustered together to detect the Sudoku Grid

  4. The cells are then detected inside the grid using the inner lines and contour detection is used to isolate the digits.

Here is one of the original images from our dataset:

Original image from our dataset

Here are the detected characters from the previous image:

Detected digits from our application

Once all the digits have been found they are passed to a Deep Belief Network for recognition. A Deep Belief Network is composed of several Restricted Boltzmann Machines (RBM) that are stacked. The network is pretrained, by training each RBM, in turn, with Contrastive Divergence. This algorithm basically trains each RBM as an auto-encoder and learns a good feature representation of the inputs. Once all the layers have been trained, the network can then be trained as a regular neural network with Stochastic Gradient Descent.

In the second paper, the images of Sudoku are containing both computer printed and handwritten digits (the grid is already filled). The other difference is that the second system used a Convolutional DBN instead of DBN. The difference being that each layer is a Convolutional RBM. Such a model will learn a set of small filters that will be applied to each position of the image.

On the second version of the dataset, we have been able to achieve 99.14% of recognition of the digits or 92.5% of fully-recognized grid with the Convolutional Network.

You can find the C++ implementation on Github.

If you want to have a look, I've updated the list of my publications on this website.

If you want more details on this project, don't hesitate to ask here or on Github, or read the paper :) The next post about my publications will probably be about CPU performances!

Add Milight smart lights to my Domoticz home automation system

Recently, I switched from my hand crafted home automation system to Domoticz. This allows me to easily integrate new smart devices and remote controllable peripherals without much effort. I plan to relate my effort in having fun controlling my home :)

I'm now able to control lights in two rooms with Domoticz. The most well-known smart bulbs are the Philips Hue. However, they are stupidly expensive. There are a lot of alternatives. I've ordered some Milight light bulbs and controller to test with Domoticz. I didn't order a lot of them because I wanted to make sure they would work with my system. Milight system is working over Wifi. There are several components to a Milight system:

  • The LED Light Bulbs with Red/Green/Blue/White channels

  • The Wifi Controller that is able to control 4 zones

  • An RGBW Controller for LED strip

The first two are necessary for any installation, the third is to control an RGBW LED strip. This list is not exhaustive, it's only the components that I have used. It is important to note that a single Wifi controller can only control 4 zones. There are also remotes, but I have not bought one since I plan to use them only from Domoticz and maybe smartphone.

The installation of the controller is relatively easy. You need to download the Milight 2.0 application on the Android Play Store (or the equivalent for IOS). Then, you can power on the Wifi Controller. It'll create a new Wifi on which you can then connect on your phone. Then, you can use the application on your phone to configure the device and make it connect to your home wireless network. Once, this is done, you can connect your phone back to your home network. You can then use the Milight application to configure your device. I highly recommend to set a static IP address to the controller. The way I did it is simply to set a fixed IP address on my DHCP server based on the MAC address of the MAC controller but you can simply do the configuration in the application or in the web interface of the controller (the user and password combination is admin:admin).

Here is the look of the controller (next to my RFLink):

Milight wifi controller

(My phone is starting to die, hence the very bad quality of images)

You can then install your LED light bulbs. For, open first the remote on your Android Milight application. Then plug the light bulb without power first. Then power on the light and press once on one of the I buttons on one of the zones on the remote. This will link the LED to the selected zone on the controller. You can then control the light from your phone. Remember, only four zones and therefore four lights per controller.

The installation for a LED strip is not much complicated. You need to plug the 4 wires (or 5 wires if your have an actual RGBW LED) into the corresponding inputs on the controller. Then, you power it and you can link it to a zone like a normal light bulb!

LEDS in my Living Room controlled by Milight

It works really well and directly without problems.

The last step is of course to configure your controller in Domoticz. It is really easy to do. You need to add a new hardware of each of the Milight controller. It is listed under the name "Limitless/AppLamp/Mi Light with LAN/WiFi interface". You then can set the IP address and the port by default is 8899. Once you did configure the hardware, you'll see new devices appear in the Devices list. There will one device for each zone and one device to control all four zones at once. You can add the device you already configured as switches. From the Switches interface you can turn the lamp on and off and you can

Domoticz Light Bulbs control

You can then put them on your floor plan or control them from your rules.

So far, I'm pretty satisfied with this Milight system. The Android application is of poor quality but aside from this is pretty good and the price is very fair. I'm also really satisfied with the Domoticz support. The only that is sad is that the Domoticz Android application does not support RGBW control of the lamps, only on and off, but that is already cool.

Now that all of this is working well, I've ordered a few more light bulbs to cover all my rooms and a few LED controller to control (and install first) the other LEDS that I have in mind.

On another note, I've also added a new outside temperature sensor outside my apartment. It is a very cheap Chinese sensor, bought on Ebay, based on the XT200 system that is working very well with RFLink.

The next step in my system is probably to integrate Voice Control, but I don't know exactly which way I'll go. I ordered a simple microphone that I intend to plug on my spare Raspberry Pi, but I don't know if the range will be enough to cover a room. Ideally, I would like to use an Amazon Dot, but they are not available in Switzerland. I'll probably write more on the subject once I've found an adequate solution. Another idea I've is to integrate support for ZWave via OpenZWave and then add a few more cool sensors that I haven't found on an cheaper system.

I hope this is interesting and don't hesitate if you have any question about my home automation project. You can expect a few more posts about this as soon as In improve it :)

Vivaldi + Vimium = Finally no more Firefox!

I've been using the Pentadactyl Firefox extension for a long time. This extensions "vimifies" Firefox and it does a very good job of it. This is probably the best extension I have ever seen on any browser. This post is really not against Pentadactyl, this is a great addon and it still works great.

However, I have been more and more dissatisfied of Mozilla Firefox over the years. Indeed, the browser is becoming slower and slower all the time and I'm experiencing more and more issues on Gentoo with it. But the biggest problem I've with Firefox right now is the philosophy of the developers that is really crappy. Currently, there is only one thing that is good in Firefox compared to the other browsers, its extensions. Basically, an extension in Firefox can do almost anything. Pentadactyl is able to transform most of the interface and get rid of all of the useless parts of the interface. It is currently impossible to do so in other browsers. These powerful addons are using the XUL/XPCOM programming interface to do so. Pentadactyl is the only reason I've kept to Firefox so long. But Firefox has announced, already more than a year ago, that it will deprecate its XUL/XPCOM interface in favour of webextensions. This means that a lot of very good addons will not be able to work anymore once the deprecation has been completed. Several writers of popular Firefox have announced that they will not even try to port their addons and some addons will simply not be possible anymore. This is the case for Pentadactyl which is on the line for when the deprecation occurs. The data for deprecated has already been delayed but is likely to come anyway.

For several months, I've been looking at several possible replacements for my current Pentadactyl browser. I've tried qutebrowser, but it is really too limited in terms of features so far. I've also tried again Chromium which is a great browser but unfortunately, there are very few possibilities for addons to modify the interface. Vimium is a great addon for Chromium which is basically the very much more lightweight alternative to Pentadactyl. It has much less features, but most of the missing features are simply things that cannot be done in Chromium.

Only recently did I test Vivaldi. Vivaldi is a free multi-platform browser, based on Chromium and supporting Chromium extensions. The major difference with Chrome is how the UI is customizable, due to the use of a dynamic UI, stylable with CSS. With the customizability of Vivaldi plus the great shortcuts and vim-like behaviour of vimium, I really feel like I found a new Pentadactyl with the advantage of not having to bear Firefox!

Here is how it is looking with the follow URLs feature from vimium:

View of my Vivaldi browser

Note: The gray bar on the left is the console to the left and the top kind of bar is awesome wm, they are not part of the browser.

I'm using the dark theme with native windows. I've disabled the address bar, moved the tab bar to the bottom and completely hidden the side panel. All that remained was the title bar and the scroll bar.

To get rid of the title bar, you can use CSS. First, you have to only display the Vivaldi button in the settings page. Then, you can use this custom CSS:

button.vivaldi {
    display: none !important;
}

#header {
    min-height: 0 !important;
    z-index: auto !important;
}

.button-toolbar.home { display: none }

to hide the title completely! To get rid of the scroll bar, you need to use the Stylish extension and use this custom CSS:

::-webkit-scrollbar{display:none !important; width:0px;}
::-webkit-scrollbar-button,::-webkit-scrollbar-track{display:none !important;}
::-webkit-scrollbar-thumb{display: none !important;}
::-webkit-scrollbar-track{display: none !important;}

And then, no more scroll bar :)

If you want to have full HTML5 video support, you need to install extra codecs. On Gentoo, I've uploaded a ebuild on my overlay (wichtounet on layman) with the name vivaldi-ffmpeg-codecs and everything should be working fine :)

Vimium is clearly inferior to Pentadactyl in that for instance it only works in web page, not in system page and you still have to use the browser for a few things, but it does not seem too bar so far. Moreover, I wasn't using all the features of Pentadactyl. I haven't been used this browser for a long time, so maybe there are things that I will miss from Pentadactyl, but I won't certainly miss Firefox!

New home automation system with Domoticz

As you may remember, I started going into Home Automation last year with a C++ project, Asgard.

Unfortunately, I haven't add the time to improve this project further and make it really useful and I have so many C++ projects already, so I decided to switch to using an existing project.

Choice

I needed a system that was at least able to handle everything my existing system does:

  1. Control my RF-433 Temperature Sensors (Oregon Temperature Sensors)

  2. Control my RF-433 Remote Button

  3. Control my smart power outlets

  4. Ping and wake-on-lan my different computers

  5. Be installable on a Raspberry Pi

  6. Control Skadi/Kodi Home Cinema

Of course, it also had to be open source and in a language that I can write without agonizing pain (no Ruby, no JavaScript, ideally no Python (I hate a lot of languages...)).

It's impressive the number of home automation projects that exist today. It's really a hot topic, more than I though. After a few hours of research, I've finally settled on Domoticz. It seemed that it could handle all my home automation devices that I already had. Domoticz is an open source home automation system. It's written mainly in C++, which is an advantage for me since I'll be able to work inside it if necessary. It has a quite modern HTML5 interface. It has a lot of support for hardware and a lot of bridges for other controllers as well. One of the reason I chose it is also the floor-planner feature that looks really cool.

Installation

First of all, I cleaned the hardware of my Raspberry Pi. I got rid of my breadboard and the components on it. Then, I put the Raspberry Pi on a nicer box that I had laying around. One problem with Domoticz is that it does not support directly RF433 devices, but need a controller in the middle. At first, I believed I could simply connect them through GPIO and lets Domoticz do the rest, but it's not possible. I ordered the different pieces for a RFLink controller at nodo-shops. It is running on a Arduino Mega and is connected to the Pi. The very big advantage is that they handle a lot of protocols directly, so you only have to read the serial port to get information on RF-433 events.

Here is how the current system look:

Asgard automation system hardware

The black box is the Arduino Mega with RFLink software while the Transparent is simply the Raspberry on which Domoticz is installed.

As for the installation of Domoticz, it's really simple. They also have images of Raspberry Pi directly, but since my Raspberry was already installed with Raspbian, I installed Domoticz on it directly. A simple matter of curl and bash:

sudo curl -L install.domoticz.com | sudo bash

After a few questions, your installation should be complete. You can browse your Domoticz installation at the IP of your Pi and at the given port.

Home Automation with Domoticz

There are several concepts in Domoticz that are important. At first, it seemed a bit weird to me, but in the end it works really well and you get used to it pretty fast.

The first concept is the hardware. It is not necessary hardware directly, but rather a driver to some piece of information of switches than a real hardware in my opinion. For instance, the RFLink Gateway is considered hardware as well as the Forecast weather API. Here is all the hardware I've configured:

Domoticz Hardware Configuration

I've got some sensors from the motherboard, the Kodi interaction, the driver to ping the different computers, the Forecast weather with Dark Sky and Weather Underground, the RFLink communication, the wake-on-lan and some dummies virtual switches.

On its own, an hardware is useless, but it can create devices that will be used for home automation. A device is sub device of a particular driver. In some cases, the devices will be created automatically. For instance, RF Link can create devices as soon as they are detected. For wake-on-lan, you have to configure MAC Addresses and they will be added as devices. And so on...

There are a lot of types of devices, also called switches. Some devices can do some actions, for instance the wake-on-lan devices, while others are information based such as ping or temperature sensors detected from the RFLink. For instance, here are my temperature sensors:

Domoticz Temperature Sensors

As for my hardware I already had, I haven't add too many issues with them. The Oregon Temperature Sensors worked out of the box without any issues as well my old RF433 Ninja Block temperature sensor. The smart power outlets have been pretty easy to use as well. The most problem I've add was with the remote buttons. It seems to many that it should be the easiest, but RFLink has a lot of problem with them, they are detected several times and are highly unreliable. Interestingly you can also change the icon of most device to a large variety of existing devices so that they would look more realistic.

Another feature I find pretty cool is the floor plan. You can create plans for each floor of your house and then create rooms inside and finally attach devices to each room and place inside the plan. Unfortunately, to draw the plan, you'll have to use an external tool. I've used floorplanner for this, but you may use any plan you have as long as you have an image.

Here is my floor plan with the devices (the scale is terribly off :P) :

Domoticz Floor Plan

With that you can directly see the status of each of your sensors in each room. Moreover, you can also activate some devices directly from the floor plan as well :)

Normally, my Somfy blinds are supposed to work with the RFLink controller. I have managed to control my blinds but only when the RFLink was within 50 centimeters of the Blinds, which is clearly not acceptable. I don't know from where the problem comes. It may come from my Blinds controller inside the wall or may come from bad antenna of the RFLink or from a bug in RFLink, so from now I cannot control my blinds.

I have several D-Link cameras at home. You can also add cameras to Domoticz, but don't expect a lot of support on this side. It's pretty poor indeed. The only useful you can do in Domoticz with Cameras is to take a screenshot from them. You cannot control the Camera or even have a decent video stream and cannot do motion detection directly. I hope that the Camera support will improve in the future. One thing that would be good is to add a view of the cameras in the floor plan, but it is not possible currently.

What I did is to use Zoneminder to manage the cameras and send alert to Domoticz when motion is detect with the REST API of Domoticz. Unfortunately that means two systems to manage the Cameras. Zoneminder is a very good piece of software, but one of the ugliest I've ever seen (even I can do a better web interface...) and quite obscure to configure. But the numbers of cameras it can handle and the capabilities to control the camera is very very powerful.

Events and actions

No home automation system would be complete without an events and rules system. In Domoticz, you have several ways to create rules.

The first solution is to create group. A group is simply a set of switches that are all activated together. This is pretty limited, but can be useful. The second solution is a scene. A scene is activated by a device and can set several switches to on or off after the activation. The problem with this is that you have to listen for an action as activation, you cannot use an existing device or a rule with a value. For me, these two possibilities are way too limited and I don't really a reason to use them.

The best solution is to script an handler. For that, there are two ways, either you define visually your script with blocky, for instance:

Domoticz Blockly Rule

This seemed so cool that I wanted to do all my rules with that. Unfortunately, it is really limited. The main limitation is that you cannot nest if blocks. In fact the interface lets you do, but it doesn't work afterwards. The other limitation is that it has no notion of time. For instance, it's very hard to create an action if a computer is shutdown for more than 60 seconds. You can do it, but you end up creating virtual devices which are turned off after some delay and it gets really complicated really soon...

In the end, I used Lua script directly. These scripts have the information about the last values of each device and the last updated time as well. It's much easier with that to create powerful rules especially when you want a notion of time. There are plenty of examples on the Domoticz forum about very powerful rules that you can create. Unfortunately, there are some limitations. For instance, you cannot send several actions to the same device in the same script Moreover, you also have to decode the values of the sensors yourself. For instance, for a temperature and humidity sensor, you'll have to parse the values and extract the one you need by hand.

So far, I haven't created many rules, only four. The first rule is that with the push of one remote button I can power on my smart socket and turn on one of my computers in my office. Then, if both the computers on this smart sockets have been off for more than 60 seconds, the power is shut off on the smart socket. And I have done almost the same for my media center and TV in my living room.

In the future, I'll probably only use the Lua scripting capability. In my opinion, it's better to have all the scripts in the same language for maintainability reasons. Once my futures devices arrive, I'll have a few more rules to code.

Conclusion

To wrap up, I'd say that I'm pretty satisfied with my new home automation system with Domoticz. It's not a perfect tool, but it has a lot of features and is working quite well in general. I would recommend you to try it if you want a good home automation system, fully featured and relatively easy to use.

I've several more things planned for this system. I plan to test a real motion sensor rather than rely only on the cameras which are focused on the doors and windows. I also plan to add an outdoor temperature sensor. And more interestingly, I'm going to try to integrate smart bulbs from Milight to be able to control my lights from the system. These are the shot term projects that I want to do, but I have many more ideas!

I'm also sure that there are some features from Domoticz that I have overlooked or not discovered.

I'll probably write more posts on Home Automation on the coming months.

For more information on Domoticz, you can consult the official Domoticz website.