Creation of Swing User Interface : Tables (JTable)
1. Introduction
This article will introduce you to create tables in Swing. This composent often gives problems when we start with Swing. I will try to explain the different concepts linked to the use of tables in Swing.
In this document we will see the basic concepts of JTable, the definition of table's models, the dynamic modification of table, the way to edit the rendering of cells, the edition of the content of the table and finally the sort and the filter of the table.
2. Elementary concepts
A JTable is a Swing component enabling the program to display a table formed of a certain number of lines and columns. More than the content lines, the JTable has also a header line displaying a title for each column.
A JTable has data and header. We can see the data like a two-dimensional array in which all data correspond to the data of a cell and we can see the header's data like a unidimentional array of String.
JTable use diffent concepts of Swing :
- A model to keep the data. A JTable use a class implementing TableModel. We will see later how to specify a data model.
- A renderer for the rendering of cells. We can specify a TableCellRenderer for each column class. Once again we will see that later.
- An editor to edit the content of a cell. We can specify a TableCellEditor for each column class.
During this article, we will develop a very simple program to manage a list of friends. Here are the infromations about a friend :
- A name and firnstname (Class String)
- A favourite color (Class Color)
- A gender (boolean man/woman)
- A sport he like to do (Enum Sport)
Here is the Sport enumeration :
public enum Sport {
    TENNIS,
    FOOTBALL,
    SWIMMING,
    NOTHING
}
We will start with a basic first version of our application.
The easiest way, but not the best, is to use two arrays and to give them to the JTable constructor.
So, here is the most basic implementation of our program :
public class JTableBasicWithPanel extends JFrame {
    public JTableBasicWithPanel() {
        super();

        setTitle("Basic JTable in a JPanel");
        setDefaultCloseOperation(JFrame.EXIT_ON_CLOSE);

        Object[][] data = {
                {"Johnathan", "Sykes", Color.red, true, Sport.TENNIS},
                {"Nicolas", "Van de Kampf", Color.black, true, Sport.FOOTBALL},
                {"Damien", "Cuthbert", Color.cyan, true, Sport.NOTHING},
                {"Corinne", "Valance", Color.blue, false, Sport.SWIMMING},
                {"Emilie", "Schrödinger", Color.magenta, false, Sport.FOOTBALL},
                {"Delphine", "Duke", Color.yellow, false, Sport.TENNIS},
                {"Eric", "Trump", Color.pink, true, Sport.FOOTBALL},
        };

        String[] headers = {"First name", "Name", "Favourite color", "Gender", "Sport"};

        JTable table = new JTable(data, headers);

        getContentPane().add(table.getTableHeader(), BorderLayout.NORTH);
        getContentPane().add(table, BorderLayout.CENTER);

        pack();
    }

    public static void main(String[] args) {
        new JTableBasicWithPanel().setVisible(true);
    }
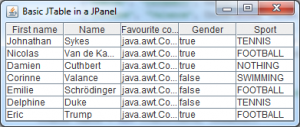
We use the constructor JTable(Object[][] data, Object[] entetes) to manage our data and headers. To add our table to a JPanel, we must add separately the header and the table itself.
That will give us this result :
With a few number of lines of code, we have a functional table. Nevertheless, this first implementation has some disadvantages :
- We cannot display more lines than the lines that can ben displayed by the window.
- The data are totally static
- We cannot manage the way the data are rendered.
- There is no distinction between the view and the datas
- The column Color and Gender are not really esthetic
The first point is easily solvable. The good way to add a JTable in container is to use a JScrollPane who enable to display more lines than the windows has space. For the rest of the article, we will always use a JScrollPane. So, here is a new version with a JScrollPane :
public class JTableBasicWithScrollPane extends JFrame {
    public JTableBasicWithScrollPane() {
        super();

        setTitle("Basic JTable in a JScrollPane");
        setDefaultCloseOperation(JFrame.EXIT_ON_CLOSE);

        Object[][] data = {
                {"Johnathan", "Sykes", Color.red, true, Sport.TENNIS},
                {"Nicolas", "Van de Kampf", Color.black, true, Sport.FOOTBALL},
                {"Damien", "Cuthbert", Color.cyan, true, Sport.NOTHING},
                {"Corinne", "Valance", Color.blue, false, Sport.SWIMMING},
                {"Emilie", "Schrödinger", Color.magenta, false, Sport.FOOTBALL},
                {"Delphine", "Duke", Color.yellow, false, Sport.TENNIS},
                {"Eric", "Trump", Color.pink, true, Sport.FOOTBALL},
        };

        String[] headers = {"First name", "Name", "Favourite color", "Gender", "Sport"};

        JTable table = new JTable(data, headers);

        getContentPane().add(new JScrollPane(table), BorderLayout.CENTER);

        pack();
    }

    public static void main(String[] args) {
        new JTableBasicWithScrollPane().setVisible(true);
    }
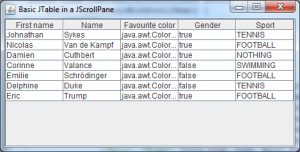
Now, we add directly the entire JTable in the JScrollPane. Here is the result :
This version is already better than the previous, but this is not the best approach. We will improve it in the next chapters.
3. The table's model
An essential thing to do is to use a table's model to manage the data. So, we must create a class implementing TableModel. In practice, we rarely directly implement TableModel, we normally extends AbstractTableModel and we define the necessary methods only. To start, here are the methods we must override for our static model :
- int getRowCount() : Return the number of lines of the table.
- int getColumnCount() : Return the number of columns of the table.
- Object getValueAt(int rowIndex, int columnIndex) : Return the the value a the specified cell.
- String getColumnName(int columnIndex) : Return the header for the specified column
We will create our first model. To start, we will let the data in a two-dimensional array :
public class ModelStatic extends AbstractTableModel {
    private final Object[][] data;

    private final String[] headers = {"First name", "Name", "Favourite color", "Gender", "Sport"};

    public ModelStatic() {
        super();

        data = new Object[][]{
                {"Johnathan", "Sykes", Color.red, true, Sport.TENNIS},
                {"Nicolas", "Van de Kampf", Color.black, true, Sport.FOOTBALL},
                {"Damien", "Cuthbert", Color.cyan, true, Sport.NOTHING},
                {"Corinne", "Valance", Color.blue, false, Sport.SWIMMING},
                {"Emilie", "Schrödinger", Color.magenta, false, Sport.FOOTBALL},
                {"Delphine", "Duke", Color.yellow, false, Sport.TENNIS},
                {"Eric", "Trump", Color.pink, true, Sport.FOOTBALL},
        };
    }

    public int getRowCount() {
        return data.length;
    }

    public int getColumnCount() {
        return headers.length;
    }

    public String getColumnName(int columnIndex) {
        return headers[columnIndex];
    }

    public Object getValueAt(int rowIndex, int columnIndex) {
        return data[rowIndex][columnIndex];
    }
And we modify the JTable to use this model :
public class JTableBasicWithStaticModel extends JFrame {
    public JTableBasicWithStaticModel() {
        super();

        setTitle("JTable with static model");
        setDefaultCloseOperation(JFrame.EXIT_ON_CLOSE);

        JTable table = new JTable(new ModelStatic());

        getContentPane().add(new JScrollPane(table), BorderLayout.CENTER);

        pack();
    }

    public static void main(String[] args) {
        new JTableBasicWithStaticModel().setVisible(true);
So, we've created a class extending AbstractTableModel and overriding the essential methods. The data are always stored the same way, but this solution is more flexible and cleaner. If we watch the JFrame, we can see that there is no more data in this class, that's really better, isn't it ? Moreover, we have now total access to the data and the way they are stored. Nothing changed for the view :
We've now a good base, but we will improve it. Normally, it's extremely rer to have data directly in arrays. Java is an Object Orienter language, so we will use objects. We will create a class Friend :
public class Friend {
    private String name;
    private String firstName;
    private Color color;
    private boolean gender;
    private Sport sport;

    public Friend(String name, String firstName, Color color, boolean gender, Sport sport) {
        super();

        this.name = name;
        this.firstName = firstName;
        this.color = color;
        this.gender = gender;
        this.sport = sport;
    }

    public String getName() {
        return name;
    }

    public void setName(String name) {
        this.name = name;
    }

    public String getFirstName() {
        return firstName;
    }

    public void setFirstName(String firstName) {
        this.firstName = firstName;
    }

    public Color getColor() {
        return color;
    }

    public void setColor(Color color) {
        this.color = color;
    }

    public boolean isGender() {
        return gender;
    }

    public void setGender(boolean gender) {
        this.gender = gender;
    }

    public Sport getSport() {
        return sport;
    }

    public void setSport(Sport sport) {
        this.sport = sport;
So, a simple data class. And we will use it in our model :
public class ModelStaticObject extends AbstractTableModel {
    private final Friend[] friends;

    private final String[] headers = {"First name", "Name", "Favourite color", "Gender", "Sport"};

    public ModelStaticObject() {
        super();

        friends = new Friend[]{
                new Friend("Johnathan", "Sykes", Color.red, true, Sport.TENNIS),
                new Friend("Nicolas", "Van de Kampf", Color.black, true, Sport.FOOTBALL),
                new Friend("Damien", "Cuthbert", Color.cyan, true, Sport.NOTHING),
                new Friend("Corinne", "Valance", Color.blue, false, Sport.SWIMMING),
                new Friend("Emilie", "Schrödinger", Color.magenta, false, Sport.FOOTBALL),
                new Friend("Delphine", "Duke", Color.yellow, false, Sport.TENNIS),
                new Friend("Eric", "Trump", Color.pink, true, Sport.FOOTBALL)
        };
    }

    public int getRowCount() {
        return friends.length;
    }

    public int getColumnCount() {
        return headers.length;
    }

    public String getColumnName(int columnIndex) {
        return headers[columnIndex];
    }

    public Object getValueAt(int rowIndex, int columnIndex) {
        switch(columnIndex){
            case 0:
                return friends[rowIndex].getFirstName();
            case 1:
                return friends[rowIndex].getName();
            case 2:
                return friends[rowIndex].getColor();
            case 3:
                return friends[rowIndex].isGender();
            case 4:
                return friends[rowIndex].getSport();
            default:
                return null; //Must never happens
        }
Now, the code starts to be interesting. It's now that we start to understand the purpose of a model. Now, if we want change the order of two columns, we just have to invert them in the getValueAt() method, but this would not have been possible without a model.
For the rendering, we just have to use the new model instead of the old one :
public class JTableBasicWithStaticModelObject extends JFrame {
    public JTableBasicWithStaticModelObject() {
        super();

        setTitle("JTable with static model and objects");
        setDefaultCloseOperation(JFrame.EXIT_ON_CLOSE);

        JTable table = new JTable(new ModelStaticObject());

        getContentPane().add(new JScrollPane(table), BorderLayout.CENTER);

        pack();
    }

    public static void main(String[] args) {
        new JTableBasicWithStaticModelObject().setVisible(true);
    }
}
Once again, nothing change in rendering. In the next chapter, we will make our table dynamic enabling to add/remove friends of the table.
4. Add/Remove lines
We will now make our application a litlle more interesting and especially make our model essential. It seems give the user the possibility to add/remove lines of the table. We will see at chapter 6 how to edit the values of the cells.
The first thing to do is to make our model dynamic. For that, we will add the methods addFriend() and removeFriend. To inform the table that there is changes on the data, we just have to call the fireXXX methods who are already defined in AbstractTableModel. Moreover, we must of course use a data structure who is dynamic. The array is not really useful for that. So we will use an ArrayList. Here is our dynamic model :
public class DynamicModelObject extends AbstractTableModel {
    private final List friends = new ArrayList();

    private final String[] headers = {"First name", "Name", "Favourite color", "Gender", "Sport"};

    public DynamicModelObject() {
        super();

        friends.add(new Friend("Johnathan", "Sykes", Color.red, true, Sport.TENNIS));
        friends.add(new Friend("Nicolas", "Van de Kampf", Color.black, true, Sport.FOOTBALL));
        friends.add(new Friend("Damien", "Cuthbert", Color.cyan, true, Sport.NOTHING));
        friends.add(new Friend("Corinne", "Valance", Color.blue, false, Sport.SWIMMING));
        friends.add(new Friend("Emilie", "Schrödinger", Color.magenta, false, Sport.FOOTBALL));
        friends.add(new Friend("Delphine", "Duke", Color.yellow, false, Sport.TENNIS));
        friends.add(new Friend("Eric", "Trump", Color.pink, true, Sport.FOOTBALL));
    }

    public int getRowCount() {
        return friends.size();
    }

    public int getColumnCount() {
        return headers.length;
    }

    public String getColumnName(int columnIndex) {
        return headers[columnIndex];
    }

    public Object getValueAt(int rowIndex, int columnIndex) {
        switch(columnIndex){
            case 0:
                return friends.get(rowIndex).getFirstName();
            case 1:
                return friends.get(rowIndex).getName();
            case 2:
                return friends.get(rowIndex).getColor();
            case 3:
                return friends.get(rowIndex).isGender();
            case 4:
                return friends.get(rowIndex).getSport();
            default:
                return null; //Must never happens
        }
    }

    public void addFriend(Friend friend) {
        friends.add(friend);

        fireTableRowsInserted(friends.size() -1, friends.size() -1);
    }

    public void removeFriend(int rowIndex) {
        friends.remove(rowIndex);

        fireTableRowsDeleted(rowIndex, rowIndex);
    }
}
Nothing to hard. For the addFriend() method, we add the new Friend in the list and we inform the JTable of a new insert. For the removeFriend() method, we use the same principle, we start deleting the element from the list and we inform the JTable of the deletion.
Now we will add 2 actions in our user interface. The first to add a new friend (to make easier, it will always add the same object) and the second one to remove the selected elements. Here is what we will do :
public class JTableBasicWithDynamicModelObject extends JFrame {
    private DynamicModelObject model = new DynamicModelObject();

    private JTable table;

    public JTableBasicWithDynamicModelObject() {
        super();

        setTitle("JTable with dynamic model");
        setDefaultCloseOperation(JFrame.EXIT_ON_CLOSE);

        table = new JTable(model);

        getContentPane().add(new JScrollPane(table), BorderLayout.CENTER);

        JPanel buttons = new JPanel();

        buttons.add(new JButton(new AddAction()));
        buttons.add(new JButton(new RemoveAction()));

        getContentPane().add(buttons, BorderLayout.SOUTH);

        pack();
    }

    public static void main(String[] args) {
        new JTableBasicWithDynamicModelObject().setVisible(true);
    }

    private class AddAction extends AbstractAction {
        private AddAction() {
            super("Add");
        }

        public void actionPerformed(ActionEvent e) {
            model.addFriend(new Friend("Megan", "Sami", Color.green, false, Sport.SWIMMING));
        }
    }

    private class RemoveAction extends AbstractAction {
        private RemoveAction() {
            super("Remove");
        }

        public void actionPerformed(ActionEvent e) {
            int[] selection = table.getSelectedRows();

            for(int i = selection.length - 1; i >= 0; i--){
                model.removeFriend(selection[i]);
            }
        }
    }
}
The action to add a friend doesn't make something special and is quite easy. On the other side, there is little things to say about the remove action. First of all, we must know that a JTable can use several selection modes. We can set the selection mode, using the setSelectionMode() method. We can use this values from ListSelectionModel for the parameter mode :
- SINGLE_SELECTION : only one line
- SINGLE_INTERVAL_SELECTION : one interval of lines
- MULTIPLE_INTERVAL_SELECTION : several intervals of lines. This is the default value.
We must understand than the array of lines returned by the getSelectedRows method can return several intervals. The results are returned in ascending order. We must delete them from the end to not change the line's number of the preceding elements.
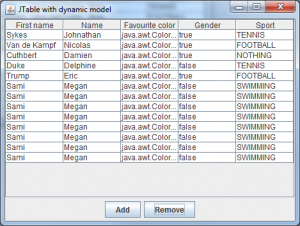
That will give us this result :
Like you can see, we just build a dynamic table without big problems. In the next chapter, we will solve the issues of Color and Gender column who are not really useful for the moment.
5. Cells rendering
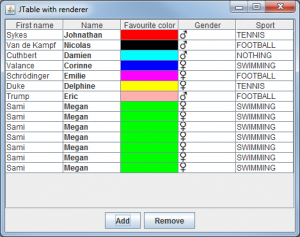
We'll now customize the rendering of the cells. Here are the changes we are going to apply to our interface :
- Display the real color instead of the toString() of the Color object
- Display the image of the gender
- Display the name of the fried in bold
For that, we must start with specifying in the model which class correspond to which column. We can only configure renderer by column. Then, we can configure a renderer for each column class in the JTable. So the first thing to do is the override the getColumnClass() method in our model :
@Override

public Class getColumnClass(int columnIndex){
    switch(columnIndex){
        case 2:
            return Color.class;
        case 3:
            return Boolean.class;
        default:
            return Object.class;
    }
}
Actually, this not really essential, because this is automatically made by AbstractTableModel. But i think, it's clearer.
We will now create our renderers. A renderer is a class implementing TableCellRenderer who is an interface containing only one method returning a Swing component. In practice, we generally extends DefaultCellRenderer who use a JLabel as renderer.
When it's possible, we must not create new object in a renderer if we've a lot of elements in our JTable. This would mean that a new object is created each time the table render a cell and that could degrade performance. That's why, we try to keep a single object modified each time we render a cell.
We will create our first renderer for the Color :
public class ColorCellRenderer extends DefaultTableCellRenderer {
    @Override
    public Component getTableCellRendererComponent(JTable table, Object value, boolean isSelected, boolean hasFocus, int row, int column) {
        super.getTableCellRendererComponent(table, null, isSelected, hasFocus, row, column);

        Color color = (Color) value;

        setBackground(color);

        return this;
    }
}
It's extremely easy to implement this render. We just have to get the color of the Friend and to set it as the background of our JLabel. We can do the next renderer. For the gender, we will display an image for the gender :
public class GenderCellRenderer extends DefaultTableCellRenderer {
    private Icon manImage;
    private Icon womanImage;

    public GenderCellRenderer() {
        super();

        manImage = new ImageIcon("man.png");
        womanImage = new ImageIcon("woman.png");
    }

    @Override
    public Component getTableCellRendererComponent(JTable table, Object value, boolean isSelected, boolean hasFocus, int row, int column) {
        super.getTableCellRendererComponent(table, null, isSelected, hasFocus, row, column);

        Boolean man = (Boolean)value;

        if(man){
            setIcon(manImage);
        } else {
            setIcon(womanImage);
        }

        return this;
    }
}
We start with loading the images in the constructor. Then in the render method, we display the image corresponding to the gender. So, we can go to the last renderer :
public class BoldCellRenderer extends DefaultTableCellRenderer {
    private final Font boldFont = getFont().deriveFont(Font.BOLD);

    @Override
    public Component getTableCellRendererComponent(JTable table, Object value, boolean isSelected, boolean hasFocus, int row, int column) {
        super.getTableCellRendererComponent(table, value, isSelected, hasFocus, row, column);

        setFont(boldFont);

        return this;
   }
}
Nothing to say here, it's more than trivial. We can now configure the renderers in the JTable :
table.setDefaultRenderer(Boolean.class, new GenderCellRenderer());

table.setDefaultRenderer(Color.class, new ColorCellRenderer());

table.getColumnModel().getColumn(1).setCellRenderer(new BoldCellRenderer());
For the two firsts, we can directly linked them to a column class, but for the bold renderer, we cannot linked it to String because, we want it only on the name and not for the firstname. This will give us this result :
This time, we have something a lot more interesting visually. You can also dorenderers more sophisticated with other components than JLabel like a JPanel of why not, a JTable.
In the next chapter, we will enable the edition of the values of the table.
6. Enable to edit cells
We will now make our table editable. For that, we must start to make our model editable. So, we have to override the isCellEditable(int row, int column), method who indicates which cells are editables. In our case, all the cells will be editables. Then, we must apply the modifications, so we have to override the setValueAt(Object value, int column, int row) method who's automatically called when the user validate the modification. Moreover, we must also edit our getColumnClass method to add the Sport class for the 4th column because we also want to edit it. So here is our modified model :
public class ModelEditable extends AbstractTableModel {
    private final List friends = new ArrayList();

    private final String[] headers = {"First name", "Name", "Favourite color", "Gender", "Sport"};

    public ModelEditable() {
        super();

        friends.add(new Friend("Johnathan", "Sykes", Color.red, true, Sport.TENNIS));
        friends.add(new Friend("Nicolas", "Van de Kampf", Color.black, true, Sport.FOOTBALL));
        friends.add(new Friend("Damien", "Cuthbert", Color.cyan, true, Sport.NOTHING));
        friends.add(new Friend("Corinne", "Valance", Color.blue, false, Sport.SWIMMING));
        friends.add(new Friend("Emilie", "Schrödinger", Color.magenta, false, Sport.FOOTBALL));
        friends.add(new Friend("Delphine", "Duke", Color.yellow, false, Sport.TENNIS));
        friends.add(new Friend("Eric", "Trump", Color.pink, true, Sport.FOOTBALL));
    }

    public int getRowCount() {
        return friends.size();
    }

    public int getColumnCount() {
        return headers.length;
    }

    public String getColumnName(int columnIndex) {
        return headers[columnIndex];
    }

    public Object getValueAt(int rowIndex, int columnIndex) {
        switch(columnIndex){
            case 0:
                return friends.get(rowIndex).getFirstName();
            case 1:
                return friends.get(rowIndex).getName();
            case 2:
                return friends.get(rowIndex).getColor();
            case 3:
                return friends.get(rowIndex).isGender();
            case 4:
                return friends.get(rowIndex).getSport();
            default:
                return null; //Must never happens
        }
    }

    @Override
    public Class getColumnClass(int columnIndex){
        switch(columnIndex){
            case 2:
                return Color.class;
            case 3:
                return Boolean.class;
            case 4 :
                return Sport.class;
            default:
                return Object.class;
        }
    }

    @Override
    public boolean isCellEditable(int rowIndex, int columnIndex) {
        return true; //All the cells editable
    }

    @Override
    public void setValueAt(Object aValue, int rowIndex, int columnIndex) {
        if(aValue != null){
            Friend friend = friends.get(rowIndex);

            switch(columnIndex){
                case 0:
                    friend.setFirstName((String)aValue);
                    break;
                case 1:
                    friend.setName((String)aValue);
                    break;
                case 2:
                    friend.setColor((Color)aValue);
                    break;
                case 3:
                    friend.setGender((Boolean)aValue);
                    break;
                case 4:
                    friend.setSport((Sport)aValue);
                    break;
            }
        }
    }

    public void addFriend(Friend friend) {
        friends.add(friend);

        fireTableRowsInserted(friends.size() -1, friends.size() -1);
    }

    public void removeFriend(int rowIndex) {
        friends.remove(rowIndex);

        fireTableRowsDeleted(rowIndex, rowIndex);
    }
}
The first method return true because all the cells are editable. The second return the modified friend and function of the column modify the good property of the Friend object.
Now our model is editable, but this is not enough to work alone because JTable doesn't know how to edit Color, Sport or Gender by default. We must use a new concept, the TableCellEditor. An editor is simpley an object enabling to edit a cell. By default, JTable can edit directly all the objects with a JTextField and the Boolean with checkbox. In our case, it will work with the name and first, but doesn't work with the other columns. So we must create 3 editors.
The first and the most simple is the one for the Sport column. For that, we'll use a simple combo box. It's more than simple because the DefaultCellEditor can take JComboBox in parameter. So we'll use it :
public class SportCellEditor extends DefaultCellEditor {
    public SportCellEditor() {
        super(new JComboBox(Sport.value));
    }
}
We can see that create an editor for an enumerated type is extremely easy.
We will now go to the editor for the color. We could use a text field with the hexadecimal value of the color or 3 text fields with each RGB component, but it would not be very practice for the user. We've a good color chooser in Swing, so we can use it. On the other side, we cannot directly use it as editor. We must use a button who display the JColorChooser. This will show us how to do an editor a little more complicated. So here is a color editor :
public class ColorCellEditor extends AbstractCellEditor implements TableCellEditor, ActionListener {
    private Color color;
    private JButton button;
    private JColorChooser colorChooser;
    private JDialog dialog;

    public ColorCellEditor() {
        super();

        button = new JButton();
        button.setActionCommand("change");
        button.addActionListener(this);
        button.setBorderPainted(false);

        colorChooser = new JColorChooser();
        dialog = JColorChooser.createDialog(button, "Pick a Color", true, colorChooser, this, null);
    }

    @Override
    public void actionPerformed(ActionEvent e) {
        if ("change".equals(e.getActionCommand())) {
            button.setBackground(color);
            colorChooser.setColor(color);
            dialog.setVisible(true);

            fireEditingStopped();
        } else {
            color = colorChooser.getColor();
        }
    }

    @Override
    public Object getCellEditorValue() {
        return color;
    }

    @Override
    public Component getTableCellEditorComponent(JTable table, Object value, boolean isSelected, int row, int column) {
        color = (Color)value;

        return this;
    }
}
This time, we can see that it is a little more hard. The TableCellEditor itself is a JButton. The getTableCellEditorComponent method must return the editor component. The getCellEditorValue method retourne the edited value. We call the fireEditingStopped method when the edition is finished to say to the JTable to display again the renderer.
And the last one for the gender. Once again, we have several solutions : a list with both choices, radio buttons, checkbox, .... In our case, we'll do very simple. A simple button that changes the gender each times the user click :
public class GenderCellEditor extends AbstractCellEditor implements TableCellEditor, ActionListener {
    private boolean gender;
    private JButton button;

    public GenderCellEditor() {
        super();

        button = new JButton();
        button.addActionListener(this);
        button.setBorderPainted(false);
    }

    @Override
    public void actionPerformed(ActionEvent e) {
        gender ^= true;

        fireEditingStopped();
    }

    @Override
    public Object getCellEditorValue() {
        return gender;
    }

    @Override
    public Component getTableCellEditorComponent(JTable table, Object value, boolean isSelected, int row, int column) {
        gender = (Boolean)value;

        return button;
    }
}
We keep the simple principle than for color choice except that this time, its easier. We just have to invert the boolean value and return it.
Finally, we configure our JTable with our editors :
table.setDefaultEditor(Sport.class, new SportCellEditor());
table.setDefaultEditor(Color.class, new ColorCellEditor());
table.setDefaultEditor(Boolean.class, new GenderCellEditor());
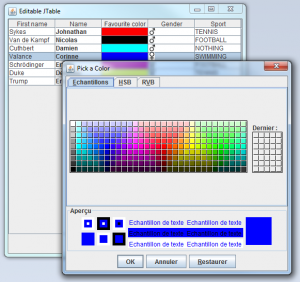
The principle is the same than for renderers, we've an editor by column class. So here is the result of the edition of a color :
We've a now a tablea fully functional. In the next chapters, we will improve the table enabling to sort/filter the content of the table.
7. Sort content
We will now make our table sortable by column. This give the possibility to a user to sort the contenu of all the table using a column for index only by clicking on a header column. This is done with a RowSorter object. The JTable has a method to enable a default sorter : d'activer un sorter par défaut :
table.setAutoCreateRowSorter(true);
This will sort all the column of class String in alphabetical order depending on the current Locale, the columns of a class implementing Comparable with their compareTo() order and the other columns with the alphabetical order of the toString() value.
In most of the case, it's enough. But we can customize the sorter. Of course, we could create our custom RowSorter, but it's easier to use the TableRowSorter class and to customize it to make our changes instead of create a new implementation. Here are a way to customize the sorter :
TableRowSorter sorter = new TableRowSorter(table.getModel());
table.addSorter(sorter);
The first thing we can do is to specify a column not sortable with the setSortable method :
sorter.setSortable(2, false);
This code set the column "Color" non sortable. Then, we can also indicate to the sorter if it must sort the table after an update in the model :
sorter.setSortsOnUpdates(true);
This code indicate the sorter that it must resort the table after each modification of the data. An other interesting thing is that we can specify our custom comparator for a specific column. In our case, this is what we need for the Color column, because Color doesn't implement Comparable and so, is sorted by its toString() value what is not very useful. We will sort the Color by its blue level. We start defining a Comparator for our Color :
public class ColorComparator implements Comparator {
    @Override
    public int compare(Color c1, Color c2) {
        return new Integer(c1.getBlue()).compareTo(c2.getBlue());
    }
}
Then, we specify that the column 2 must use this new comparator :
sorter.setComparator(2, new ColorComparator());
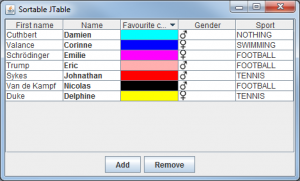
Here is what it will display after a sort on the Color column :
You can see that it's very easy to sort a table.
But now, when the table is sorted, we will have problemsn to delete lines. You can try with the current code if you sort the table and then try removing lines. You will see that the removed lines are not good ones. What happens ?
Because the returned index by the getSelectedRows() method are the index in the view, not the model. When the table isn't sorted, this two sort of indexes are the same. So there is no problem. But when the table is sorted, the two indexes are not corresponding. We can easily solve this problem using the convertRowIndexTomodel() method of the RowSorter class. This method convert an index of the view to an index of the model. We will correct our RemoveAction with this new method :
private class RemoveAction extends AbstractAction {
    private RemoveAction() {
        super("Remove");
    }

    public void actionPerformed(ActionEvent e) {
        int[] selection = table.getSelectedRows();
        int[] modelIndexes = new int[selection.length];

        for(int i = 0; i < selection.length; i++){
            modelIndexes[i] = table.getRowSorter().convertRowIndexToModel(selection[i]);
        }

        Arrays.sort(modelIndexes);

        for(int i = modelIndexes.length - 1; i >= 0; i--){
            model.removeFriend(modelIndexes[i]);
        }
    }
}
We start with getting the indexes of the views, then we convert them to indexes of the model. And finally we sort them to delete the elements from the end. You will see that with this new action the deletion of elements will work fine.
At the next chapter, we will extends this feature enabling to filter the content of the table.
8. Filter content
In addition to sort the table, the RowSorter class enable also to filter the content of the table. We can use for that the setRowFilter method who takes a RowFilter in parameter. RowFilter has several static methods to easily create filters. So we have methods to make "and" or "or" operations on filters. Moreover we've also a very useful method to create a regex filter for one or more columns.
We will add a button to filter on the "name" and "firstname" columns :
private class FilterAction extends AbstractAction {
    private FilterAction() {
        super("Filter");
    }

    public void actionPerformed(ActionEvent e) {
        String regex = JOptionPane.showInputDialog("Filter regex : ");

        sorter.setRowFilter(RowFilter.regexFilter(regex, 0, 1));
    }
}
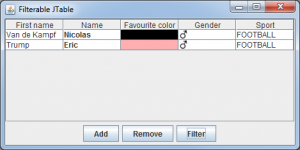
Like you can see, it's very easy to filter the content of table on one or several columns. Here is the result with a filter "mp" :
For flexibility, you can also extends RowFilter who has only one methods include(Entry entry) who indicates if a line must be included in the table or not.
9. Conclusion
Here we are. We have now covered all the main aspects of the creation and manipulation of tables (JTable) with Swing. I hope than this tutorial enable you to master this component who is, once the aspects undestood, not that hard to use.
Comments
Comments powered by Disqus